1 前言
Antisamy是OWASP(open web application security project)的一个开源项目,其能够对用户输入的html/css/javascript 脚本进行过滤,确保输入满足规范,无法提交恶意脚本。Antisamy被应用在web服务中对存储型和反射性的xss防御,尤其是在存在富文本输入的场景,antisamy能够很好的解决用户输入体验和安全要求之间的冲突。
- Antisamy的对包含非法字符的用户输入的过滤依赖于策略文件,策略文件规定了antisamy对各个标签、属性的处理方法。策略文件定义的严格与否,决定了antisamy对xss漏洞的防御效果。
- OWASP中antisamy有java和.net两个项目,这篇文档中仅对java项目进行介绍。从安装、使用及策略文件的定制几个方面讲解如何将antisamy应用到实际项目当中。
2 工具安装
- Antisamy的官方下载路径:++https://code.google.com/archive/p/owaspantisamy/downloads++。下载列表中包含antisamy的jar包,同时也包含了几个常用的策略文件。官方下载的链接需要翻墙,为方便使用,将最新版本的antisamy和策略文件放到文档的附件中(见附件1)。
- Antisamy直接导入到java的工程即可,但是其运行依赖另外三个库:
xercesImpl.jar http://xerces.apache.org/mirrors.cgi#binary
batik.jar http://xmlgraphics.apache.org/batik/download.cgi
nekohtml.jar http://sourceforge.net/projects/nekohtml/
- 可以通过链接下载,也可以从marven中直接下载。测试过程中使用的是从marven中下载,使用的版本信息如下:
<orderEntry type=”library” name=”xerces:xercesImpl:2.11.0″ level=”project” />
<orderEntry type=”library” name=”com.nrinaudo:kantan.xpath-nekohtml_2.12:0.1.9″ level=”project” />
<orderEntry type=”library” name=”org.apache.xmlgraphics:batik-script:1.8″ level=”project” />
- 在导入完成后,在java工程中新建一个类,输入如下代码进行测试,确认安装是否正确。
- public class AntiSamyApplication {
- public static void main(String[] args)
- {
- AntiSamy as = new AntiSamy();
- try{
- Policy policy = Policy.getInstance("\\antisamy\\antisamy-tinymce-1.4.4.xml");
- CleanResults cr = as.scan("<div>wwwww<script>alert(1)</script></div>", policy);
- System.out.print(cr.getCleanHTML());
- }
- catch(Exception ex) {
- } ;
- }
- }
如果输出结果如下结果,说明安装正确,可以正常使用antisamy了。
- "C:\Program Files (x86)\Java\jdk1.8.0_121\bin\java"
- <div>wwwwwdddd</div>
- Process finished with exit code 0
3 使用方法
Antisamy存在两种使用方法,一种是从系统层面,重写request处理相关的功能函数,对用户输入的每一个参数均作过滤验证;另外一种是仅对富文本使用过滤验证;
4 策略文件
4.1 策略文件结构
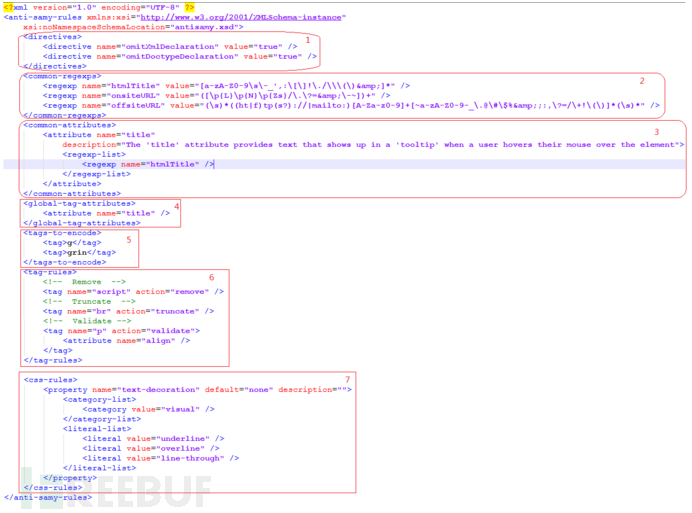
一个简易的Antisamy的策略文件主体结构如所示:

Antisamy的策略文件为xml格式的,除去xml文件头外,可以为7个部分,下面对各个部分的功能做简单的介绍。
- <directives>
- <directive name="omitXmlDeclaration" value="true" />
- <directive name="omitDoctypeDeclaration" value="true" />
- </directives>
对应上图中标注为1的部分,主要为全局性配置,对antisamy的过滤验证规则、输入及输出的格式进行全局性的控制。具体字段的意义在后面继续文档中详细介绍。
- <common-regexps>
- <regexp name="htmlTitle" value="[a-zA-Z0-9\s\-_',:\[\]!\./\\\(\)&]*" />
- <regexp name="onsiteURL" value="([\p{L}\p{N}\p{Zs}/\.\?=&\-~])+" />
- <regexp name="offsiteURL" value="(\s)*((ht|f)tp(s?)://|mailto:)[A-Za-z0-9]+[~a-zA-Z0-9-_\.@\#\$%&;:,\?=/\+!\(\)]*(\s)*" />
- </common-regexps>
对应上图中标注为2的部分,将规则文件中需要使用到的正则表达式相同的部分归总到这,会在后续中需要正则的时候通过name直接引用;
- <common-attributes>
- <attribute name="title" description="The 'title' attribute provides text that shows up in a 'tooltip' when a user hovers their mouse over the element">
- <regexp-list>
- <regexp name="htmlTitle" />
- </regexp-list>
- </attribute>
- </common-attributes>
对应上图中标注为3的部分,这部分定义了通用的属性需要满足的输入规则,其中包括了标签和css的属性;在后续的tag和css的处理规则中会引用到上述定义的属性。
- <global-tag-attributes>
- <attribute name="title" />
- </global-tag-attributes>
对应上图中标注为4的部分,这部分定义了所有标签的默认属性需要遵守的规则;需要验证如果标签中为validate,有属性但是不全的场景
- <tags-to-encode>
- <tag>g</tag>
- <tag>grin</tag>
- </tags-to-encode>
对应上图中标注为5的部分,这部分定义了需要进行编码处理的标签;
- <tag-rules>
- <!-- Remove -->
- <tag name="script" action="remove" />
- <!-- Truncate -->
- <tag name="br" action="truncate" />
- <!-- Validate -->
- <tag name="p" action="validate">
- <attribute name="align" />
- </tag>
- </tag-rules>
对应上图中标注为6的部分,这部分定义了tag的处理规则,共有三种处理方式:
remove:对应的标签直接删除如script标签处理规则为删除,当输入为:
<div><script>alert(1);</script></div>输出为:
<div>ddd</div>truncate:对应的标签进行缩短处理,直接删除所有属性,只保留标签和值;如标签dd处理规则为truncate,当输入为:
<dd id='dd00001' align='left'>test</test>validate:对应的标签的属性进行验证,如果tag中定义了属性的验证规则,按照tag中的规则执行;如果标签中未定义属性,则按照 \<global-tag-attributes\> 中定义的处理;
对应上图中中标注为7的部分,这部分定义了css的处理规则;
4.2 策略文件详解
4.2.1 策略文件指令[<directives></directives>]
策略文件指令包含13个参数,下面对其参数的意义逐一介绍。
- <directives>
- <directive name="useXHTML" value="false"/>
- <directive name="omitXMLDeclaration" value="true"/>
- <directive name="omitDoctypeDeclaration" value="true"/>
- <directive name="formatOutput" value="false"/>
- <directive name="maxInputSize" value="100000"/>
- <directive name="embedStyleSheets" value="false"/>
- <directive name="maxStyleSheetImports" value="1"/>
- <directive name="connectionTimeout" value="1000"/>
- <directive name="preserveComments" value="false"/>
- <directive name="nofollowAnchors" value="false"/>
- <directive name="validateParamAsEmbed" value="false"/>
- <directive name="preserveSpace" value="false"/>
- <directive name="onUnknownTag" value="remove"/>
- </directives>
下面的介绍中使用到的样例均以antisamy-myspace-1.4.4.xml为基础进行修改
useXHML>
类型:boolean
默认值: false
功能:开启后,antisamy的结果将按照XHTML的格式输出;默认使用HTML;
注:XHTML和HTML的主要区别在于XHMTL格式更加严格,元素必须正确的嵌套,必须闭合,标签名要小写,必须要有根元素;
在测试过程中,发现该参数实际上对输出的结果没什么影响。
omitXMLDeclaration>
类型:boolean
默认值:true
功能:按照文档描述,在开启时antisamy自动添加xml的头
测试时发现该参数对输出没啥影响。
omitDoctypeDeclaration>
类型: boolean
默认值:true
功能:在值为false时,antisamy在输出结果中自动添加html头
当输入为:
<div class='navWrapper'><p>sec_test<script>alert(1);</script></p></div>
输出结果为:
- <div class="navWrapper">
- <p>sec_test</p>
- </div>
formatOutput>
类型:boolean
默认值:true
功能:开启后,antisamy会将输出结果格式化,使可读性更好;
默认是开启的,在关闭后,当输入为:
<div class='navWrapper'><p>sec_test<script>alert(1);</script></p></div>
输出结果为:
<div class="navWrapper"><p>sec_test</p></div>
注:可以和omitDoctypeDeclaration的结果对比着看。
maxInputSize>
类型:int
默认值:100000功能:用于验证的最长字符串长度,单位bytes;
embedStyleSheets>
类型:boolean
默认值:false
功能:在开启css过滤功能后,该指令确认是否将引用的css文件下载下来并导入到用户输入一起作为检查的输入;
maxStyleSheetImports>
类型:int
默认值:1功能:配合embedStyleSheets使用,指定在输入中可以下载css文件的个数;
connecttionTimeout>
类型:int
默认值:1000
功能:配合embedStyleSheets使用,指定在下载css文件时的超时时长,单位为毫秒;
preserveComments>
类型:boolean
默认值:false
功能:开启后,保留输入中的注释行;
nofollowAnchors>
类型:boolean
默认值:falsle
功能:开启后,在锚点标签(<a>)后添加rel=“nofollow”属性,防止跳转到其他页面
开启后当输入为:
<div><a href='www.baid.com'>click</a></div>
输出结果为:
- <div>
- <a href="www.baid.com" rel="nofollow">click</a></div>
validateParamAsEmbed>
类型:booblean
默认值:false
功能:开启后,antisamy将<embed>标签的属性和嵌入到embed标签内的<param>标签的属性相同的规则处理,主要用于在需要用户输入的视频站点。
preserveSpace>
类型:boolean
默认值:false
功能:开启后,保留输入中的空格;
onUnknowTag>
类型:String
默认值:remove
功能:对未知tag的处理规则,默认为删除,可以修改为encode;
4.2.2 通用正则表达式 [<common-regexps> </common-regexps>]
其定义的格式为:
<regexp name="htmlId" value="[a-zA-Z0-9\:\-_\.]+"/>
htmlId为正则的名称,通过名称被引用
value后面是具体的正则表达式的内容 该部分可以参考antisamy中样例规则文件编写;
如有特殊需要,正则表达式可以参考网上其他资料进行编写。
4.2.3 通用属性 [<common-attributes> </common-attributes>]
通用属性义如下:
- <attribute name="media">
- <regexp-list>
- <regexp value="[a-zA-Z0-9,\-\s]+"/>
- <regexp name="htmlId"/>
- </regexp-list>
- <literal-list>
- <literal value="screen"/>
- <literal value="tty"/>
- <literal value="tv"/>
- </literal-list>
- </attribute>
“attribute name”为标签的名称,与html的tag名称保持一致;
“regexp name”为标签需要满足的正则表达式的名称,其在<common-regexps>中定义;
“regexp value”为标签需要满足的正则表达式;
可以通过literal直接指定属性的值;如media的值可以满足上面两个的正则表达式外,也可以为screen、tty、tv中的一个
注:<regexp-list><literal-list>中的值均可以为多个
4.2.4 全局tag属性<global-tag-attributes>
其定义和4.2.3中通用属性的定义无区别,只能功能不同;
具体功能在后面tag的规则介绍(4.2.7)中展示;
4.2.5 编码处理tag<tag-to-encode>
此处标识的tag将在输出中进行编码;
其定义的格式为:
- <tags-to-encode>
- <tag>g</tag>
- <tag>grin</tag>
- </tags-to-encode>
但是实际测试的时候,并未生效。
4.2.6 tag处理规则<tag-rules>
tag-rules的定义规则如下:
- <tag name="button" action="validate">
- <attribute name="name"/>
- <attribute name="value">
- <regexp-list>
- <regexp name="anything"/>
- </regexp-list>
- </attribute>
- <attribute name="type">
- <literal-list>
- <literal value="submit"/>
- <literal value="reset"/>
- <literal value="button"/>
- </literal-list>
- </attribute>
- </tag>
tagc-rule的action有三种:remove、validate、truncate,各个动作的功能在4.1中介绍过,不再赘述.
其中有一种场景需要注意:
<tag name="h1" action="validate"/>
这种标签中action是validate,但是标签的属性需要遵守的正则却没有标识出来;在这个时候,4.2.4中全局tag属性中定义的属性就起作用了。上面这种类型的标签就需要遵守4.2.4中定义的全局属性;
如:h1标签处理规则如下:
<tag name="h1" action="validate"/>
输入为:
<div><h1 id='h111' align='center'>h1 title</h1></div>
输出为:
- <div>
- <h1 id="h111">h1 title</h1></div>
在global-tag-attribute中有”id”, “style”,”title”,”class”,”lang”这5个标签,不包括align,所以在输出中就被过滤掉了。
4.2.7 css处理规则<css-rules>
css-rules定义如下:
- <property name="background-color" description="This property sets the background color of an element, either a <color> value or the keyword 'transparent', to make the underlying colors shine through.">
- <literal-list>
- <literal value="transparent"/>
- <literal value="inherit"/>
- </literal-list>
- <regexp-list>
- <regexp name="colorName"/>
- <regexp name="colorCode"/>
- <regexp name="rgbCode"/>
- <regexp name="systemColor"/>
- </regexp-list>
- </property>
从上面可以看出,css过滤规格的定义和tag的基本相同;但是css有一些特殊的字段,如:
- <property name="background" description="The 'background' property is a shorthand property for setting the individual background properties (i.e., 'background-color', 'background-image', 'background-repeat', 'background-attachment' and 'background-position') at the same place in the style sheet.">
- <literal-list>
- <literal value="inherit"/>
- </literal-list>
- <shorthand-list>
- <shorthand name="background-color"/>
- <shorthand name="background-image"/>
- <shorthand name="background-repeat"/>
- <shorthand name="background-attachment"/>
- <shorthand name="background-position"/>
- </shorthand-list>
- </property>
相比tag的过滤规则,css增加了shorthand-list,为css的自有语法。意味着如果background有多个值,说明使用了css的缩写,同时需要满足shorthand中规定的属性的过滤规则。
4.3 通用策略文件

5 Antisamy代码简介
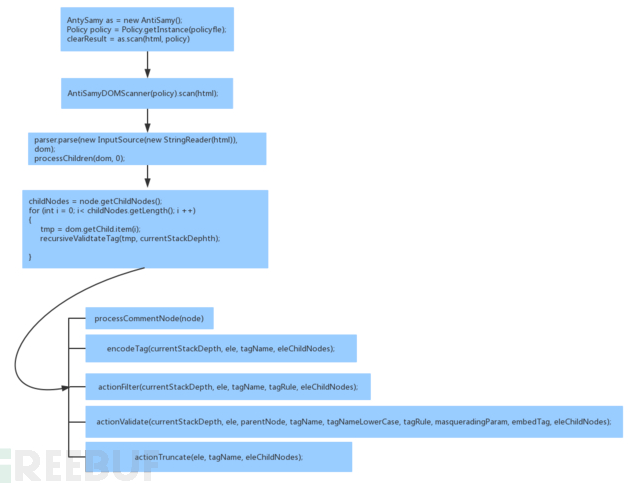
antisamy对html进行扫描的主要流程如下:

其中
recursiveValidateTag(tmp, currentStackDepth);
为antisamy最终执行扫描的函数,其通过递归调用对html中每一个标签根据规则文件的定义进行处理。
来源:https://blog.csdn.net/RayChiu757374816/article/details/79016101


