标签归档:nginx

Nginx模块fastcgi_cache的几个注意点

在web项目中,大家都已经非常熟悉其架构流程了。都说Cache是万金油,哪里不舒服抹哪里。这些流程中,几乎每个环节都会进行cache。 从浏览器到webserver,到cgi程序,到DB数据库,会进行浏览器cache,数据cache,SQL查询的cache等等。对于fastcgi 这里的cache,很少被使用。去年年底,我对nginx的fastcgi_cache进行摸索使用。在我的测试过程中,发现一些WIKI以及网络上没被提到的注意点,这里分享一下。

从浏览器到数据库的流程图

这里是我的NGinx配置信息

01
02
03
04
05
06
07
08
09
10
11
12
13
#增加调试信息
add_header X-Cache-CFC "$upstream_cache_status - $upstream_response_time";
fastcgi_temp_path /dev/shm/nginx_tmp;
#cache设置
fastcgi_cache_path   /dev/shm/nginx_cache  levels=1:2 keys_zone=cfcache:10m inactive=50m;
fastcgi_cache_key "$request_method://$host$request_uri";
fastcgi_cache_methods GET HEAD;
fastcgi_cache   cfcache;
fastcgi_cache_valid   any 1d;
fastcgi_cache_min_uses  1;
fastcgi_cache_use_stale error  timeout invalid_header http_500;
fastcgi_ignore_client_abort on;

配置这些参数时,注意每个参数的作用域,像fastcgi_cache_path参数,只能在http配置项里配置,而 fastcgi_cache_min_uses这个参数,可以在http、server、location三个配置项里配置。这样更灵活的会每个域名、每 个匹配的location进行选择性cache了。具体的参数作用域,参考FASTCGI模块的官方WIKI。我为了调试方便,添加了一个『X-Cache-CFC』的http响应头,$upstream_cache_status 变量表示此请求响应来自cache的状态,分别为:

  • MISS 未命中
  • EXPIRED – expired, request was passed to backend Cache已过期
  • UPDATING – expired, stale response was used due to proxy/fastcgi_cache_use_stale updating Cache已过期,(被其他nginx子进程)更新中
  • STALE – expired, stale response was used due to proxy/fastcgi_cache_use_stale Cache已过期,响应数据不合法,被污染
  • HIT 命中cache

FASTCGI_CACHE $upstream_cache_status 结果为miss,一次也没命中

程序代码是Discuz!论坛, 随便开启测试了几下,发现/dev/shm/nginx_cache/下没有任何目录建立,也没有文件创建。调试的http header响应头里的X-Cache-CFC 结果一直是MISS。从服务器进程上来看,Nginx cache manager process 跟Nginx cache loader process 进程也正常运行:

1
2
3
4
root      3100     1  0 14:52 ?        00:00:00 nginx: master process /usr/sbin/nginx
www-data  3101  3100  0 14:52 ?        00:00:00 nginx: worker process
www-data  3102  3100  0 14:52 ?        00:00:00 nginx: cache manager process
www-data  3103  3100  0 14:52 ?        00:00:00 nginx: cache loader process

不知道为何会这样,为何没有cache成功,我以为我配置参数有问题,只好阅读WIKI。发现fastcgi_ignore_headers 参数下解释有这么一段

fastcgi_ignore_headers
Syntax: fastcgi_ignore_headers field …
Default:
Context: http
server
location
Reference: fastcgi_ignore_headers

This directive forbids processing of the named headers from the FastCGI-server reply. It is possible to specify headers like “X-Accel-Redirect”, “X-Accel-Expires”, “Expires” or “Cache-Control”.

也就是说这个参数的值,将会被忽略掉,同样被忽略掉的响应头比如”X-Accel-Redirect”, “X-Accel-Expires”, “Expires” or “Cache-Control”,而nginx配置中并没有fastcgi_ignore_headers参数的设定,那么问题会不会出现在 FASTCGI响应结果里包含了类似”X-Accel-Redirect”, “X-Accel-Expires”, “Expires” or “Cache-Control”这几个响应头呢?用strace抓包,看了下nginx与fpm进程通讯的数据

1
2
3
4
5
6
####为了确保准确抓到处理该http请求的进程,我把nginx 、fpm都只开启了一个进程处理。
//strace -ff -tt -s 1000 -o xxx.log -p PHPFPM-PID
14:52:07.837334 write(3, "\1\6\0\1\0\343\5\0X-Powered-By: PHP/5.3.10-1ubuntu3.5\r\nExpires: Thu, 19 Nov 1981 08:52:00 GMT\r\nCache-Control: no-store, no-cache, must-revalidate, post-check=0, pre-check=0\r\nPragma: no-cache\r\nContent-type: text/html\r\n\r\nHello cfc4n1362034327\0\0\0\0\0\1\3\0\1\0\10\0\0\0\0\0\0\0\0\0\0", 256) = 256
//strace -ff -tt -s 1000 -o xxx.log -p Nginx-PID
15:05:13.265663 recvfrom(12, "\1\6\0\1\0\343\5\0X-Powered-By: PHP/5.3.10-1ubuntu3.5\r\nExpires: Thu, 19 Nov 1981 08:52:00 GMT\r\nCache-Control: no-store, no-cache, must-revalidate, post-check=0, pre-check=0\r\nPragma: no-cache\r\nContent-type: text/html\r\n\r\nHello cfc4n1362035113\0\0\0\0\0\1\3\0\1\0\10\0\0\0\0\0\0\0\0\0\0", 4023, 0, NULL, NULL) = 256

从抓取的数据包里可以看到,fpm确实返回了包含“Expires”、“Cache-Control”头的http 响应头信息。那么疑问来了:

  • nginx的fastcgi_cache没缓存这条http响应,是因为响应头里包含“Expires”、“Cache-Control”的原因吗?
  • 程序里并没有输出“Expires”、“Cache-Control” http header的代码,这是谁输出的呢?
  • 既然是fpm响应的时候,就已经有了,那么是php的core模块,还是其他拓展模块输出的?
  • “Expires:”时间为何是“Thu, 19 Nov 1981 08:52:00 GMT”?

疑问比较多,一个一个查起,先从Nginx的fastcgi_cache没缓存这条http响应查起。我根据测试环境nginx版本 1.1.9(ubuntu 12.04默认的),到nginx官方下了对应版本的源码,搜索了fastcgi参数使用的地方,在http\ngx_http_upstream.c找 到了。虽然不能很流程的读懂nginx的代码,但粗略的了解,根据了解的情况加以猜测,再动手测试实验,也得出了结论,确定了nginx的 fastcgi_cache的规则。

01
02
03
04
05
06
07
08
09
10
11
12
13
14
15
16
17
18
19
20
21
22
23
24
25
26
27
28
29
30
31
32
33
34
35
36
37
38
39
40
41
42
43
44
45
46
47
48
49
50
51
52
53
54
55
56
57
58
59
60
61
62
63
64
65
66
67
68
69
70
71
72
73
74
75
76
//ngx_http_upstream.c
//line 3136  当fastcgi响应包含set-cookie时,不缓存
static ngx_int_t
ngx_http_upstream_process_set_cookie(ngx_http_request_t *r, ngx_table_elt_t *h,
    ngx_uint_t offset)
{
#if (NGX_HTTP_CACHE)
    ngx_http_upstream_t  *u;
    u = r->upstream;
    if (!(u->conf->ignore_headers & NGX_HTTP_UPSTREAM_IGN_SET_COOKIE)) {
        u->cacheable = 0;
    }
#endif
    return NGX_OK;
}
//line 3242 当响应头包含Expires时,如果过期时间大于当前服务器时间,则nginx_cache会缓存该响应,否则,则不缓存
static ngx_int_t
ngx_http_upstream_process_expires(ngx_http_request_t *r, ngx_table_elt_t *h,
    ngx_uint_t offset)
{
    ngx_http_upstream_t  *u;
    u = r->upstream;
    u->headers_in.expires = h;
#if (NGX_HTTP_CACHE)
    {
    time_t  expires;
    if (u->conf->ignore_headers & NGX_HTTP_UPSTREAM_IGN_EXPIRES) {
        return NGX_OK;
    }
    if (r->cache == NULL) {
        return NGX_OK;
    }
    if (r->cache->valid_sec != 0) {
        return NGX_OK;
    }
    expires = ngx_http_parse_time(h->value.data, h->value.len);
    if (expires == NGX_ERROR || expires < ngx_time()) {         u->cacheable = 0;
        return NGX_OK;
    }
    r->cache->valid_sec = expires;
    }
#endif
    return NGX_OK;
}
//line 3199  当响应头包含Cache-Control时,#####如果####这里有如果啊。。。
//【注意】如果Cache-Control参数值为no-cache、no-store、private中任意一个时,则不缓存...不缓存...
//【注意】如果Cache-Control参数值为max-age时,会被缓存,且nginx设置的cache的过期时间,就是系统当前时间 + mag-age的值
    if (ngx_strlcasestrn(p, last, (u_char *) "no-cache", 8 - 1) != NULL
        || ngx_strlcasestrn(p, last, (u_char *) "no-store", 8 - 1) != NULL
        || ngx_strlcasestrn(p, last, (u_char *) "private", 7 - 1) != NULL)
    {
        u->cacheable = 0;
        return NGX_OK;
    }
    p = ngx_strlcasestrn(p, last, (u_char *) "max-age=", 8 - 1);
    if (p == NULL) {
        return NGX_OK;
    }
    ...
    r->cache->valid_sec = ngx_time() + n;

也就是说,fastcgi响应http请求的结果中,响应头包括Expires、Cache-Control、Set-Cookie三个,都会可能 不被cache,但不只有这些,别忘了nginx配置中fastcgi_ignore_headers参数设定的部分。以及ngxin的X-ACCEL X-Accel-Redirect、X-Accel-Expires、X-Accel-Charset、X-Accel-Buffering等nginx 自定义的响应头。由于这几个不常用,我也没深入研究。通过对nginx的ngx_http_upstream模块代码模糊理解,加猜测,以及写了脚本测试 验证,可以得到结论是正确的。即Nginx fastcgi_cache在缓存后端fastcgi响应时,当响应里包含“set-cookie”时,不缓存;当响应头包含Expires时,如果过期 时间大于当前服务器时间,则nginx_cache会缓存该响应,否则,则不缓存;当响应头包含Cache-Control时,如果Cache- Control参数值为no-cache、no-store、private中任意一个时,则不缓存,如果Cache-Control参数值为max- age时,会被缓存,且nginx设置的cache的过期时间,就是系统当前时间 + mag-age的值。

nginx fastcgi_cache 响应expired

nginx fastcgi_cache hit命中

FASTCGI_CACHE $upstream_cache_status 结果为miss,一次也没命中。

01
02
03
04
05
06
07
08
09
10
//逐个测试,测试时,注释其他的
header("Expires: ".gmdate("D, d M Y H:i:s", time()+10000).' GMT');
header("Expires: ".gmdate("D, d M Y H:i:s", time()-99999).' GMT');
header("X-Accel-Expires:30");
header("Cache-Control: no-cache");
header("Cache-Control: no-store");
header("Cache-Control: private");
header("Cache-Control: max-age=10");
setcookie('cfc4n',"testaaaa");
echo 'Hello cfc4n',time();

到了这里,疑问1解决了。那么疑问2、3呢?程序里并没有输出“Expires”、“Cache-Control” http header的代码,这是谁输出的呢?既然是fpm响应的时候,就已经有了,那么是php的core模块,还是其他拓展模块输出的?我精简了代码,只输出 一个“hello world”,发现也确实被缓存了。显然,php脚本程序中并没输出http header 的“Expires”、“Cache-Control”,多次测试,最终定位到session_start函数,翻阅源码找到了这些代码:

01
02
03
04
05
06
07
08
09
10
11
12
13
14
15
16
17
18
19
20
21
22
23
24
25
26
27
28
29
30
31
32
33
34
35
36
37
38
39
40
41
42
43
44
45
46
47
48
49
50
51
52
53
54
55
56
57
//ext/session/session.c  line:1190 左右
// ...
CACHE_LIMITER_FUNC(private) /* {{{ */
{
    ADD_HEADER("Expires: Thu, 19 Nov 1981 08:52:00 GMT");
    CACHE_LIMITER(private_no_expire)(TSRMLS_C);
}
/* }}} */
//再到这里3 或者上面几个 ##默认是nocache
CACHE_LIMITER_FUNC(nocache) /* {{{ */
{
    ADD_HEADER("Expires: Thu, 19 Nov 1981 08:52:00 GMT");
    /* For HTTP/1.1 conforming clients and the rest (MSIE 5) */
    ADD_HEADER("Cache-Control: no-store, no-cache, must-revalidate, post-check=0, pre-check=0");
    /* For HTTP/1.0 conforming clients */
    ADD_HEADER("Pragma: no-cache");
}
/* }}} */
//这里2
static php_session_cache_limiter_t php_session_cache_limiters[] = {
    CACHE_LIMITER_ENTRY(public)
    CACHE_LIMITER_ENTRY(private)
    CACHE_LIMITER_ENTRY(private_no_expire)
    CACHE_LIMITER_ENTRY(nocache)
    {0}
};
static int php_session_cache_limiter(TSRMLS_D) /* {{{ */
{
    php_session_cache_limiter_t *lim;
    if (PS(cache_limiter)[0] == '\0') return 0;
    if (SG(headers_sent)) {
        const char *output_start_filename = php_output_get_start_filename(TSRMLS_C);
        int output_start_lineno = php_output_get_start_lineno(TSRMLS_C);
        if (output_start_filename) {
            php_error_docref(NULL TSRMLS_CC, E_WARNING, "Cannot send session cache limiter - headers already sent (output started at %s:%d)", output_start_filename, output_start_lineno);
        } else {
            php_error_docref(NULL TSRMLS_CC, E_WARNING, "Cannot send session cache limiter - headers already sent");
        }
        return -2;
    }
    for (lim = php_session_cache_limiters; lim->name; lim++) {
        if (!strcasecmp(lim->name, PS(cache_limiter))) {
            lim->func(TSRMLS_C);   //这里1
            return 0;
        }
    }
    return -1;
}
// ...

到了这里,知道原因了,是程序调用session_start时,php的session拓展自己输出的。session.cache_limit 参数来决定输出包含哪种Expires的header,默认是nocache,修改php.ini的session.cache_limit参数为 “none”即可让session模块不再输出这些http 响应头。或在调用session_start之前,使用session_cache_limiter函数来指定下该参数值。那为什么要在使用 session时,发Expires、Cache-Control的http response header呢?我猜测了下,需要session时,基本上是用户跟服务器有交互,那么,既然有交互,就意味着用户的每次交互结果也可能不一样,就不能 cache这个请求的结果,给返回给这个用户。同时,每个用户的交互结果都是不一样的,nginx也就不能把包含特殊Cache-Control的个人响 应cache给其他人提供了。

还有一个无聊的问题“Expires:时间为何是Thu, 19 Nov 1981 08:52:00 GMT”?我翻阅了session.c这段代码的添加时间,版本,作者信息,在php官方版本库中找到了这次提交的信息:

Revision 17092 – (view) (download) (as text) (annotate) – [select for diffs]
Modified Sun Dec 12 14:16:55 1999 UTC (13 years, 2 months ago) by sas
File length: 28327 byte(s)
Diff to previous 16964
Add cache_limiter and cache_expire options. Rename extern_referer_check
to referer_check.

对比session.c两个版本的变更,果然是这块代码。作者是sas,也就是Sascha Schumann, http://php.net/credits.php里可以看到他的大名。关于这个expires过期时间的问题,有人在stackoverflow也提问过,Why is “Expires” 1981?,别人说那天是他生日。这是真的么?如果那天是他生日的话,而他增加session.cache_limiter时是1999年,他才17岁,17岁呀。我17岁时在干嘛?还不知道电脑长啥样,正在玩『超级玛丽』呢。

好奇的不是我一个人,还有个帖子是epoch date — Expires: Thu, 19 Nov 1981 08:52:00也问了。另外两个地址虽然没问,也有人提到那天是他生日了。http://boinc.berkeley.edu/dev/forum_thread.php?id=2514、https://github.com/codeguy/Slim/issues/157,这些帖子都提到说原帖是http://www.phpbuilder.com/lists/php3-list/199911/3159.php ,我无法访问,被跳转到首页了。用http://web.archive.org找到了历史快照,发现上下文关系不大,也不能证明是他生日。 我更是好奇的发了两封邮件到他的不同邮箱里问他,不过,目前他还没回复。或许他没收到、没看到,或许懒得回了。N年后,“Expires:时间为何是Thu, 19 Nov 1981 08:52:00 GMT”这个日期,会不会又成了一段奇闻佳话了呢?


来源:http://www.cnxct.com/several-reminder-in-nginx-fastcgi_cache-and-php-session_cache_limiter/
两台nginx实现https负载均衡

现在网络完全越来越受到重视, 因此https也是大势所趋, 以往nginx都是工作在http方式下, 其实nginx在https下工作也挺好的。 这里将分步骤的逐步实现一套采用nginx, haproxy, keepalived实现的https系统, 并且系统没有单点故障, 基本适应中小系统的安全需要。

1. Nginx https安装    这个文章主要是安装支持https的nginx, 源代码装过程

2. https安装(2)nginx配置   继承上一个文章, 记录配置过程, 然后实现https服务

本文继承前两个文章, 记录通过nginx实现https的功能, 并且通过haproxy将两台nginx的https进行整合, 统一对外提供服务。

但是本文的方法, 在haproxy上仍然存在单点故障, 下一篇文章, 将修正这个错误


本文记录详细的安装过程, 供大家参考。

 一. 准备linux操作系统

本文的nginx和haproxy都是在linux下进行的安装与测试, 因此需要linux计算机。

我们采用vmware作为虚拟机软件, 采用下面的已经安装好的虚拟机镜像做为操作系统。 这样节省了安装时间。

链接:http://pan.baidu.com/s/1nutqTkP 密码:f4bh

  1. 安装好vmware软件, 这个百度上搜索, 或者参考:     虚拟机vmware新手使用教程
  1. 下载好虚拟机软件后解压缩到一个比较大的硬盘空间, 记录下目录地址
  2. 启动虚拟机软件, 在文件菜单中, 选择打开按钮, 然后选择好, 您刚才解压缩的文件目录, 选择其中*.vmx文件, 然后打开
  3. 选择运行这个软件, 最后您可以开始这个虚拟机了, 虚机运行后, 最后进入登录界面, 在登录界面中输入 root作为用户名, 密码为 thoughtpolice   或者root

或者查看README-vmware-image.txt 文件

  1. 进入虚拟机后, 使用 ifconfig命令, 检查一下 虚拟机是否网络已经正确启动, 并且查看一下, 这个虚拟机的ip地址
  2. 运行 setup命令, 进入防火墙选项 关闭防火墙
  3. 安装xshell软件, 在xshell软件里面配置一个连接到您虚拟机的连接, 然后连接上。这样方便后续的操作等
  4. 安装xftp软件  方便上传相关文件到服务器。

上述软件, 客户baidu搜索相关安装方法等。

二. nginx下https的安装和配置

  1. 安装https01服务器

本 文目标是测试多机负载均衡下https的工作状况, 因此我们需要安装至少2台nginx服务器, 并且每个服务器都要支持https协议, 因此我们需 要首先安装1台nginx, 然后在配置相关的https服务, 测试没问题了, 然后在站另外一台nginx, 最后安装负载均衡软件。

关于nginx的安装, https的安装, https的配置请参考下面的文章进行

Nginx https安装

https安装(2)nginx配置

参考上面文章, 安装配置完成nginx的https后, 进行测试一下, 配置文件为:

worker_processes  1;
events {
    worker_connections  1024;
}

http {
    include       mime.types;
    default_type  application/octet-stream;
    sendfile        on;
    keepalive_timeout  65;
  
    server {
        listen       80;
        server_name  test.iigrowing.cn;
        location / {
            root   html;
            index  index.html index.htm;
        }
    }
    server {
        listen       443;
        server_name  test.iigrowing.cn;
        ssl                  on;
        ssl_certificate      /etc/pki/tls/certs/rsyslog.crt;
        ssl_certificate_key  /etc/pki/tls/certs/rsyslog.key;
        ssl_session_timeout  5m;
        ssl_protocols  SSLv2 SSLv3 TLSv1;
        ssl_ciphers  ALL:!ADH:!EXPORT56:RC4+RSA:+HIGH:+MEDIUM:+LOW:+SSLv2:+EXP;
        ssl_prefer_server_ciphers   on;
        location / {
            root   html;
            index  index.html index.htm;
        }
   }  
}
  1. 测试https01服务器

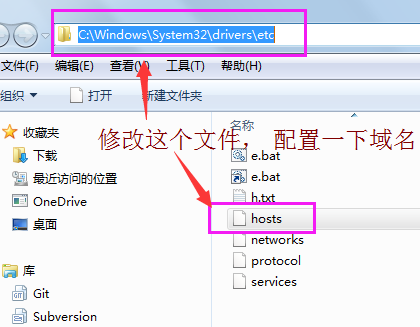
进入下图目录中, 编辑hosts文件, 添加一行记录

192.168.128.138  test.iigrowing.cn

另外, 请用您的正确ip地址替换上面的ip地址, 用您喜欢的域名替换测试的域名。 这里用域名就是方便, 啥域名或者使用ip不影响您的测试结果。

haproxy001

  1. 启动一个浏览器, 在浏览器里面输入 https://test.iigrowing.cn

然后, 应该能看到 正确的显示了额,

您也可用修改nginx的html目录下的 index.html文件的内容, 来仔细测试您的工作成果。


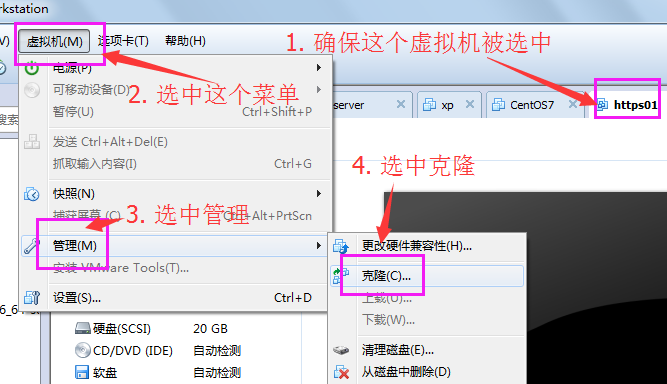
  1. 关闭这个https01服务器, 然后在vmware的虚拟机菜单中选择

haproxy002

最后在弹出菜单中选择  链接克隆选项  这样可以节省点磁盘空间。 虚拟机名称可为 https02

  1. 克隆完毕启动这个新的虚拟机。

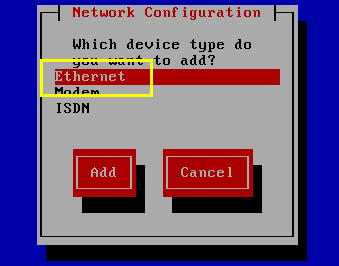
启动虚拟机后, 要先登录, 然后立即检查是否网络启动正常, 以及网络的ip地址, 若是网络不正常。

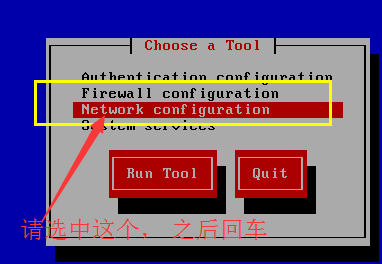
请运行setup命令

haproxy003

之后选择这个

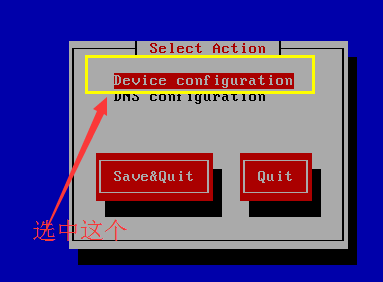
haproxy005

haproxy006

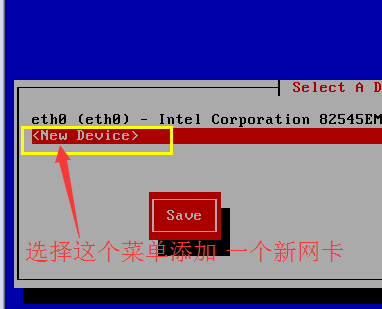
haproxy007

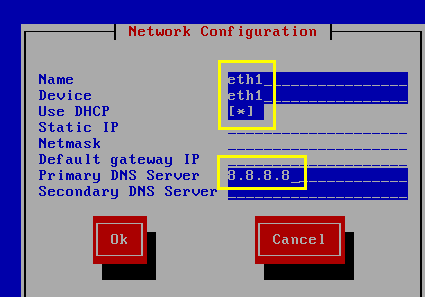
填写下面的信息

haproxy008

最后选择 保存退出, 然后运行下面的命令, 检查新网卡是否启动正常了

service network restart              启动网卡(英文部分为命令)

Ifconfig                           检查网络是否正常启动

  1. 在xshell中配置一个新的连接, 用这个配置连接到新的虚拟机
  2. 进入/usr/local/nginx/sbin下, 运行./nginx 启动nginx, 然后测试这个https是否正常工作了。


到此我们准备好了,两个有https功能的nginx, 另外两个nginx的证书等信息都是完全一致的, 我们是采用虚拟机clone进行的。里面数据是一致的。


 三. 安装haproxy

关于haproxy的功能, 安装配置详情请参考下面的文章

Haproxy学习笔记-源码安装

这里简单进行安装配置, 然后进行配置

  1. 下载软件源代码 wget http://www.haproxy.org/download/1.6/src/haproxy-1.6.3.tar.gz

最后发现国外网站, 下载速度慢, 可以用本文提供的 下载好的版本

         haproxy-1.6.3.tar

  1. 下载本文提供的软件
  2. 启动xftp上传文件, 过程略
  3. 解压缩上传后的软件包
  4. 进入解压缩后的目录
  5. 运行make PREFIX=/usr/local/haproxy install  进行编译安装
  6. 最后执行 cd /usr/local/haproxy 目录
  7. 然后执行 mkdir conf  创建配置目录
  8. 进入文件目录, 执行vi haproxy.cfg  命令创建配置文件, 内容如下
global
    log 127.0.0.1 local0 info #[err warning info debug]
    maxconn 4096
    user root
    group root
    daemon
    nbproc 1
    pidfile /home/admin/haproxy/logs/haproxy.pid

defaults
    maxconn 2000
    contimeout 5000
    clitimeout 30000
    srvtimeout 30000

frontend https
    bind :443
    default_backend cluster_https

backend cluster_https
    mode tcp
    balance roundrobin
    server https01 192.168.128.136:443
    server https02 192.168.128.137:443

listen admin_stats
    bind 0.0.0.0:1080
    mode http
    log 127.0.0.1 local0 err
    stats uri /admin?stats
  1. 执行下面命令创建目录 mkdir -p  /home/admin/haproxy/logs/
  1. 执行  /usr/local/haproxy/sbin/haproxy  -f  /usr/local/haproxy/conf/haproxy.cfg
  2. 通过 netstat -ntlp  查看是否 启动了443端口
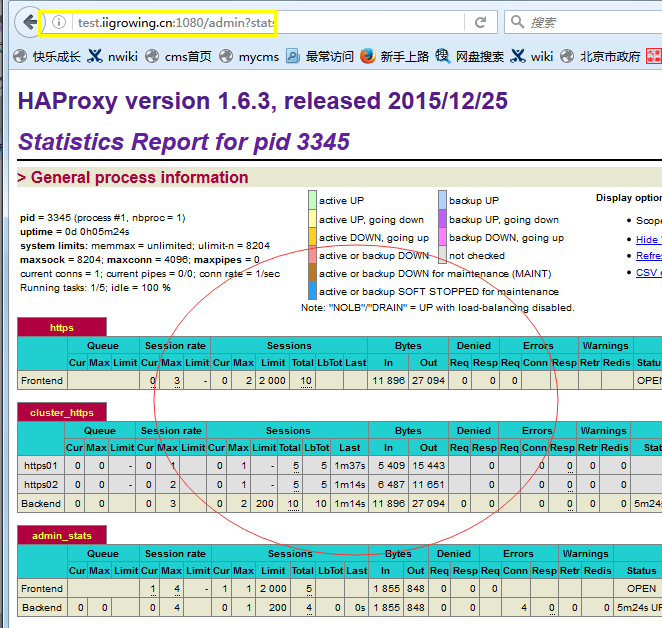
  3. 通过 http://test.iigrowing.cn:1080/admin?stats查看相关统计信息

haproxy009

 最后.  测试整个haproxy下的用nginx实现的https程序

  1. 登录https01服务器, 进入/usr/local/nginx/html 下  编辑html 修改内容, 添加些字符串 111111111111等, 这样方便我们了解到 我们访问的是https01机器
  2. 登录https02服务器, 进入/usr/local/nginx/html 下  编辑html 修改内容, 添加些字符串 222222222222等, 这样方便我们了解到 我们访问的是https01机器
  3. 启动firefox浏览器 输入 https://test.iigrowing.cn请确保协议时https, 另外域名解析到 haproxy的地址上。
  4. 在启动另外一个chrome浏览器, 然后同样输入上述的地址, 多次测试发现有时显示带 111有时显示带222的,测试基本正常


srcache_nginx redis 构建缓存系统应用一例

redis是一种高效的key-value存储。srcache_nginx模块相关参数介绍,可以参见《memc_nginx+srcache_nginx+memcached构建透明的动态页面缓存》。

下面举一例应用,看配置:

upstream redis {
server 127.0.0.1:6380;
keepalive 512;
}server {
listen       80 backlog=1024 default;
server_name  www.ttlsa.com;
index index.html index.htm index.php;
root  /data/wwwroot/www.ttlsa.com/webroot;

location / {
set $flag 0;
if ($uri ~ /thumb/[0-9]+_160.jpg$){
set $flag "${flag}1";
}
if ($arg_unitid = 42012){
set $flag "${flag}1";
}
if (!-e $request_filename) {
rewrite ^/(.*)$ /index.php?kohana_uri=$1 last;
}
}
location ~ .*\.php?$ {
srcache_store_private on;
srcache_methods GET;
srcache_response_cache_control off;
if ($flag = "011"){
set $key $request_uri;
set_escape_uri $escaped_key $key;
srcache_fetch GET /redis $key;
srcache_default_expire 172800;
srcache_store PUT /redis2 key=$escaped_key&exptime=$srcache_expire;

add_header X-flag $flag;
add_header X-Cached-From $srcache_fetch_status;
add_header X-Cached-Store $srcache_store_status;
add_header X-Key $key;
set_md5 $md5key $key;
add_header X-md5-key $md5key;
add_header X-Query_String $query_string;
add_header X-expire $srcache_expire;
}
include fastcgi_params;
fastcgi_pass  127.0.0.1:10080;
fastcgi_index index.php;
fastcgi_connect_timeout 300;
fastcgi_send_timeout 300;
fastcgi_read_timeout 300;
fastcgi_buffer_size 128k;
fastcgi_buffers 4 256k;
fastcgi_busy_buffers_size 256k;
fastcgi_temp_file_write_size 256k;
fastcgi_intercept_errors on;
fastcgi_param  SCRIPT_FILENAME  $document_root$fastcgi_script_name;
}

location = /redis {
internal;
set_md5 $redis_key $args;
redis_pass redis;
}

location = /redis2 {
internal;

set_unescape_uri $exptime $arg_exptime;
set_unescape_uri $key $arg_key;
set_md5 $key;

redis2_query set $key $echo_request_body;
redis2_query expire $key $exptime;
redis2_pass redis;
}
}

测试:memcached

redis实例下:

memcached

可以记录下日志来测试加缓存前后的耗时。日志格式如下:

log_format srcache_log '$remote_addr - $remote_user [$time_local] "$request" '
'"$status" $body_bytes_sent $request_time $bytes_sent $request_length '
'[$upstream_response_time] [$srcache_fetch_status] [$srcache_store_status] [$srcache_expire]';

转载请注明来自运维生存时间: http://www.ttlsa.com/html/3952.html

nginx后端验证模块ngx_http_auth_request_module

nginx验证模块ngx_http_auth_request_module
AuthRequestNginxModule(ngx_http_auth_request_module)
这个是nginx的一个验证模块

Here is auth request module, it allows authorization based on
subrequest result.  It works at access phase and therefore may be
nicely combined with other access modules (access, auth_basic) via
satisfy directive.
这个模块, 允许您的nginx通过发送请求到后端服务器(一般是应用服务器,例如tomcat,或者php等)进行请求, 并且根据请求决定是验证通过或者不通过。

使用方法如下:

Example usage:

location /private/ {
auth_request /auth;
...
}

location = /auth {
proxy_pass ...
proxy_set_header X-Original-Uri $request_uri;
...
}

To allow access backend should return 200, to disable - 401/403.
后端返回200 验证通过, 后端返回401或者403验证不通过

Further info is here:

进一步信息参考:

http://mdounin.ru/hg/ngx_http_auth_request_module/

http://mdounin.ru/files/ngx_http_auth_request-0.1.tar.gz

源代码如下:

http://mdounin.ru/hg/ngx_http_auth_request_module/

使用memc-nginx和srcache-nginx模块构建高效透明的缓存机制

Nginx的Memc和SR Cache模块

缓存策略的改进

为了提高性能,几乎所有互联网应用都有缓存机制,其中Memcache是使用非常广泛的一个分布式缓存系统。众所周知,LAMP是非常经典的Web架构方式,但是随着Nginx的成熟,越来越多的系统开始转型为LNMP(Linux+Nginx+MySQL+PHP with fpm),这是因为Nginx采用基于事件机制的I/O多路复用思想设计,在高并发情况下其性能远远优于默认采用prefork模式的Apache,另外,相对于Apache,Nginx更轻量,同时拥有大量优秀的扩展模块,使得在Nginx上可以实现一些美妙的功能。

传统上,PHP中使用memcache的方法是使用php-memcache或php-memached扩展操作Memcache,然而在Nginx上有构建更高效缓存机制的方法,本文将首先介绍这种机制,然后介绍具体的操作步骤方法,最后将对这种机制和传统的PHP操作memcache的性能进行一个benchmark。

我们知道,Nginx的核心设计思想是事件驱动的非阻塞I/O。

Nginx被设计为可以配置I/O多路复用策略,在Unix系统中传统的多路复用是采用select或poll,但是这两个方法的问题是随着监听 socket的增加,性能会下降,因为在linux内核中是采用轮询的方式判断是否可以触发事件,换句话说算法的复杂度为O(N),而在较新的linux 内核中引入了复杂度为O(1)的epoll,因此Nginx在Linux下默认采用epoll,而在FreeBSD下默认采用kqueue作为I/O策 略。

即便是这样,传统的缓存策略仍可能造成效率低下,因为传统上是通过PHP操作memcache的,要执行PHP代码,Nginx就必然要和FastCGI 通信,同时也要进入PHP的生命周期,因此SAPI、PHP Core和Zend Engine的一系列逻辑会被执行。更糟糕的是,fpm和PHP可能会阻塞,因此破坏了Nginx的非阻塞性。(原文中此处表述有误,fastcgi与 nginx进行同步通信,但并不会破坏nginx i/o的非阻塞性,多谢agentzh给予指正)下图展示了在memcache命中时整个处理过程。

可以看到,即使Memcache命中,还是要进入PHP的生命周期。我们知道,目前很多互联网应用都使用RESTful规范进行设计,在RESTful应 用下,普遍使用uri和查询参数作为缓存的key,因此一种更高效的缓存策略是Nginx直接访问Memcache,并用$uri和$args等 Nginx内置变量设定缓存key规则,这样,当缓存命中时,Nginx可以跳过通过fastcgi和PHP通信的过程,直接从memcache中获取数 据并返回。memc-nginx和srcache-nginx正是利用这种策略提高了缓存的效率。下图是这种高效缓存策略的示意图(当memcache命 中时)。

模块介绍

memc-nginxsrcache-nginx模 块均为前淘宝工程师agentzh(章亦春)开发。其中memc模块扩展了Nginx标准的memcache模块,增加了set、add、delete等 memcache命令,而srcache则是为location增加了透明的基于subrequest的缓存层。两者配合使用,可以实现上一节提到的高效 缓存机制。关于两个模块的详细信息可以参考它们Nginx官网的wiki(memc wikisrcache wiki)页。

安装及配置

下面以LNMP环境介绍如何使用这两个模块构建缓存层。

因为Nginx并不支持模块动态加载,所以要安装新的模块,必须重新编译Nginx。首先下载两个模块(memc下载地址,srcache下载地址),另外,为了发挥出缓存的最大性能,建议将memcache的upstream配置为keep-alive,为了支持upstream的keep-alive需要同时安装http-upstream-keepalive-module。

将模块下载并解压到合适的目录,这里我Nginx使用的版本是1.0.4,与相关模块一起解压到了/home/www/download

然后就可以编译安装Nginx了,命令如下:

./configure --prefix=/usr/local/nginx \
--add-module=../memc-nginx-module \
--add-module=../srcache-nginx-module \
--add-module=../ngx_http_upstream_keepalive
make
make install

这里我将nginx安装到/usr/local/nginx下,你可以根据自己的需要更改安装路径,另外,我只列出了本文必要的configure命令,你也可以增加需要的configure选项。
然后需要对nginx进行配置,nginx默认主配置文件放在安装目录的conf下,例如我的主配置文件为/usr/local/nginx/conf/nginx.conf。
这里我只贴出相关的配置:

#Memcache服务upstream
upstream memcache {
    server localhost:11211;
    keepalive 512 single;
}
server {
    listen       80;
    server_name  localhost;
    #memc-nginx-module
    location /memc {
        internal;
        memc_connect_timeout 100ms;
        memc_send_timeout 100ms;
        memc_read_timeout 100ms;
        set $memc_key $query_string;
        set $memc_exptime 300;
        memc_pass memcache;
    }
    location / {
        root   /var/www;
        index  index.html index.htm index.php;
    }
    # pass the PHP scripts to FastCGI server listening on 127.0.0.1:9000
    #
    location ~ \.php$ {
        charset        utf-8;
        default_type   text/html;
        #srcache-nginx-module
        set $key $uri$args;
        srcache_fetch GET /memc $key;
        srcache_store PUT /memc $key;
        root           /var/www;
        fastcgi_pass   127.0.0.1:9000;
        fastcgi_index  index.php;
        include        fastcgi_params;
        fastcgi_param  SCRIPT_FILENAME $document_root$fastcgi_script_name;
    }
}

下面解释一下其中几个点。
上文说过,memc-nginx是一个标准的upstream模块,因此首先需要定义memcache的upstream。这里我在本机上启动了一个 memcache服务,端口为默认的11211,keepalive指令是http-upsteram-keepalive-module提供的功能,这 里我们最大保持512个不立即关闭的连接用于提升性能。

下面是为memc-nginx-module配置location,我们配置为/memc,所有请求都通过请求这个location来操作 memcache,memc-nginx-module存取memcache是基于http method语义的,使用http的GET方法表示get、PUT方法表示set、DELETE方法表示delete。这里我们将/memc设为internal表示只接受内部访问,不接收外部http请求,这是为了安全考虑,当然如果需要通过http协议开放外部访问,可以去掉internal然后使用deny和allow指 令控制权限。比较重要的是$memc_key这个变量,它表示以什么作为key,这里我们直接使用Nginx内置的$query_string来作为 key,$memc_exptime表示缓存失效时间,以秒记。这里统一设为300(5分钟),在实际应用中可以根据具体情况为不同的内容设置不同的过期 时间。

最后我们为“~ \.php$”这个location配置了缓存,这表示所有以“.php”结尾的请求都会结果被缓存,当然这里只是示例需要,实际中一般不会这么配,而是为特定需要缓存的location配置缓存。

srcache_fetch表示注册一个输入拦截处理器到location,这个配置将在location进入时被执行;而srcache_store表 示注册一个输出拦截器到location,当location执行完成并输出时会被执行。注意srcache模块实际可以与任何缓存模块进行配合使用,而 不必一定是memc。这里我们以$uri$args作为缓存的key。

经过上述配置后,相当于对Nginx增加了如下逻辑:当所请求的uri以“.php”结尾时,首先到memcache中查询有没有以$uri$args为 key的数据,如果有则直接返回;否则,执行location的逻辑,如果返回的http状态码为200,则在输出前以$uri$args为key,将输 入结果存入memcache。

更多配置

上一节给出了使用memc和srcache构建缓存层的最基本方法,实际应用中可能需要更多灵活的配置,例如为不同的location配置不同的缓存参 数,根据返回内容而不是返回的http状态码确定是否缓存等等。可以有很多的方法实现这些需求,例如,srcache还支持两个指 令:srcache_fetch_skip和srcache_fetch_skip,这两个指令接受一个参数,当参数已定义且非0时,则进行相应操作,否 则不进行。例如,如果配置了srcache_fetch_skip $skip,这条指令,那么只有当$skip的值为非0时,才将结果缓存,如果配合ngx_lua模块的set_by_lua指令,则可以实现复杂的缓存控制。如:

location /xxxx {
    set $key ...;
    set_by_lua $skip '
        if ngx.var.cookie_foo == "bar" then
            return 1
        end
        return 0
    ';
    srcache_fetch_skip $skip;
    srcache_store_skip $skip;
    srcache_fetch GET /memc $key;
    srcache_store GET /memc $key;
    # proxy_pass/fastcgi_pass/...
}

这表示对/xxxx这个location的访问,只有存在cookie “foo”且值为“bar”时缓存机制才起作用。关于ngx_lua的更多内容请参考其主页。

另外,我最近在春哥(章亦春在淘宝的昵称)的微博上看到他目前正在完善srcache的功能,为其实现更多RFC2616的缓存行为标准。关于这个模块的最新动态可以关注其github主页。

Benchmark

下面对使用memc和srcache构建的缓存机制进行一个简单的benchmark,并与使用PHP操作memcache的策略进行一个对比。为了简单起见,我们的测试PHP脚本不去访问I/O,而仅仅是调用phpinfo函数输出PHP相关信息。
测试一共分三组进行:第一组在Nginx和PHP中均不开启缓存,第二组仅使用PHP memcache缓存,第三组仅使用Nginx memcache缓存。三组都用ab程序去压,并发数为20,请求次数为10000。
这里的测试环境是我的一个虚拟机,操作系统为Ubuntu10,内存512M。Nginx采用epoll,单worker进程,memcache最大并发数为1024,最大使用内存64m。

不开启缓存

这一组我们不开启缓存,PHP程序非常简单:

<?php
phpinfo();
?>

测试结果如下:

PHP memcache缓存策略

第二组我们用PHP操作缓存,测试脚本为:

<?php
$memc = new Memcached;
$memc->addServer('localhost', 11211) or die('Connect to memcache server failed!');
$output = $memc->get('my_key');
if(empty($output)) {
    ob_start();
    phpinfo();
    $output = ob_get_contents();
    ob_end_clean();
    $memc->set('my_key', $output, 300);
}
echo $output; 
?>

测试结果如下:

Nginx memcache缓存策略

最后,我们将PHP脚本回归到不使用缓存的版本,并配置好memc和srcache缓存机制。
测试结果如下:

结果对比分析

为了直观,我取“每秒处理请求数”、“平均每个请求处理时间”和“吞吐率”作为评价指标,制作了一张图表。

我想看到图表,结论已毋需我多言。在各项指标上使用memc和srcache构建的缓存机制都大大优于使用PHP操作memcache。其中每秒处理请求数(并发度)和吞吐率都是其9倍左右,而平均个请求所用时间仅有传统策略的1/8。

这里要特别说明一下,这里之所以PHP memcache策略比不使用缓存优势不明显,是因为我们的PHP脚本不涉及I/O操作,如果其中存在如数据库存取,PHP memcache的优势还是有的,但不论如何,Nginx memcache策略在性能上的优势是其无法比拟的。

另外,除了性能优势外,使用这种策略还可以简化PHP逻辑,因为缓存这一层都放在Nginx中了,PHP就从缓存操作中解放了出来,因此是一举多得。

如果你的系统也构建在LNMP上(或LAMP)上,不妨使用本文提到的方法替代传统的缓存策略,尽情享受性能上的提升。

转载:张洋个人博客 --- 使用memc-nginx和srcache-nginx模块构建高效透明的缓存机制

来源:http://www.qixing318.com/article/using-memc-nginx-and-srcache-nginx-module-build-efficient-and-transparent-caching-mechanism.html