分类目录归档:nginx

nginx后端验证模块ngx_http_auth_request_module

nginx验证模块ngx_http_auth_request_module
AuthRequestNginxModule(ngx_http_auth_request_module)
这个是nginx的一个验证模块

Here is auth request module, it allows authorization based on
subrequest result.  It works at access phase and therefore may be
nicely combined with other access modules (access, auth_basic) via
satisfy directive.
这个模块, 允许您的nginx通过发送请求到后端服务器(一般是应用服务器,例如tomcat,或者php等)进行请求, 并且根据请求决定是验证通过或者不通过。

使用方法如下:

Example usage:

location /private/ {
auth_request /auth;
...
}

location = /auth {
proxy_pass ...
proxy_set_header X-Original-Uri $request_uri;
...
}

To allow access backend should return 200, to disable - 401/403.
后端返回200 验证通过, 后端返回401或者403验证不通过

Further info is here:

进一步信息参考:

http://mdounin.ru/hg/ngx_http_auth_request_module/

http://mdounin.ru/files/ngx_http_auth_request-0.1.tar.gz

源代码如下:

http://mdounin.ru/hg/ngx_http_auth_request_module/

web内容缓存 nginx高性能缓存详解

内容缓存是显著提高web站点的性能最有效的方法之一。下面来说说nginx高性能缓存。

内容缓存的基本原则

nginx

对GET请求进行缓存。

使用:浏览器缓存,内容分发网络和/或反向代理缓存。

nginx

HTTP缓存机制:

1. 源服务器宣称的内容缓存能力。 主要是对http头信息来控制的。

2. 请求的客户端缓存能力,如GET请求。

nginx

nginx对哪些进行缓存?

1. 缓存没有 Set-Cookie 的GET和HEAD的响应。

2. 通过定义独特的原始URL,如proxy_cache_key。

3. 通过定义缓存时间,如X-Accel-Expires、Cache-Control、Expires。

nginx 操作

nginx

nginx配置

nginx

缓存的过程

nginx的可在下列情况下使用陈旧的内容,通过proxy_cache_use_stale指令定义。

nginx

不仅仅对HTTP缓存,还有其他的,如:

1. FastCGI  功能很像HTTP

2. Memcache 检索memcached服务器的内容(必须预先填充)

3. uwsgi and SCGI

如何理解这些

nginx

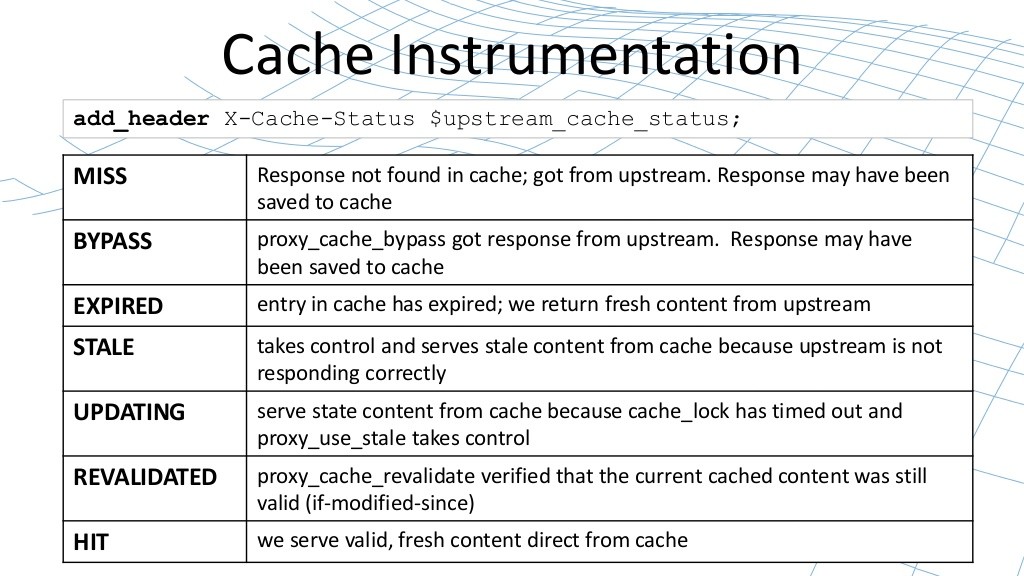
缓存仪表

$upstrem_cache_status 变量值有:MISS、BYPASS、EXPIRED、STALE、UPDATING、REVALDATED、HIT。

nginx

nginx

扩展状态监控

在nginx上缓存内容

nginx

它是如何工作的?

1. nginx是使用基于磁盘的持久性缓存

2. 关注下面几点:

  • 内容是如何存储在缓存?
  • 缓存是如何在启动时加载的?
  • 缓存过期修剪
  • 人工清理缓存内容

nginx

缓存内容是如何存储的?

首先需要定义proxy_cache_path。

  • 定义缓存key,proxy_cahce_key
  • 获取内容到缓存中,然后检查MD5值
  • 验证

nginx

从磁盘加载缓存

nginx

管理磁盘缓存

nginx

清除磁盘内容

控制缓存

nginx

延迟缓存  proxy_cache_min_uses 节省磁盘写入

缓存重新验证 proxy_cache_revalidate 节省上行带宽和磁盘写入

nginx

缓存时间控制

nginx

nginx

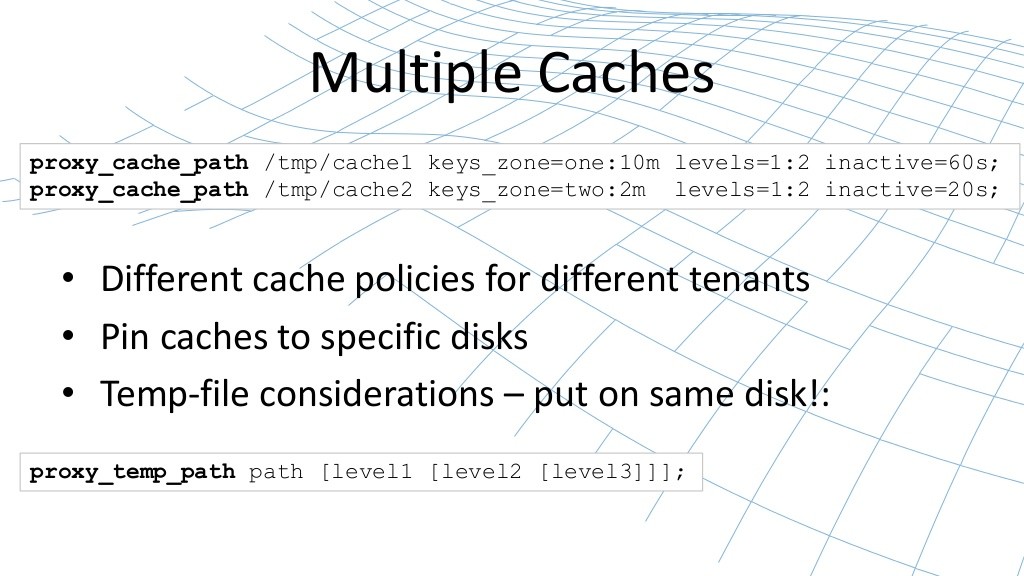
多个缓存

为什么缓存

nginx

提高网页速度

nginx

nginx

nginx

参考内容:

NGINX High-performance Caching from Nginx, Inc.

HTTP caching basics:http://www.tommylacroix.com/2008/07/17/http-caching-basics/

HTTP cache headers:http://www.mobify.com/blog/beginners-guide-to-http-cache-headers/

HTTP:https://www.varnish-software.com/static/book/HTTP.html

来源:http://www.ttlsa.com/nginx/nginx-high-performance-caching/

nginx的HeadersMoreNginxModule模块功能

模块地址:

https://github.com/openresty/headers-more-nginx-module

ngx_headers_more - Set and clear input and output headers...more than "add"!
设置和清除 http的输入和输出头

This module is not distributed with the Nginx source. See the installation instructions.
本模块不是标准模块, 安装需要参照最后的安装指令

Version

This document describes headers-more-nginx-module v0.25 released on 10 January 2014.
Synopsis

# set the Server output header  设置server输出header
more_set_headers 'Server: my-server';

# set and clear output headers       设置和清除输出header
location /bar {
more_set_headers 'X-MyHeader: blah' 'X-MyHeader2: foo';
more_set_headers -t 'text/plain text/css' 'Content-Type: text/foo';
more_set_headers -s '400 404 500 503' -s 413 'Foo: Bar';
more_clear_headers 'Content-Type';          清除header

# your proxy_pass/memcached_pass/or any other config goes here...
}

# set output headers
location /type {
more_set_headers 'Content-Type: text/plain';
# ...
}

# set input headers    设置输入 header, 由nginx传递给 应用服务器,例如tomcat
location /foo {
set $my_host 'my dog';
more_set_input_headers 'Host: $my_host';
more_set_input_headers -t 'text/plain' 'X-Foo: bah';

# now $host and $http_host have their new values...
# ...
}

# replace input header X-Foo *only* if it already exists
more_set_input_headers -r 'X-Foo: howdy';

Description

This module allows you to add, set, or clear any output or input header that you specify.
这个模块允许您 添加,设置,清除 任何输出(发给客户端浏览器的)和输入(有浏览器发过来的)流中的http头。

This is an enhanced version of the standard headers module because it provides more utilities like resetting or clearing "builtin

headers" like Content-Type, Content-Length, and Server.
这个是个增强版本的标准 头修改工具, 他提供了更多的功能比通常的内建的工具(理解的)

It also allows you to specify an optional HTTP status code criteria using the -s option and an optional content type criteria

using the -t option while modifying the output headers with the more_set_headers and more_clear_headers directives. For example,
模块也允许你设置一个可选的http状态码 通过使用-s选项, 和-t选项改变输出头  下面这个功能的例子:

more_set_headers -s 404 -t 'text/html' 'X-Foo: Bar';

Input headers can be modified as well. For example    输入的http头的例子

location /foo {
more_set_input_headers 'Host: foo' 'User-Agent: faked';
# now $host, $http_host, $user_agent, and
#   $http_user_agent all have their new values.
}

The option -t is also available in the more_set_input_headers and more_clear_input_headers directives (for request header

filtering) while the -s option is not allowed.

-t选项也可以在more_set_input_headers 和 more_clear_input_headers指令中使用

Unlike the standard headers module, this module's directives will by default apply to all the status codes, including 4xx and 5xx.
??

more_set_headers

syntax: more_set_headers [-t <content-type list>]... [-s <status-code list>]... <new-header>...

default: no

context: http, server, location, location if

phase: output-header-filter

Replaces (if any) or adds (if not any) the specified output headers when the response status code matches the codes specified by

the -s option AND the response content type matches the types specified by the -t option.

If either -s or -t is not specified or has an empty list value, then no match is required. Therefore, the following directive set

the Server output header to the custom value for any status code and any content type:

more_set_headers    "Server: my_server";

Existing response headers with the same name are always overridden. If you want to add headers incrementally, use the standard

add_header directive instead.

A single directive can set/add multiple output headers. For example

more_set_headers 'Foo: bar' 'Baz: bah';

Multiple occurrences of the options are allowed in a single directive. Their values will be merged together. For instance

more_set_headers -s 404 -s '500 503' 'Foo: bar';

is equivalent to

more_set_headers -s '404 500 503' 'Foo: bar';

The new header should be the one of the forms:

Name: Value
Name:
Name

The last two effectively clear the value of the header Name.

Nginx variables are allowed in header values. For example:

set $my_var "dog";
more_set_headers "Server: $my_var";

But variables won't work in header keys due to performance considerations.

Multiple set/clear header directives are allowed in a single location, and they're executed sequentially.

Directives inherited from an upper level scope (say, http block or server blocks) are executed before the directives in the

location block.

Note that although more_set_headers is allowed in location if blocks, it is not allowed in the server if blocks, as in

?  # This is NOT allowed!
?  server {
?      if ($args ~ 'download') {
?          more_set_headers 'Foo: Bar';
?      }
?      ...
?  }

Behind the scene, use of this directive and its friend more_clear_headers will (lazily) register an ouput header filter that

modifies r->headers_out the way you specify.

Back to TOC
more_clear_headers

syntax: more_clear_headers [-t <content-type list>]... [-s <status-code list>]... <new-header>...

default: no

context: http, server, location, location if

phase: output-header-filter

Clears the specified output headers.

In fact,

more_clear_headers -s 404 -t 'text/plain' Foo Baz;

is exactly equivalent to

more_set_headers -s 404 -t 'text/plain' "Foo: " "Baz: ";

or

more_set_headers -s 404 -t 'text/plain' Foo Baz

See more_set_headers for more details.

Wildcard * can also be used to specify a header name pattern. For example, the following directive effectively clears any output

headers starting by "X-Hidden-":

more_clear_headers 'X-Hidden-*';

The * wildcard support was first introduced in v0.09.

Back to TOC
more_set_input_headers

syntax: more_set_input_headers [-r] [-t <content-type list>]... <new-header>...

default: no

context: http, server, location, location if

phase: rewrite tail

Very much like more_set_headers except that it operates on input headers (or request headers) and it only supports the -t option.

Note that using the -t option in this directive means filtering by the Content-Type request header, rather than the response

header.

Behind the scene, use of this directive and its friend more_clear_input_headers will (lazily) register a rewrite phase handler

that modifies r->headers_in the way you specify. Note that it always run at the end of the rewrite so that it runs after the

standard rewrite module and works in subrequests as well.

If the -r option is specified, then the headers will be replaced to the new values only if they already exist.

Back to TOC
more_clear_input_headers

syntax: more_clear_input_headers [-t <content-type list>]... <new-header>...

default: no

context: http, server, location, location if

phase: rewrite tail

Clears the specified input headers.

In fact,

more_clear_input_headers -s 404 -t 'text/plain' Foo Baz;

is exactly equivalent to

more_set_input_headers -s 404 -t 'text/plain' "Foo: " "Baz: ";

or

more_set_input_headers -s 404 -t 'text/plain' Foo Baz

See more_set_input_headers for more details.

Back to TOC
Limitations

Unlike the standard headers module, this module does not automatically take care of the constraint among the Expires, Cache-

Control, and Last-Modified headers. You have to get them right yourself or use the headers module together with this module.
You cannot remove the Connection response header using this module because the Connection response header is generated by the

standard ngx_http_header_filter_module in the Nginx core, whose output header filter runs always after the filter of this module.

The only way to actually remove the Connection header is to patch the Nginx core, that is, editing the C function

ngx_http_header_filter in the src/http/ngx_http_header_filter_module.c file.

Back to TOC
Installation

Grab the nginx source code from nginx.org, for example, the version 1.7.7 (see nginx compatibility), and then build the source

with this module:

wget 'http://nginx.org/download/nginx-1.7.7.tar.gz'
tar -xzvf nginx-1.7.7.tar.gz
cd nginx-1.7.7/

# Here we assume you would install you nginx under /opt/nginx/.
./configure --prefix=/opt/nginx \
--add-module=/path/to/headers-more-nginx-module

make
make install

Download the latest version of the release tarball of this module from headers-more-nginx-module file list.

Also, this module is included and enabled by default in the ngx_openresty bundle.

Back to TOC
Compatibility

ngx_http_userid_module模块基本指令整理

原创文章,转载请指明出处并保留原文url地址

本文主要针对nginx的ngx_http_userid_module模块做简单介绍,本文具体包括如下指令:userid,userid_domain,userid_expires,userid_mark,userid_name,userid_p3p,userid_path,userid_service

ngx_http_userid_module模块为标示客户端设置合适的cookies。接受和设置的cookies能通过内嵌$uid_got 和 $uid_set变量获取,并记录到日志中。这个模块同apache的 mod_uid 模块不兼容。

Example Configuration

userid         on;

userid_name    uid;

userid_domain  example.com;

userid_path    /;

userid_expires 365d;

userid_p3p     'policyref="/w3c/p3p.xml", CP="CUR ADM OUR NOR STA NID"';

Nginx原文:

The ngx_http_userid_module module sets cookies suitable for client identification. Received and set cookies can be logged using the embedded variables $uid_got and $uid_set. This module is compatible with the mod_uid module for Apache.

Example Configuration

userid         on;

userid_name    uid;

userid_domain  example.com;

userid_path    /;

userid_expires 365d;

userid_p3p     'policyref="/w3c/p3p.xml", CP="CUR ADM OUR NOR STA NID"';

1. userid

syntax:userid  on | v1 | log | off;
default:userid off;
context:http, server, location

允许或禁止设置并且记录日志接受到的cookies

On

允许设置接受到cookies的版本2的cookies并记录日志

V1

允许设置接受到cookies的版本1的cookies并记录日志

Log

禁止设置cookies但是允许记录到日志中

Off

禁止设置并记录日志接受到cookies

Nginx原文:

Allows or prohibits to set cookies and log the received cookies:

on

allows to set version 2 cookies and log the received cookies;

v1

allows to set version 1 cookies and log the received cookies;

log

prohibits to set cookies but allows to log the received cookies;

off

prohibits to set cookies and log the received cookies.

2. userid_domain

syntax:userid_domain    name| none;
default:userid_domain none;
context:http, server, location

定义要设置的cookies的域名。参数none禁止设置cookies的域名。

Nginx原文:

Defines a domain for which the cookie is set. The parameter none disables setting a domain for a cookie.

3. userid_expires

syntax:userid_expires   time| max | off;
default:userid_expires off;
context:http, server, location

设置浏览器应该保留这个cookie的过期时间。这个max参数使cookie在“31 Dec 2037 23:55:55 GMT”年过期。这个最大的时间被旧的浏览器理解。Off参数使浏览器在session过期后让cookie过期。

Nginx原文:

Sets a time during which a browser should keep the cookie. The parameter max will cause the cookie to expire on “31 Dec 2037 23:55:55 GMT”. This is the maximum time understood by old browsers. The parameter off will cause the cookie to expire at the end of a browser session.

4. userid_mark

syntax:userid_mark  letter| digit | = | off;
default:userid_mark off;
context:http, server, location

如果参数不是off,使能cookie的标志功能, 设置一个字符作为标志。这个机制运行添加或者改变userid_p3p或者cookie的过期时间,当保留客户端标志时。标记能是任何英文字母(大小写敏感),数字,或“=”字。

如果一个标记被设置,它将同在cookie中的客户端标示符base64 表示的第一个填充符号进行比较。如果他们不匹配,cookie被从新发送带有标志,过期时间和一个“P3P”头。

Nginx原文:

If parameter is not off, enables the cookie marking mechanism and sets a character used as a mark. This mechanism allows to add or change userid_p3p and/or cookie expiration time while preserving the client identifier. The mark can be any letter of the English alphabet (case-sensitive), digit, or the “=” character.

If a mark is set, it is compared with the first padding symbol in the base64 representation of client identifier passed in a cookie. If they do not match, a cookie is resent with the specified mark, expiration time and a “P3P” header.

5. userid_name

syntax:userid_name    name;
default:userid_name uid;
context:http, server, location

设置cookie名称

Nginx原文:

Sets a cookie name.

6. userid_p3p

syntax:userid_p3p   string| none;
default:userid_p3p none;
context:http, server, location

为随着cookie一起发送的“P3P”头部域设置一个值。如果特殊值none被设置则p3p头部域将不会被发送。

Nginx原文:

Sets a value for the “P3P” header field that will be sent along with a cookie. If set to the special value none, the “P3P” header will not be sent in a response.

7. userid_path

syntax:userid_path  path;
default:userid_path /;
context:http, server, location

为设置的cookie设置一个路径

Nginx原文:

Defines a path for which the cookie is set.

8. userid_service

syntax:userid_service  number;
default:userid_service IP address of the server;
context:http, server, location

如果标识符是由多个服务器发布(服务),每个服务器程序应该关联他自己的数字来确保客户标识符是唯一指定号码。对于版本1的cookie默认值为零的饼干。版本2cookie默认值组成从服务器ip地址最后4个字节中数字组成。

Nginx原文:

If identifiers are issued by multiple servers (services), each service should be assigned its own number in order to ensure that client identifiers are unique. For version 1 cookies the default value is zero. For version 2 cookies this is the number composed from the last four octets of the server’s IP address.


Embedded variables(内嵌变量)

ngx_http_userid_module模块应该支持下面内置的变量。

The ngx_http_userid_module module supports the following embedded variables:

$uid_got

The cookie name and received client identifier.

Cookie名称和接受到客户端标识。

$uid_reset

如果设置为非空字符串,并且他不是“0”,则客户端标识被重置(reset,从新设置)。特殊值log设置输出消息关于重置标识消息到error_log日志。

If set to a non-empty string, and it is not “0”, client identifiers are reset. The special value “log” additionally leads to the output of messages about reset identifiers to the error_log.

$uid_set

The cookie name and sent client identifier.

Cookie名称和发送客户端标识

ngx_http_upstream_module模块基本指令整理

原创文章,转载请指明出处并保留原文url地址

本文主要针对nginx的ngx_http_upstream_module模块做简单介绍,本文具体包括如下指令:upstream,server,ip_hash,keepalive,least_conn

ngx_http_upstream_module模块定义一组服务器,这个组服务器可以从proxy_pass,fastcgi_pass和memcached_pass指令中访问。

Example Configuration

upstream backend {

server backend1.example.com       weight=5;

server backend2.example.com:8080;

server unix:/tmp/backend3;

server backup1.example.com:8080   backup;

server backup2.example.com:8080   backup;

}

server {

location / {

proxy_pass http://backend;

}

}

Nginx原文:

The ngx_http_upstream_module module allows to define groups of servers that can be referenced from the proxy_pass, fastcgi_pass, and memcached_pass directives.

Example Configuration

upstream backend {

server backend1.example.com       weight=5;

server backend2.example.com:8080;

server unix:/tmp/backend3;

server backup1.example.com:8080   backup;

server backup2.example.com:8080   backup;

}

server {

location / {

proxy_pass http://backend;

}

}

1. upstream

syntax:upstream      name{ ... }
default:
context:http

定义一组servers。这些服务器能监听不同的端口。另外服务器可以监听在tcp或者unix-doming端口, 也可以混合。例如:

Example:

upstream backend {

server backend1.example.com weight=5;

server 127.0.0.1:8080       max_fails=3 fail_timeout=30s;

server unix:/tmp/backend3;

}

默认情况下,请求使用加权的办法轮流均衡的分配到服务器上。在上面例子中,每7个请求中有5个请求分发到backend1.example.com服务器,第二个及第三个服务器各一个请求。如果在通信过程中发生错误,请求被传递到下一个服务器中,如此进行下去,直到全部服务器都被测试一遍后,如果这个时候仍然不能获取任何正确的相应,客户端将会获取到最后一个服务器那里获取到的结果。

Nginx原文:

Defines a group of servers. Servers can listen on different ports. In addition, servers listening on TCP and UNIX-domain sockets can be mixed.

Example:

upstream backend {

server backend1.example.com weight=5;

server 127.0.0.1:8080       max_fails=3 fail_timeout=30s;

server unix:/tmp/backend3;

}

By default, requests are distributed between servers using a weighted round-robin balancing method. In the above example, each 7 requests will be distributed as follows: 5 requests to backend1.example.com and one request to each of second and third servers. If an error occurs when communicating with the server, a request will be passed to the next server, and so on until all of the functioning servers will be tried. If a successful response could not be obtained from any of the servers, the client will be returned the result of contacting the last server.

2. server

syntax:server  address[parameters];
default:
context:upstream

定义服务器的地址和其它参数。地址可以指定为域名或IP地址,一个可选的端口,或作为一个UNIX域套接字路径后的“UNIX指定:”前缀。如果没有指定端口,80端口被默认使用。有多个ip地址域名定义为多个服务器。

下面的参数能够使用

weight=number

设置一个server的权重, 默认是1

max_fails=number

设置nginx同server之间通信的不成功访问次数的参数,参数通过fail_timeout参数进行设置, 在一定时间内,当不成功测试达到这个次数时,将考虑服务器down(下线, 宕机)。默认情况下不成功访问次数是1次。特殊值0将禁止统计这个访问的企图次数。什么是不成功的访问, 这个是通过 proxy_next_upstream, fastcgi_next_upstream, and memcached_next_upstream 指令进行配置的。http404状态不被考虑为不成功的尝试。

fail_timeout=time

sets

一时间值,在这个时间值下不能与服务器进行通信被认为是尝试失败,在与服务器通信不成功的尝试次数到达后,服务器被认为是宕机;

默认情况下, 超时时间是10秒钟

Backup

标记服务器作为备份服务器。通常当主服务器宕机后传递请求给备份服务器

Down

标志着服务器永久宕机;随着ip_hash指令使用。

示例:

upstream backend {

server backend1.example.com     weight=5;

server 127.0.0.1:8080           max_fails=3 fail_timeout=30s;

server unix:/tmp/backend3;

server backup1.example.com:8080 backup;

}

Nginx原文:

Defines an address and other parameters of the server. An address can be specified as a domain name or IP address, and an optional port, or as a UNIX-domain socket path specified after the “unix:” prefix. If port is not specified, the port 80 is used. A domain name that resolves to several IP addresses essentially defines multiple servers.

The following parameters can be defined:

weight=number

sets a weight of the server, by default 1.

max_fails=number

sets a number of unsuccessful attempts to communicate with the server during a time set by the fail_timeout parameter after which it will be considered down for a period of time also set by the fail_timeout parameter. By default, the number of unsuccessful attempts is set to 1. A value of zero disables accounting of attempts. What is considered to be an unsuccessful attempt is configured by the proxy_next_upstream, fastcgi_next_upstream, and memcached_next_upstream directives. The http_404 state is not considered an unsuccessful attempt.

fail_timeout=time

sets

a time during which the specified number of unsuccessful attempts to communicate with the server should happen for the server to be considered down;

and a period of time the server will be considered down.

By default, timeout is set to 10 seconds.

backup

marks the server as a backup server. It will be passed requests when the primary servers are down.

down

marks the server as permanently down; used along with the ip_hash directive.

Example:

upstream backend {

server backend1.example.com     weight=5;

server 127.0.0.1:8080           max_fails=3 fail_timeout=30s;

server unix:/tmp/backend3;

server backup1.example.com:8080 backup;

}

3. ip_hash

syntax:ip_hash;
default:
context:upstream

制定一组服务器应该采用负载均衡的方法,在这个方法中用户请求基于用户的ip地址被分发到不同的服务器上。对于IPv4的前3个字节或者整个IPv6地址被作为hashing的key值。这个方法试题将相同客户端的请求分发到相同的服务器上,出发这个服务器宕机了,才考虑将请求分发到其他服务器上。

IPv6的地址是由版本1.3.2和1.2.2开始支持

如果一个服务器需要暂时删除,并要用down参数保存当前服务器参与到散列客户端IP地址中。

Example:

upstream backend {

ip_hash;

server backend1.example.com;

server backend2.example.com;

server backend3.example.com down;

server backend4.example.com;

}

直到版本1.3.1和1.2.2不能使用ip_hash中采用权重的方法来做负载均衡。

Nginx原文:

Specifies that a group should use a load balancing method where requests are distributed between servers based on client IP addresses. The first three octets of the client IPv4 address, or the entire IPv6 address, are used as a hashing key. The method ensures that requests of the same client will always be passed to the same server except when this server is considered down in which case client requests will be passed to another server and most probably it will also be the same server.

IPv6 addresses are supported starting from versions 1.3.2 and 1.2.2.

If one of the servers needs to be temporarily removed, it should be marked with the down parameter in order to preserve the current hashing of client IP addresses.

Example:

upstream backend {

ip_hash;

server backend1.example.com;

server backend2.example.com;

server backend3.example.com down;

server backend4.example.com;

}

Until versions 1.3.1 and 1.2.2 it was not possible to specify a weight for servers using the ip_hash load balancing method.

4. keepalive

syntax:keepalive   connections;
default:
context:upstream

This directive appeared in version 1.1.4.

激活连接到上游服务器缓存。(upstream  adj. 向上游的;(石油工业等)上游的;逆流而上的;)

连接参数设置空闲的保持连接的最大连接数目, 当连接数码超过最大值, 这些保存在每个工作者进程的缓存中的到上游缓存的连接将被释放, 释放时选择最近没有使用的连接进行释放。

需要特别指出的是keepalive指令并不限制工作者进程连接到上游服务器的连接总数。连接参数应该设置的足够低,来确保上游服务器有足够的剩余连接来接收新连接请求。

连接到memcached上游服务器的配置示例

upstream memcached_backend {

server 127.0.0.1:11211;

server 10.0.0.2:11211;

keepalive 32;

}

server {

...

location /memcached/ {

set $memcached_key $uri;

memcached_pass memcached_backend;

}

}

对于http协议, 这proxy_http_version指令应该被设置到1.1并且Connection头部域应该被清除。

upstream http_backend {

server 127.0.0.1:8080;

keepalive 16;

}

server {

...

location /http/ {

proxy_pass http://http_backend;

proxy_http_version 1.1;

proxy_set_header Connection "";

...

}

}

另外,HTTP/1.0持久连接可以通过“Connection: Keep-Alive”头部域保持同上游服务器的长连接,尽管这个方法不被推荐采用。

对于FastCGI服务器,要求设置set fastcgi_keep_conn为keepalive连接。

upstream fastcgi_backend {

server 127.0.0.1:9000;

keepalive 8;

}

server {

...

location /fastcgi/ {

fastcgi_pass fastcgi_backend;

fastcgi_keep_conn on;

...

}

}

当使用轮训以外的负载均衡方法是必须在keepalive指令前激活相应负载均衡功能

SCGI and uwsgi协议没有保持连接的概念

Nginx原文:

Activates cache of connections to upstream servers.

The connections parameter sets the maximum number of idle keepalive connections to upstream servers that are retained in the cache per one worker process. When this number is exceeded, the least recently used connections are closed.

It should be particularly noted that keepalive directive does not limit the total number of connections that nginx worker process can open to upstream servers. The connections parameter should be set low enough to allow upstream servers to process additional new incoming connections as well.

Example configuration of memcached upstream with keepalive connections:

upstream memcached_backend {

server 127.0.0.1:11211;

server 10.0.0.2:11211;

keepalive 32;

}

server {

...

location /memcached/ {

set $memcached_key $uri;

memcached_pass memcached_backend;

}

}

For HTTP, the proxy_http_version directive should be set to “1.1” and the “Connection” header field should be cleared:

upstream http_backend {

server 127.0.0.1:8080;

keepalive 16;

}

server {

...

location /http/ {

proxy_pass http://http_backend;

proxy_http_version 1.1;

proxy_set_header Connection "";

...

}

}

Alternatively, HTTP/1.0 persistent connections can be used by passing the “Connection: Keep-Alive” header field to an upstream server, though this is not recommended.

For FastCGI servers, it is required to set fastcgi_keep_conn for keepalive connections to work:

upstream fastcgi_backend {

server 127.0.0.1:9000;

keepalive 8;

}

server {

...

location /fastcgi/ {

fastcgi_pass fastcgi_backend;

fastcgi_keep_conn on;

...

}

}

When using load balancer methods other than the default round-robin, it is necessary to activate them before the keepalive directive.

SCGI and uwsgi protocols do not have a notion of keepalive connections.

5. least_conn

syntax:least_conn;
default:
context:upstream

This directive appeared in versions 1.3.1 and 1.2.2.

制定一组服务器应该尽可能使用负载均衡的办法,在考虑服务器权重的情况下, 即一个请求尽可能传递给具有最少活动连接的服务器。如果有多个这种服务器应该使用轮训的方式。

Nginx原文:

Specifies that a group should use a load balancing method where a request is passed to the server with the least number of active connections, taking into account weights of servers. If there are several such servers, they are tried using a weighted round-robin balancing method.

内嵌变量

Embedded Variables

The ngx_http_upstream_module module supports the following embedded variables:

$upstream_addr

保存服务器的ip地址和端口,或者UNIX-domain socket的path。如果多个服务器被联系,在请求处理过程中,他们的地址被逗号“,”分割,例如“192.168.1.1:80, 192.168.1.2:80, unix:/tmp/sock”,如果内部从定向从一个server组到另外一个服务器(通过使用“X-Accel-Redirect”或者error_page 指令), 然后这些server组被分割“192.168.1.1:80, 192.168.1.2:80, unix:/tmp/sock : 192.168.10.1:80, 192.168.10.2:80”

keeps an IP address and port of the server, or a path to the UNIX-domain socket. If several servers were contacted during request processing, their addresses are separated by commas, e.g. “192.168.1.1:80, 192.168.1.2:80, unix:/tmp/sock”. If an internal redirect from one server group to another happened using “X-Accel-Redirect” or error_page then these server groups are separated by colons, e.g. “192.168.1.1:80, 192.168.1.2:80, unix:/tmp/sock : 192.168.10.1:80, 192.168.10.2:80”.

$upstream_cache_status

保持状态的访问响应缓存(0.8.3)。状态可以是一个“小姐”,“搭桥”,“过期”,“过时”,“更新”或“打”

保持一个存取相应缓存的状态, 这些状态能是下面:“MISS”,  “BYPASS”, “EXPIRED”, “STALE”, “UPDATING” or “HIT”。

keeps status of accessing a response cache (0.8.3). The status can be one of “MISS”,  “BYPASS”, “EXPIRED”, “STALE”, “UPDATING” or “HIT”.

$upstream_response_length

保持从上游获取获取相应的长度, 长度单位是自己, 多个相应的长度别逗号分隔,像$upstream_addr变量那样。

keeps lengths of responses obtained from upstream servers (0.7.27); lengths are kept in bytes. Several responses are separated by commas and colons like in the $upstream_addr variable.

$upstream_response_time

保持从上游服务器获取相应的时间, 时间以毫秒为单位被保持。多个相应用逗号分隔。

keeps times of responses obtained from upstream servers; times are kept in seconds with a milliseconds resolution. Several responses are separated by commas and colons like in the $upstream_addr variable.

$upstream_status

保持相应代码从上游服务器获取的。多个相应的代码用逗号分隔。

keeps codes of responses obtained from upstream servers. Several responses are separated by commas and colons like in the $upstream_addr variable.

$upstream_http_...

保持相应头域,例如相应头“Server”域可以通过$upstream_http_server变量获取。转换头域名称为相同变量并且用“http_”开通,仅最后的服务器的响应头被保持。

keep server response header fields. For example, the “Server” response header field is made available through the $upstream_http_server variable. The rules of converting header field names to variable names are the same as for variables starting with the “$http_” prefix. Only the last server’s response header fields are saved.