CAS 原理和协议
基础模式
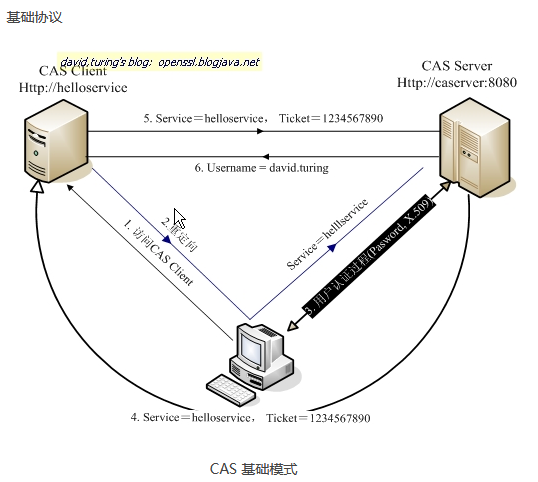
基础模式 SSO 访问流程主要有以下步骤:
1. 访问服务: SSO 客户端发送请求访问应用系统提供的服务资源。
2. 定向认证: SSO 客户端会重定向用户请求到 SSO 服务器。
3. 用户认证:用户身份认证。
4. 发放票据: SSO 服务器会产生一个随机的 Service Ticket 。
5. 验证票据: SSO 服务器验证票据 Service Ticket 的合法性,验证通过后,允许客户端访问服务。
6. 传输用户信息: SSO 服务器验证票据通过后,传输用户认证结果信息给客户端。
下面是 CAS 最基本的协议过程:
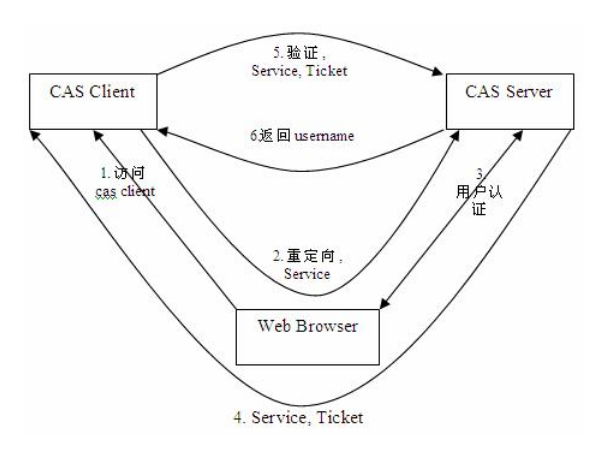
基础协议图
如 上图: CAS Client 与受保护的客户端应用部署在一起,以 Filter 方式保护 Web 应用的受保护资源,过滤从客户端过来的每一个 Web 请求,同 时, CAS Client 会分析 HTTP 请求中是否包含请求 Service Ticket( ST 上图中的 Ticket) ,如果没有,则说明该用户是没有经过认证的;于是 CAS Client 会重定向用户请求到 CAS Server ( Step 2 ),并传递 Service (要访问的目的资源地址)。 Step 3 是用户认证过程,如果用户提供了正确的 Credentials , CAS Server 随机产生一个相当长度、唯一、不可伪造的 Service Ticket ,并缓存以待将来验证,并且重定向用户到 Service 所在地址(附带刚才产生的 Service Ticket ) , 并为客户端浏览器设置一个 Ticket Granted Cookie ( TGC ) ; CAS Client 在拿到 Service 和新产生的 Ticket 过后,在 Step 5 和 Step6 中与 CAS Server 进行身份核实,以确保 Service Ticket 的合法性。
在该协议中,所有与 CAS Server 的交互均采用 SSL 协议,以确保 ST 和 TGC 的安全性。协议工作过程中会有 2 次重定向 的过程。但是 CAS Client 与 CAS Server 之间进行 Ticket 验证的过程对于用户是透明的(使用 HttpsURLConnection )。
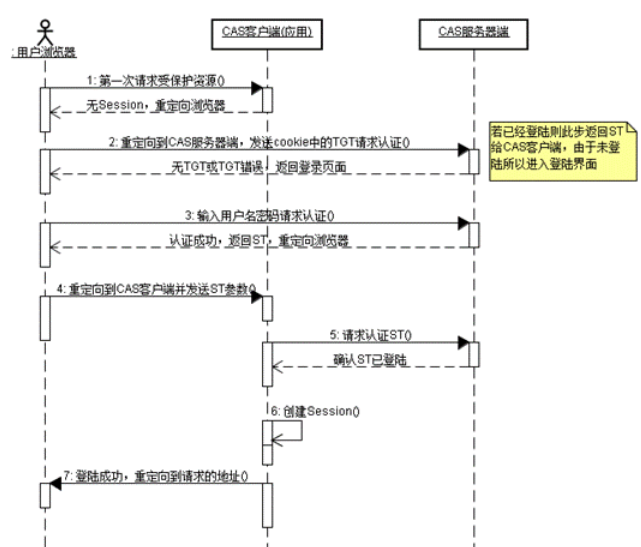
CAS 请求认证时序图如下:
CAS 如何实现 SSO
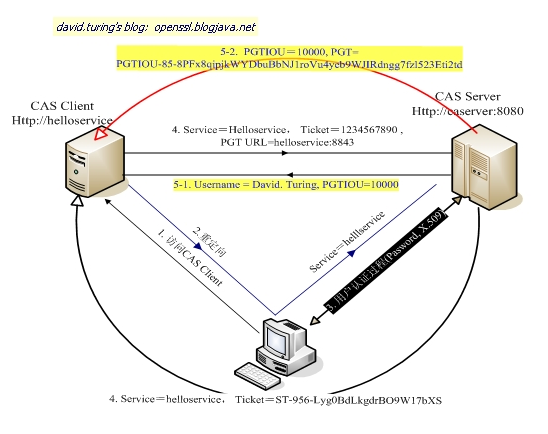
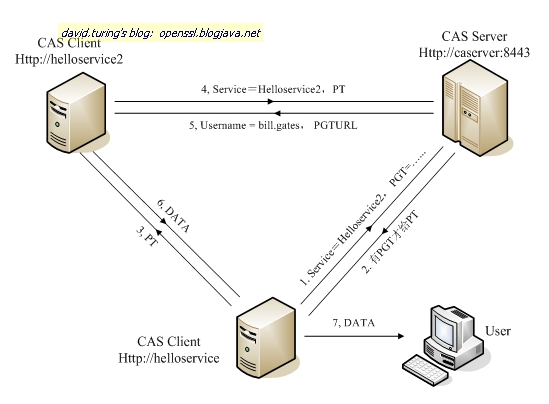
当用户访问另一个应用的服务再次被重定向到 CAS Server 的时候, CAS Server 会主动获到这个 TGC cookie ,然后做下面的事情:
1) 如果 User 持有 TGC 且其还没失效,那么就走基础协议图的 Step4 ,达到了 SSO 的效果;
2) 如果 TGC 失效,那么用户还是要重新认证 ( 走基础协议图的 Step3) 。
以上是在网络上找到的相关描述,详细请参考:
http://www.open-open.com/lib/view/open1432381488005.html
但是光看文字描述还是不够清晰,不如Debug来看一下。
----------------------------------------------------------------------------------
前提:
有两个web应用
app1.testcas.com
app2.testcas.com
Cas认证中心
demo.testcas.com
第一步:访问目标应用app1
如果想要访问app1的网页
例如:app1.testcas.com/user/doWelcome
这时,该请求将会被事先配置好的CAS Filter所拦截
app1的web.xml配置如下:
<filter>
        <filter-name>CAS Filter</filter-name>
        <filter-class>org.jasig.cas.client.authentication.AuthenticationFilter</filter-class>
        <init-param>
            <param-name>casServerLoginUrl</param-name>
            <param-value>https://demo.testcas.com/cas/login</param-value>
        </init-param>
        <init-param>
            <param-name>serverName</param-name>
            <param-value>http://app1.testcas.com</param-value>
        </init-param>
</filter>
<filter-mapping>
    <filter-name>CAS Filter</filter-name>
    <url-pattern>/*</url-pattern>
</filter-mapping>断点进入该类的doFilter方法 org.jasig.cas.client.authentication.AuthenticationFilter > doFilter
public final void doFilter(final ServletRequest servletRequest,
            final ServletResponse servletResponse, final FilterChain filterChain)
            throws IOException, ServletException
    {
        final HttpServletRequest request = (HttpServletRequest) servletRequest;
        final HttpServletResponse response = (HttpServletResponse) servletResponse;
        final HttpSession session = request.getSession(false);

        // 该变量为判断用户是否已经登录的标记,在用户成功登录后会被设置
        final Assertion assertion = session != null ? (Assertion) session.getAttribute(CONST_CAS_ASSERTION)
                : null;

        // 判断是否登录过,如果已经登录过,进入if并且退出
        if (assertion != null)
        {
            filterChain.doFilter(request, response);
            return;
        }
        // 如果没有登录过,继续后续处理

        // 构造访问的URL,如果该Url包含tikicet参数,则去除参数
        final String serviceUrl = constructServiceUrl(request, response);
        // 如果ticket存在,则获取URL后面的参数ticket
        final String ticket = CommonUtils.safeGetParameter(request,
                getArtifactParameterName());
        // 研究中
        final boolean wasGatewayed = this.gatewayStorage.hasGatewayedAlready(request,
                serviceUrl);

        // 如果ticket存在
        if (CommonUtils.isNotBlank(ticket) || wasGatewayed)
        {
            filterChain.doFilter(request, response);
            return;
        }

        final String modifiedServiceUrl;

        log.debug("no ticket and no assertion found");
        if (this.gateway)
        {
            log.debug("setting gateway attribute in session");
            modifiedServiceUrl = this.gatewayStorage.storeGatewayInformation(request,
                    serviceUrl);
        }
        else
        {
            modifiedServiceUrl = serviceUrl;
        }

        if (log.isDebugEnabled())
        {
            log.debug("Constructed service url: " + modifiedServiceUrl);
        }

        // 如果用户没有登录过,那么构造重定向的URL
        final String urlToRedirectTo = CommonUtils.constructRedirectUrl(this.casServerLoginUrl,
                getServiceParameterName(),
                modifiedServiceUrl,
                this.renew,
                this.gateway);

        if (log.isDebugEnabled())
        {
            log.debug("redirecting to \"" + urlToRedirectTo + "\"");
        }

        // 重定向跳转到Cas认证中心
        response.sendRedirect(urlToRedirectTo);
    }
第二步:请求被重定向到CAS服务器端后
根据CAS_Server端的login-webflow.xml配置
 View Code
首先会进入initialFlowSetupAction
 protected Event doExecute(final RequestContext context) throws Exception {
        final HttpServletRequest request = WebUtils.getHttpServletRequest(context);
        if (!this.pathPopulated) {
            final String contextPath = context.getExternalContext().getContextPath();
            final String cookiePath = StringUtils.hasText(contextPath) ? contextPath + "/" : "/";
            logger.info("Setting path for cookies to: "
                + cookiePath);
            this.warnCookieGenerator.setCookiePath(cookiePath);
            this.ticketGrantingTicketCookieGenerator.setCookiePath(cookiePath);
            this.pathPopulated = true;
        }

        // 获取客户端的名为CASTGC的cookie
        context.getFlowScope().put(
            "ticketGrantingTicketId", this.ticketGrantingTicketCookieGenerator.retrieveCookieValue(request));
        context.getFlowScope().put(
            "warnCookieValue",
            Boolean.valueOf(this.warnCookieGenerator.retrieveCookieValue(request)));

        // 获取要访问的服务
        final Service service = WebUtils.getService(this.argumentExtractors,
            context);

        if (service != null && logger.isDebugEnabled()) {
            logger.debug("Placing service in FlowScope: " + service.getId());
        }

        context.getFlowScope().put("service", service);

        return result("success");
    }
之后根据webflow流程,主要有两大分歧
如果TGC并且service存在,则发放ST(service ticket)并重定向回到客户端应用
如果首次访问,TGC不存在,则跳转到CAS-server的登录页面,如下(本登录页面是重新绘制,不是CAS原生登录页)
因为我是首次登录,所以会跳转到该登录页进行认证。
第三步:用户认证
输入用户名、密码、验证码,点击登录
这时再来看login-webflow.xml
用户提交登录后,按流程依次是
1.authenticationViaFormAction.doBind
    <view-state id="viewLoginForm" view="casMyLoginView" model="credentials">
        <binder>
            <binding property="username" />
            <binding property="password" />
            <binding property="imgverifycode" />
        </binder>
        <on-entry>
            <set name="viewScope.commandName" value="'credentials'" />
        </on-entry>
        <transition on="submit" bind="true" validate="true" to="imgverifycodeValidate">
            <evaluate
                expression="authenticationViaFormAction.doBind(flowRequestContext, flowScope.credentials)" />
        </transition>
</view-state>2.imgverifycodeValidate(验证码处理为自定义的处理,不是原生逻辑)
    <action-state id="imgverifycodeValidate">
        <evaluate
            expression="authenticationViaFormAction.validatorCode(flowRequestContext, flowScope.credentials, messageContext)" />
        <transition on="error" to="generateLoginTicket" />
        <transition on="success" to="realSubmit" />
    </action-state>
=>
3.realSubmit
<action-state id="realSubmit">
        <evaluate
            expression="authenticationViaFormAction.submit(flowRequestContext, flowScope.credentials, messageContext)" />
        <transition on="warn" to="warn" />
        <transition on="success" to="sendTicketGrantingTicket" />
        <transition on="error" to="generateLoginTicket" />
    </action-state>
realSubmit中执行的是authenticationViaFormAction.submit
 public final String submit(final RequestContext context,
            final Credentials credentials, final MessageContext messageContext)
            throws Exception
    {
        // Validate login ticket
        final String authoritativeLoginTicket = WebUtils.getLoginTicketFromFlowScope(context);
        final String providedLoginTicket = WebUtils.getLoginTicketFromRequest(context);
        if (!authoritativeLoginTicket.equals(providedLoginTicket))
        {
            this.logger.warn("Invalid login ticket " + providedLoginTicket);
            final String code = "INVALID_TICKET";
            messageContext.addMessage(new MessageBuilder().error()
                    .code(code)
                    .arg(providedLoginTicket)
                    .defaultText(code)
                    .build());
            return "error";
        }

        // 获取TGT,首次登录的话应该是不存在的,所以直接跳过该分歧
        final String ticketGrantingTicketId = WebUtils.getTicketGrantingTicketId(context);
        final Service service = WebUtils.getService(context);
        if (StringUtils.hasText(context.getRequestParameters().get("renew"))
                && ticketGrantingTicketId != null && service != null)
        {

            try
            {
                final String serviceTicketId = this.centralAuthenticationService.grantServiceTicket(ticketGrantingTicketId,
                        service,
                        credentials);
                WebUtils.putServiceTicketInRequestScope(context,
                        serviceTicketId);
                putWarnCookieIfRequestParameterPresent(context);
                return "warn";
            }
            catch (final TicketException e)
            {
                if (e.getCause() != null
                        && AuthenticationException.class.isAssignableFrom(e.getCause()
                                .getClass()))
                {
                    populateErrorsInstance(e, messageContext);
                    return "error";
                }
                this.centralAuthenticationService.destroyTicketGrantingTicket(ticketGrantingTicketId);
                if (logger.isDebugEnabled())
                {
                    logger.debug("Attempted to generate a ServiceTicket using renew=true with different credentials",
                            e);
                }
            }
        }

        try
        {
            // 首次登录时,用户输入信息验证成功后,创建一个新的TGT
            WebUtils.putTicketGrantingTicketInRequestScope(context,
                    this.centralAuthenticationService.createTicketGrantingTicket(credentials));
            putWarnCookieIfRequestParameterPresent(context);
            return "success";
        }
        catch (final TicketException e)
        {
            // 如果用户输入信息验证不通过,会抛出异常,并在页面上显示
            populateErrorsInstance(e, messageContext);
            return "error";
        }
    }
=>
4.用户信息认证通过,并且创建了新的TGT后,缓存TGT,并且生成cookie,待后续把cookie写入客户端
    <action-state id="sendTicketGrantingTicket">
        <evaluate expression="sendTicketGrantingTicketAction" />
        <transition to="serviceCheck" />
    </action-state>
sendTicketGrantingTicketAction.doExecute
    protected Event doExecute(final RequestContext context) {
        final String ticketGrantingTicketId = WebUtils.getTicketGrantingTicketId(context);
        final String ticketGrantingTicketValueFromCookie = (String) context.getFlowScope().get("ticketGrantingTicketId");

        if (ticketGrantingTicketId == null) {
            return success();
        }

        // 生成Cookie并且写入response,最终在客户端Cookie中保存了本TGT
        this.ticketGrantingTicketCookieGenerator.addCookie(WebUtils.getHttpServletRequest(context), WebUtils
            .getHttpServletResponse(context), ticketGrantingTicketId);

        if (ticketGrantingTicketValueFromCookie != null && !ticketGrantingTicketId.equals(ticketGrantingTicketValueFromCookie)) {
            this.centralAuthenticationService
                .destroyTicketGrantingTicket(ticketGrantingTicketValueFromCookie);
        }

        return success();
    }
=>
5. 然后验证是否存在Service,如果存在,生成ST,重定向用户到 Service 所在地址(附带该ST ) , 并为客户端浏览器设置一个 Ticket Granted Cookie ( TGC )
serviceCheck => generateServiceTicket => warn => redirect =>postRedirectDecision
第四步:拿着新产生的ST,到 CAS Server 进行身份核实,以确保 Service Ticket 的合法性。
当cas Service重定向到客户端所在service时,该重定向请求同样会被客户端配置的过滤器所拦截,又进入了第一步处的AuthenticationFilter
但是由于本次请求已经带回了ST(service ticket),所以处理与首次有所不同。
public final void doFilter(final ServletRequest servletRequest,
            final ServletResponse servletResponse, final FilterChain filterChain)
            throws IOException, ServletException
    {
        final HttpServletRequest request = (HttpServletRequest) servletRequest;
        final HttpServletResponse response = (HttpServletResponse) servletResponse;
        final HttpSession session = request.getSession(false);
        final Assertion assertion = session != null ? (Assertion) session.getAttribute(CONST_CAS_ASSERTION)
                : null;

        if (assertion != null)
        {
            filterChain.doFilter(request, response);
            return;
        }
        final String serviceUrl = constructServiceUrl(request, response);
        final String ticket = CommonUtils.safeGetParameter(request,
                getArtifactParameterName());
        final boolean wasGatewayed = this.gatewayStorage.hasGatewayedAlready(request,
                serviceUrl);

        // 由于本次已经可以取到cas service返回的新的service ticket
        if (CommonUtils.isNotBlank(ticket) || wasGatewayed)
        {
            // 所以直接进入本代码块,然后退出
            filterChain.doFilter(request, response);
            return;
        }
        // 不会再一次被重定向会cas 认证中心

        final String modifiedServiceUrl;

        log.debug("no ticket and no assertion found");
        if (this.gateway)
        {
            log.debug("setting gateway attribute in session");
            modifiedServiceUrl = this.gatewayStorage.storeGatewayInformation(request,
                    serviceUrl);
        }
        else
        {
            modifiedServiceUrl = serviceUrl;
        }

        if (log.isDebugEnabled())
        {
            log.debug("Constructed service url: " + modifiedServiceUrl);
        }

        // 如果用户没有登录过,那么构造重定向的URL
        final String urlToRedirectTo = CommonUtils.constructRedirectUrl(this.casServerLoginUrl,
                getServiceParameterName(),
                modifiedServiceUrl,
                this.renew,
                this.gateway);

        if (log.isDebugEnabled())
        {
            log.debug("redirecting to \"" + urlToRedirectTo + "\"");
        }

        // 重定向跳转到Cas认证中心
        response.sendRedirect(urlToRedirectTo);
    }
之后,又会被web.xml中的CAS Validation Filter(Cas20ProxyReceivingTicketValidationFilter)所拦截
该拦截器用来与CAS Server 进行身份核实,以确保 Service Ticket 的合法性
由于 Cas20ProxyReceivingTicketValidationFilter 没有重写doFilter方法,所以会进入父类AbstractTicketValidationFilter的doFilter方法
AbstractTicketValidationFilter.doFilter
 public final void doFilter(final ServletRequest servletRequest,
            final ServletResponse servletResponse, final FilterChain filterChain)
            throws IOException, ServletException
    {

        if (!preFilter(servletRequest, servletResponse, filterChain))
        {
            return;
        }

        final HttpServletRequest request = (HttpServletRequest) servletRequest;
        final HttpServletResponse response = (HttpServletResponse) servletResponse;
        final String ticket = CommonUtils.safeGetParameter(request,
                getArtifactParameterName());

        if (CommonUtils.isNotBlank(ticket))
        {
            if (log.isDebugEnabled())
            {
                log.debug("Attempting to validate ticket: " + ticket);
            }

            try
            {
                // 构造验证URL,向cas server发起验证请求
                final Assertion assertion = this.ticketValidator.validate(ticket,
                        constructServiceUrl(request, response));

                if (log.isDebugEnabled())
                {
                    log.debug("Successfully authenticated user: "
                            + assertion.getPrincipal().getName());
                }

                // 如果验证成功,设置assertion,当再一次发起访问请求时,如果发现assertion已经被设置,所以已经通过验证,不过再次重定向会cas认证中心
                request.setAttribute(CONST_CAS_ASSERTION, assertion);

                if (this.useSession)
                {
                    request.getSession().setAttribute(CONST_CAS_ASSERTION,
                            assertion);
                }
                onSuccessfulValidation(request, response, assertion);

                if (this.redirectAfterValidation)
                {
                    log.debug("Redirecting after successful ticket validation.");
                    response.sendRedirect(constructServiceUrl(request, response));
                    return;
                }
            }
            catch (final TicketValidationException e)
            {
                response.setStatus(HttpServletResponse.SC_FORBIDDEN);
                log.warn(e, e);

                onFailedValidation(request, response);

                if (this.exceptionOnValidationFailure)
                {
                    throw new ServletException(e);
                }

                return;
            }
        }

        filterChain.doFilter(request, response);

    }
this.ticketValidator.validate(..) 代码如下
 public Assertion validate(final String ticket, final String service)
            throws TicketValidationException
    {

        // 生成验证URL,如果你debug会发现,此处会构造一个类似以下的URL,访问的是cas server的serviceValidate方法
        // https://demo.testcas.com/cas/serviceValidate?ticket=ST-31-cioaDNxSpUWIgeYEn4yK-cas&service=http%3A%2F%2Fapp1.testcas.com%2Fb2c-haohai-server%2Fuser%2FcasLogin
        final String validationUrl = constructValidationUrl(ticket, service);
        if (log.isDebugEnabled())
        {
            log.debug("Constructing validation url: " + validationUrl);
        }

        try
        {
            log.debug("Retrieving response from server.");
            // 得到cas service响应,验证成功或者失败
            final String serverResponse = retrieveResponseFromServer(new URL(
                    validationUrl), ticket);

            if (serverResponse == null)
            {
                throw new TicketValidationException(
                        "The CAS server returned no response.");
            }

            if (log.isDebugEnabled())
            {
                log.debug("Server response: " + serverResponse);
            }

            return parseResponseFromServer(serverResponse);
        }
        catch (final MalformedURLException e)
        {
            throw new TicketValidationException(e);
        }
    }
可以看一下,cas server侧的serverValidate的具体实现 在cas server的cas-servlet.xml中,可以看到如下配置:
    <bean
        id="handlerMappingC"
        class="org.springframework.web.servlet.handler.SimpleUrlHandlerMapping">
        <property
            name="mappings">
            <props>
                <prop
                    key="/logout">
                    logoutController
                </prop>
                <prop
                    key="/serviceValidate">
                    serviceValidateController
                </prop>
     ...
指向serviceValidateController ServiceValidateController.handleRequestInternal(...)
 protected final ModelAndView handleRequestInternal(final HttpServletRequest request, final HttpServletResponse response) throws Exception {
        final WebApplicationService service = this.argumentExtractor.extractService(request);
        final String serviceTicketId = service != null ? service.getArtifactId() : null;

        if (service == null || serviceTicketId == null) {
            if (logger.isDebugEnabled()) {
                logger.debug(String.format("Could not process request; Service: %s, Service Ticket Id: %s", service, serviceTicketId));
            }
            return generateErrorView("INVALID_REQUEST", "INVALID_REQUEST", null);
        }

        try {
            final Credentials serviceCredentials = getServiceCredentialsFromRequest(request);
            String proxyGrantingTicketId = null;

            // XXX should be able to validate AND THEN use
            if (serviceCredentials != null) {
                try {
                    proxyGrantingTicketId = this.centralAuthenticationService
                        .delegateTicketGrantingTicket(serviceTicketId,
                            serviceCredentials);
                } catch (final TicketException e) {
                    logger.error("TicketException generating ticket for: "
                        + serviceCredentials, e);
                }
            }

            final Assertion assertion = this.centralAuthenticationService.validateServiceTicket(serviceTicketId, service);

            final ValidationSpecification validationSpecification = this.getCommandClass();
            final ServletRequestDataBinder binder = new ServletRequestDataBinder(validationSpecification, "validationSpecification");
            initBinder(request, binder);
            binder.bind(request);

            if (!validationSpecification.isSatisfiedBy(assertion)) {
                if (logger.isDebugEnabled()) {
                    logger.debug("ServiceTicket [" + serviceTicketId + "] does not satisfy validation specification.");
                }
                return generateErrorView("INVALID_TICKET", "INVALID_TICKET_SPEC", null);
            }

            onSuccessfulValidation(serviceTicketId, assertion);

            final ModelAndView success = new ModelAndView(this.successView);
            success.addObject(MODEL_ASSERTION, assertion);

            if (serviceCredentials != null && proxyGrantingTicketId != null) {
                final String proxyIou = this.proxyHandler.handle(serviceCredentials, proxyGrantingTicketId);
                success.addObject(MODEL_PROXY_GRANTING_TICKET_IOU, proxyIou);
            }

            if (logger.isDebugEnabled()) {
                logger.debug(String.format("Successfully validated service ticket: %s", serviceTicketId));
            }

            return success;
        } catch (final TicketValidationException e) {
            return generateErrorView(e.getCode(), e.getCode(), new Object[] {serviceTicketId, e.getOriginalService().getId(), service.getId()});
        } catch (final TicketException te) {
            return generateErrorView(te.getCode(), te.getCode(),
                new Object[] {serviceTicketId});
        } catch (final UnauthorizedServiceException e) {
            return generateErrorView(e.getMessage(), e.getMessage(), null);
        }
    }
验证成功后,就可以正常访问了。 来源:https://www.cnblogs.com/notDog/p/5252973.html
![wps_clip_image-14543[3][1]](http://www.iigrowing.cn/wp-content/uploads/CASSSO_9209/wps_clip_image1454331.jpg "wps_clip_image-14543[3][1]")
![wps_clip_image-30622[3][1]](http://www.iigrowing.cn/wp-content/uploads/CASSSO_9209/wps_clip_image3062231.jpg "wps_clip_image-30622[3][1]")
![wps_clip_image-8415[3][1]](http://www.iigrowing.cn/wp-content/uploads/CASSSO_9209/wps_clip_image841531.jpg "wps_clip_image-8415[3][1]")
![wps_clip_image-25343[3][1]](http://www.iigrowing.cn/wp-content/uploads/CASSSO_9209/wps_clip_image2534331.jpg "wps_clip_image-25343[3][1]")
![wps_clip_image-22055[3][1]](http://www.iigrowing.cn/wp-content/uploads/CASSSO_9209/wps_clip_image2205531.jpg "wps_clip_image-22055[3][1]")
![wps_clip_image-13962[3][1]](http://www.iigrowing.cn/wp-content/uploads/CASSSO_9209/wps_clip_image1396231.jpg "wps_clip_image-13962[3][1]")
![wps_clip_image-29822[3][1]](http://www.iigrowing.cn/wp-content/uploads/CASSSO_9209/wps_clip_image2982231.jpg "wps_clip_image-29822[3][1]")
![wps_clip_image-16711[3][1]](http://www.iigrowing.cn/wp-content/uploads/CASSSO_946C/wps_clip_image1671131.jpg "wps_clip_image-16711[3][1]")
![wps_clip_image-24140[3][1]](http://www.iigrowing.cn/wp-content/uploads/CASSSO_946C/wps_clip_image2414031.jpg "wps_clip_image-24140[3][1]")
![wps_clip_image-8209[3][1]](http://www.iigrowing.cn/wp-content/uploads/CASSSO_946C/wps_clip_image820931.jpg "wps_clip_image-8209[3][1]")
![wps_clip_image-12599[3][1]](http://www.iigrowing.cn/wp-content/uploads/CASSSO_946C/wps_clip_image1259931.jpg "wps_clip_image-12599[3][1]")
![wps_clip_image-22420[3][1]](http://www.iigrowing.cn/wp-content/uploads/CASSSO_946C/wps_clip_image2242031.jpg "wps_clip_image-22420[3][1]")
![wps_clip_image-32639[3][1]](http://www.iigrowing.cn/wp-content/uploads/CASSSO_946C/wps_clip_image3263931.jpg "wps_clip_image-32639[3][1]")
![wps_clip_image-32105[3][1]](http://www.iigrowing.cn/wp-content/uploads/CASSSO_946C/wps_clip_image3210531.jpg "wps_clip_image-32105[3][1]")
![wps_clip_image-3739[3][1]](http://www.iigrowing.cn/wp-content/uploads/CASSSO_946C/wps_clip_image373931.jpg "wps_clip_image-3739[3][1]")
![wps_clip_image-13922[3][1]](http://www.iigrowing.cn/wp-content/uploads/CASSSO_946C/wps_clip_image1392231.jpg "wps_clip_image-13922[3][1]")
![wps_clip_image-30824[3][1]](http://www.iigrowing.cn/wp-content/uploads/CASSSO_946C/wps_clip_image3082431.jpg "wps_clip_image-30824[3][1]")
![wps_clip_image-25588[3][1]](http://www.iigrowing.cn/wp-content/uploads/CASSSO_946C/wps_clip_image2558831.jpg "wps_clip_image-25588[3][1]")
![wps_clip_image-13159[3][1]](http://www.iigrowing.cn/wp-content/uploads/CASSSO_946C/wps_clip_image1315931.jpg "wps_clip_image-13159[3][1]")
![wps_clip_image-23028[3][1]](http://www.iigrowing.cn/wp-content/uploads/CASSSO_946C/wps_clip_image2302831.jpg "wps_clip_image-23028[3][1]")
![wps_clip_image-1552[3][1]](http://www.iigrowing.cn/wp-content/uploads/CASSSO_946C/wps_clip_image155231.jpg "wps_clip_image-1552[3][1]")
![wps_clip_image-18214[3][1]](http://www.iigrowing.cn/wp-content/uploads/CASSSO_946C/wps_clip_image1821431.jpg "wps_clip_image-18214[3][1]")
![wps_clip_image-1425[3][1]](http://www.iigrowing.cn/wp-content/uploads/CASSSO_946C/wps_clip_image142531.jpg "wps_clip_image-1425[3][1]")
![wps_clip_image-3963[3][1]](http://www.iigrowing.cn/wp-content/uploads/CASSSO_946C/wps_clip_image396331.jpg "wps_clip_image-3963[3][1]")
![wps_clip_image-945[3][1]](http://www.iigrowing.cn/wp-content/uploads/CASSSO_946C/wps_clip_image94531.jpg "wps_clip_image-945[3][1]")
![wps_clip_image-3301[3][1]](http://www.iigrowing.cn/wp-content/uploads/CASSSO_946C/wps_clip_image330131.jpg "wps_clip_image-3301[3][1]")
![wps_clip_image-11445[3][1]](http://www.iigrowing.cn/wp-content/uploads/CASSSO_946C/wps_clip_image1144531.jpg "wps_clip_image-11445[3][1]")
![wps_clip_image-5166[3][1]](http://www.iigrowing.cn/wp-content/uploads/CASSSO_946C/wps_clip_image516631.jpg "wps_clip_image-5166[3][1]")
![wps_clip_image-23925[3][1]](http://www.iigrowing.cn/wp-content/uploads/CASSSO_946C/wps_clip_image2392531.jpg "wps_clip_image-23925[3][1]")
![wps_clip_image-17724[3][1]](http://www.iigrowing.cn/wp-content/uploads/CASSSO_946C/wps_clip_image1772431.jpg "wps_clip_image-17724[3][1]")
![wps_clip_image-15104[3][1]](http://www.iigrowing.cn/wp-content/uploads/CASSSO_946C/wps_clip_image1510431.jpg "wps_clip_image-15104[3][1]")
![wps_clip_image-10908[3][1]](http://www.iigrowing.cn/wp-content/uploads/CASSSO_946C/wps_clip_image1090831.jpg "wps_clip_image-10908[3][1]")