月度归档:2013年09月

WordPress 积分插件 WordPoints

WordPoints是一款最近发布的WordPress积分插件,支持自定义积分类型,目前(2013-09-22)可以为用户注册、定期登录、发表评论、发布文章提供积分功能,拥有3个小工具:最近积分日志、用户个人积分、积分最多的用户。前台支持使用简码 [wordpoints_points_logs] 调用积分日志,[wordpoints_points_top]调用积分用户排行榜。

WordPoints 使用 组件(component)和 模块(module)方式来定制功能,目前只有 积分(Points)一个组件可用,还没有模块。在 组件 标签下激活 Points,然后会在管理菜单中出现相应的设置菜单。

wordpoints_configure-wpdaxue_com

积分的管理界面很像我们使用的小工具界面,你需要先创建一种积分类型,然后拖动左边的 Hook 到这种积分类型的下方,并设置相应的积分。

wordpoints_points_hooks-wpdaxue_com

WordPoints 还在紧张开发中,后续会有什么惊喜,让我们拭目以待。在后台插件安装界面搜索 WordPoints 即可在线安装,或者下载 WordPoints。目前该插件还不支持本地化,所以没办法汉化。

来源:http://www.wpdaxue.com/wordpoints.html

开心上学记(2)

image

同学们, 上课了,今天的游戏课先推迟一小会. 新的小同学来了, 先来看看她叫什么名字吧, 大家好,我叫卡卡. 我的姐姐是卡卡心,我的哥哥是卡卡多. 全班同学都很欢迎卡卡. 叮铃铃,午饭时间到了. 大家都来到饭堂吃饭了,广播一个通知,由新同学卡卡去校长室领取一件东西. 到了校长室,校长给卡卡个小小的手提包, 让她放到班级的柜子里面, 下午到了安全课开始了. 先放一个动画片吧, 放完了片子大家都害怕的捂着眼睛. 傍晚到了, 该回宿舍了, 虽然卡卡才3岁, 别看她才3岁, 因为她是整个花花城的神童. 所以3岁就能上学.

WordPress 添加滚动公告栏

想为你的博客添加滚动公告栏,不妨试试 Continuous announcement scroller (以下简称 CAS)或 News announcement scroll(以下简称 NAS)。两者都可以添加一个滚动公告,支持设置滚动间隔时间、排序等,可以通过小工具或php函数调用。不同的是,CAS是连续滚动显示多条公告(目前不支持设置公告过期时间),NAS每次只滚动一条(支持设置公告过期时间)。


Continuous announcement scroller wordpress plugin create an announcement widget in the website, it’s not a simply message display instead the message will scroll vertically from bottom to top like roller and many message display at the same time. This plugin will support multilingual content. There is separate text management page available in the dashboard to add the announcement content.

Features of this plugin

    Easy installation.
    Widgets, so you can add pretty much anything.
    Easy scroller setting.
    We can arrange the message order easily.
    We can disable the message temporary.
    Display many message at a same time.

    See live demo on sidebar; Do you want to scroll the rss feed instead of own content? use continuous rss scrolling wordpress plugin.

Installation instruction

Method 1

    Download the plugin continuous-announcement-scroller.zip from download location.
    Unpack the continuous-announcement-scroller.zip file
    Extract the /continuous-announcement-scroller/ folder.
    Drop the continuous-announcement-scroller folder into your ‘wp-content/plugins’ folder.
    In word press administration panels, click on plug-in from the menu.
    You should see your new continuous announcement scroller plug-in listed.
    To turn the word presses plug-in on, click activate.

Method 2

    Go to ‘add new’ menu under ‘plugins’ tab in your word-press admin.
    Search continuous announcement scroller plugin using search option.
    Find the plugin and click ‘Install Now’ link.
    Finally click activate plug-in link to activate the plug-in.

Method 3

    Download the plugin continuous-announcement-scroller.zip from download location.
    Go to ‘add new’ menu under ‘plugins’ tab in your word press admin.
    Select upload link (top link menu).
    Upload the available continuous-announcement-scroller.zip file and click install now.
    Finally click activate plug-in link to activate the plug-in.

Plugin configuration

Option – 1 : Go to widget link under Appearance tab, Drag & drop continuous announcement scroller widget into your side bar.

Option – 2 : Copy and paste the below mentioned code in desired template location ie your PHP theme file.

<?php if (function_exists (cas)) cas(); ?>


下面分别为 CAS 和 NAS 的小工具演示:

image


image


在后台插件安装界面分别搜索两个插件的名字就可以在线安装,或者下载 CASNAS   。两个插件后台都是英文的(不支持语言包汉化)

News announcement scroll wordpress plug-in create a vertical scroll news widget for your wordpress website, This is same as announcement and vertical scroll news wordpress plugin. announcement and vertical scroll news wordpress plugin disappeared suddenly from wordpress directory, so i have created the same plugin with different name. This is very easy to use, no coding knowledge required to customize this plugin. after activated the plugin, drag and drop the widget into the sidebar.

Features of this plugin

    Easy installation.
    Widgets, so you can add pretty much anything.
    Easy style-override system.
    Expiration date setup.
    You can add N number of news; it will scroll one by one at front end (vertical scrolling).
    You can arrange the scrolling news order. Also you can customize the scroll direction.
    If you want, you can hide the news temporarily.
    Short code available for pages and posts.

    If any problems occur after plugin upgrade from version 1 to version 2 just deactivate the plugin and activate it again. Go to widget menu and drag and drop the plugin widget into your sidebar.

See live demo on sidebar. Now short code available to add plugin. now we can add this scrolling into pages and posts. if you want to display continuous scrolling use continuous announcement scroller plugin.

To configure

    Go to News Announcement link under setting menu to add/edit/delete the announcement.
    Go to widget link under appearance menu, Drag & drop news announcement widget to your desired location in the active sidebar.
    Go to news announcement link under setting menu and click setting page link here you can customize all the announcement front end styles.

Installation Instruction

Method 1

    Download the plugin news-announcement-scroll.zip from download location.
    Unpack the news-announcement-scroll.zip file
    Extract the /news-announcement-scroll/ folder.
    Drop the news-announcement-scroll folder into your ‘wp-content/plugins’ folder.
    In word press administration panels, click on plug-in from the menu.
    You should see your new news announcement scroll plug-in listed.
    To turn the word presses plug-in on, click activate.

Method 2

    Go to ‘add new’ menu under ‘plugins’ tab in your word-press admin.
    Search news announcement scroll plugin using search option.
    Find the plugin and click ‘Install Now’ link.
    Finally click activate plug-in link to activate the plug-in.

Method 3

    Download the plugin news-announcement-scroll.zip from download location.
    Go to ‘add new’ menu under ‘plugins’ tab in your word press admin.
    Select upload link (top link menu).
    Upload the available news-announcement-scroll.zip file and click install now.
    Finally click activate plug-in link to activate the plug-in.

Plugin configuration

Drag and drop the widget: Go to widget page under appearance tab, drag and drop News announcement scroll widget into your side bar. It’s very easy.

Add directly in the theme: Use this code, <?php if (function_exists (news_announcement)) news_announcement(); ?> to add the plugin to your theme files.

Add the news in the posts or pages: Copy and paste the given short code into pages or posts.

Short code from version 2.0 to 5.0

[NEWS:TYPE=widget]

Short code from version 6.0 onwards

[news-announcement type="widget"]

hadoop 1.2.1本地安装入门

原创文档,转载请将原文url地址标明

1年多没接触hadoop了, 最近hadoop发展很快,最近有些时间, 准备重新开始研究一下hadoop的源代码了, 为熟悉最新的hadoop情况, 先从1.2.1版本hadoop研究一下工作情况, 包括:安装,调试等等情况,然后再开始研究hadoop的源代码。

若是您不了解hadoop是啥, 请参考 百度百科hadoop的介绍

Hadoop的安装一般可以分为, 本地安装, 本地集群安装(每个hadoop组件都运行单独的jvm进程中), 最后是分布式集群安装。

本次安装,我们也采用这个顺序来进行系列的研究。

一. 下载hadoop源代码到windows

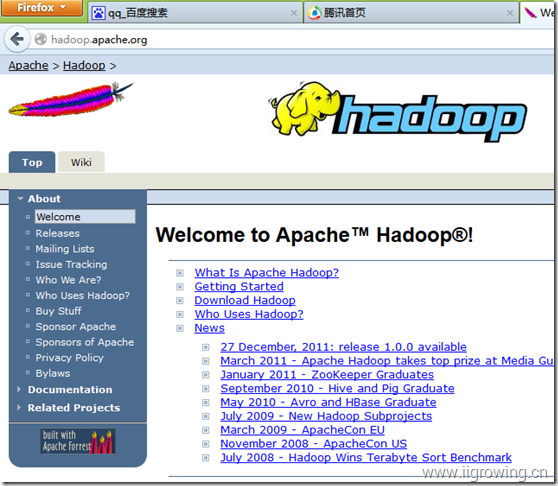
下面是hadoop的官方网站

http://hadoop.apache.org/

显示如下:

wps_clip_image-4634

我们下载1.2.1版本的稳定版本

下载地址如下:

http://apache.fayea.com/apache-mirror/hadoop/common/hadoop-1.2.1/hadoop-1.2.1.tar.gz

下载完成后, 解压缩文件, 这里源代码解压缩到 c:\tmp目录

注意: 1. hadoop在linux系列下工作, 尽管windows下可以进行安装, 但是需要安装很多其他软件, 这里也在linux下安装运行。

2. 这里之所以下载安装文件到windows下,我们目的是方便查看里面的文档,查看里面的帮助文档可以了解更多的hadoop情况。

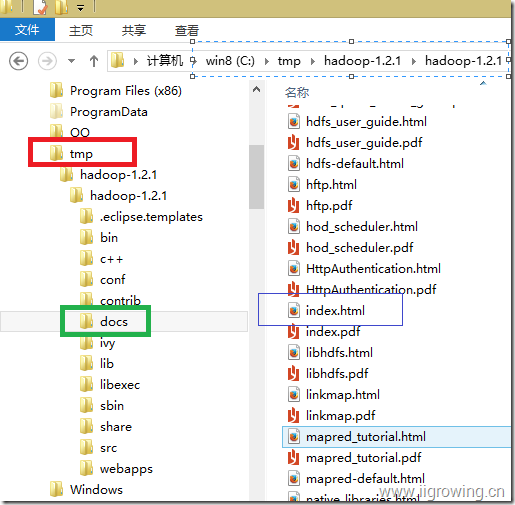
下面进入程序目录, 打开帮助文档

二.查看hadoop的文档

在浏览器地址栏中输入如下地址(请根据您的具体位置,调整相关地址,或者在资源管理里面直接打开 index.html文件)

file:///C:/tmp/hadoop-1.2.1/hadoop-1.2.1/docs/index.html

wps_clip_image-28216

如上图

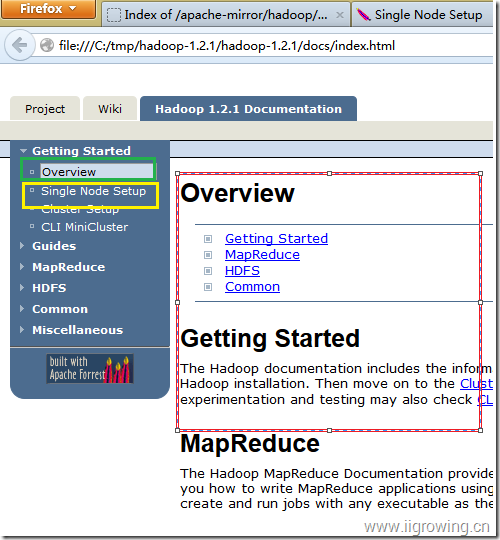
打开文档后,如下图:

wps_clip_image-12302

Getting Started

The Hadoop documentation includes the information you need to get started using Hadoop. Begin with the Single Node Setup which shows you how to set up a single-node Hadoop installation. Then move on to the Cluster Setup to learn how to set up a multi-node Hadoop installation. Users interested in quickly setting-up a hadoop cluster for experimentation and testing may also check CLI MiniCluster.

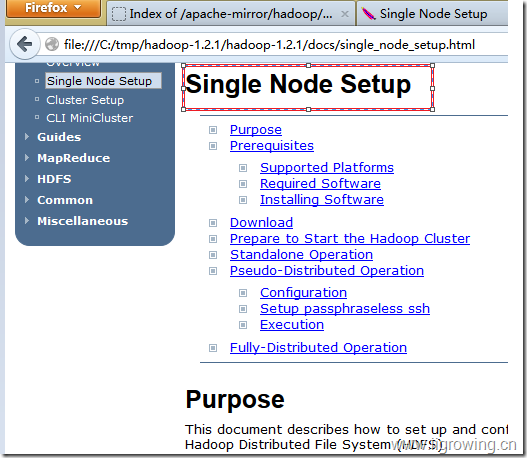
我首先查看本地安装指南

wps_clip_image-11565

Prerequisites必须的环境

Supported Platforms(支持的平台)

· GNU/Linux is supported as a development and production platform. Hadoop has been demonstrated on GNU/Linux clusters with 2000 nodes.

· Win32 is supported as a development platform. Distributed operation has not been well tested on Win32, so it is not supported as a production platform. Windows平台需要准备很多东西, 才能满足大量的脚本等。

Required Software必须的软件

Required software for Linux and Windows include:

1 JavaTM 1.6.x, preferably from Sun, must be installed. Java安装情况

2 sshmust be installed and sshd must be running to use the Hadoop scripts that manage remote Hadoop daemons.

Hadoop必须采用ssh进行相关管理

Additional requirements for Windows include:

3 Cygwin- Required for shell support in addition to the required software above.

在windows下必须这个环境, 我们本次在linux下进行, 因此我们没有这个安装的必要

Installing Software

If your cluster doesn't have the requisite software you will need to install it.

For example on Ubuntu Linux:

$ sudo apt-get install ssh
$ sudo apt-get install rsync

上面是 ubuntu进行安装的命令, 我们用的 centos环境, 因此我们命令如下:

$ yum install ssh
$ yum install rsync

On Windows, if you did not install the required software when you installed cygwin, start the cygwin installer and select the packages:

· openssh - the Net category

Download

To get a Hadoop distribution, download a recent stable release from one of the Apache Download Mirrors.

下载hadoop环境,我们前面已经下载了。

Prepare to Start the Hadoop Cluster在本地开始hadoop的相关情况

Unpack the downloaded Hadoop distribution. In the distribution, edit the file conf/hadoop-env.sh to define at least JAVA_HOME to be the root of your Java installation.

Try the following command:
$ bin/hadoop
This will display the usage documentation for the hadoop script.

Now you are ready to start your Hadoop cluster in one of the three supported modes:

· Local (Standalone) Mode

· Pseudo-Distributed Mode

· Fully-Distributed Mode

Standalone Operation

By default, Hadoop is configured to run in a non-distributed mode, as a single Java process. This is useful for debugging.

The following example copies the unpacked conf directory to use as input and then finds and displays every match of the given regular expression. Output is written to the given output directory.
$ mkdir input
$ cp conf/*.xml input
$ bin/hadoop jar hadoop-examples-*.jar grep input output 'dfs[a-z.]+'
$ cat output/*

Hadoop在本地工作情况, 默认采用的是本地文件系统, 单个jvm进程,我们可以充分调试我们的程序, 就像普通程序一样。

三.hadoop学习的硬件环境

a) 网络环境

wps_clip_image-24156

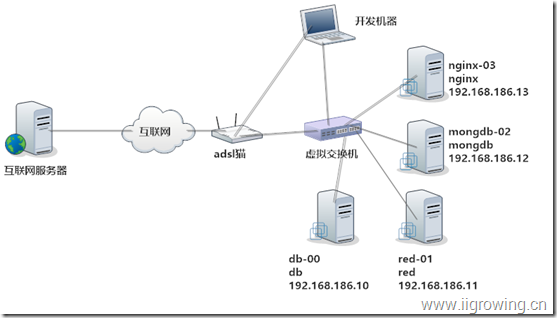
如上图, 我们创建了一个虚拟的网络系统, 进行本系列文章的研究。

创建了一个虚拟的交换机, 然后创建4个虚拟的linux服务器(centos5.6版本), 分别是:db,red,mongdb, nginx, (后续在这个4个不同的服务器上安装不同的应用,进行其他研究。)

Ip地址也已经设置完毕。

我们的开发用笔记本通过虚拟交换机相连, 同时也同adsl相连接, 虚拟机交换机也同adsl相连接, 这样保证4台虚拟机及其也能同互联网联通。

b) 服务器环境

wps_clip_image-16347

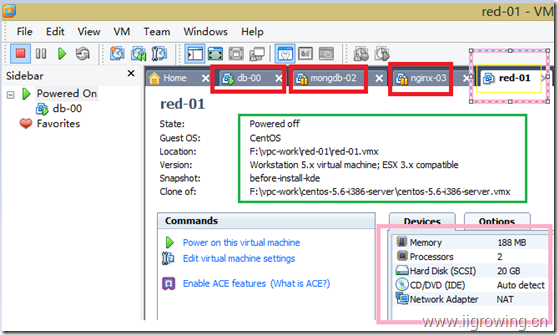
虚拟机环境如上。

wps_clip_image-12329

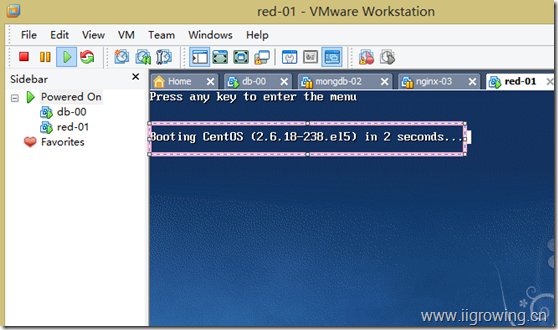
环境结果情况如下图。

wps_clip_image-1294

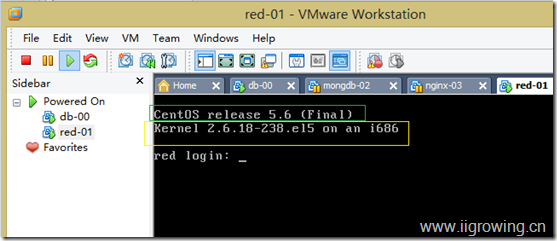
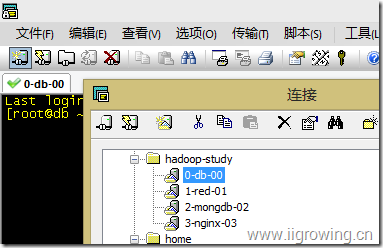
虚拟机链接方法:

wps_clip_image-10339

c) 软件环境

wps_clip_image-24067

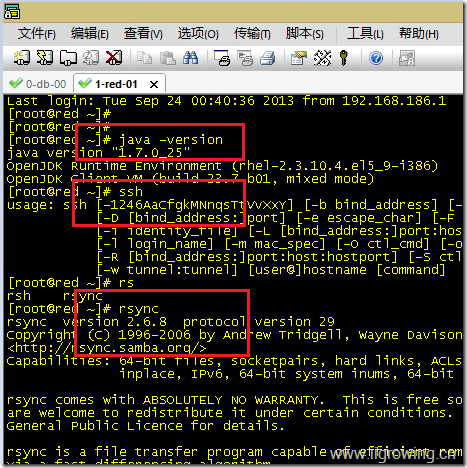
软件环境:

[root@red ~]# java -version

java version "1.7.0_25"

OpenJDK Runtime Environment (rhel-2.3.10.4.el5_9-i386)

OpenJDK Client VM (build 23.7-b01, mixed mode)

[root@red ~]# ssh

usage: ssh [-1246AaCfgkMNnqsTtVvXxY] [-b bind_address] [-c cipher_spec]

[-D [bind_address:]port] [-e escape_char] [-F configfile]

[-i identity_file] [-L [bind_address:]port:host:hostport]

[-l login_name] [-m mac_spec] [-O ctl_cmd] [-o option] [-p port]

[-R [bind_address:]port:host:hostport] [-S ctl_path]

[-w tunnel:tunnel] [user@]hostname [command]

[root@red ~]# rs

rsh    rsync

[root@red ~]# rsync

rsync  version 2.6.8  protocol version 29

Copyright (C) 1996-2006 by Andrew Tridgell, Wayne Davison, and others.

四.配置hadoop单节点环境

a) 下载hadoop

wget http://apache.fayea.com/apache-mirror/hadoop/common/hadoop-1.2.1/hadoop-1.2.1.tar.gz

下载后的结果如下:

[root@db apps]# pwd

/work/apps

[root@db apps]# ls

hadoop-1.2.1.tar.gz

b) 解压缩

tar xzvf hadoop-1.2.1.tar.gz

[root@db apps]# pwd

/work/apps

[root@db apps]# ll

drwxr-xr-x 15 root root     4096 Jul 22 18:26  hadoop-1.2.1

-rw-r--r--  1 root root 63851630 Sep 20 16:02  hadoop-1.2.1.tar.gz

c) 测试

[root@db apps]# cd hadoop-1.2.1

[root@db hadoop-1.2.1]# ls

....

[root@db hadoop-1.2.1]# pwd

/work/apps/hadoop-1.2.1

/work/apps/hadoop-1.2.1

[root@db hadoop-1.2.1]# mkdir input      // 创建输入文件目录

[root@db hadoop-1.2.1]#

[root@db hadoop-1.2.1]# cp conf/*.xml input    //  拷贝文件到输入文件目录

[root@db hadoop-1.2.1]# bin/hadoop jar hadoop-examples-*.jar grep input output 'dfs[a-z.]+'    // 执行hadoop的相关目录

Error: JAVA_HOME is not set.   //错误信息

[root@db hadoop-1.2.1]#

用下面的命令, 找到java的目录

[root@db bin]# find / -name rt.jar

/usr/lib/jvm/java-1.7.0-openjdk-1.7.0.25/jre/lib/rt.jar

[root@db bin]# cd /usr/lib/jvm/java-1.7.0-openjdk-1.7.0.25/

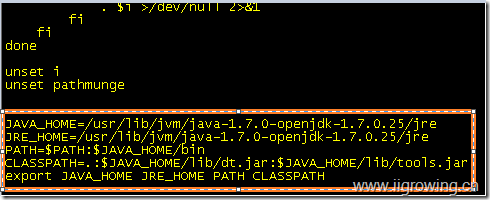
根据上面信息, 需要添加 下面信息到  /etc/profile

JAVA_HOME=/usr/lib/jvm/java-1.7.0-openjdk-1.7.0.25/jre

JRE_HOME=/usr/lib/jvm/java-1.7.0-openjdk-1.7.0.25/jre

PATH=$PATH:$JAVA_HOME/bin

CLASSPATH=.:$JAVA_HOME/lib/dt.jar:$JAVA_HOME/lib/tools.jar

export JAVA_HOME JRE_HOME PATH CLASSPATH

输入如下命令:

vi   /etc/profile   编辑文件, 将上面信息放到文件最后面,如下:

wps_clip_image-3382

保存文件推出

source  /etc/profile  使刚刚编辑的文件生效

然后输入如下命令, 执行hadoop的相关命令

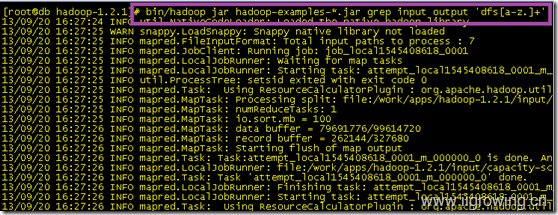
bin/hadoop jar hadoop-examples-*.jar grep input output 'dfs[a-z.]+'

运行结果如下:

wps_clip_image-17044

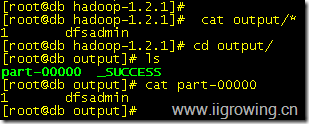
检查结果文件:

[root@db hadoop-1.2.1]#  cat output/*

1       dfsadmin

[root@db hadoop-1.2.1]# cd output/

[root@db output]# ls

part-00000  _SUCCESS

[root@db output]# cat part-00000

1       dfsadmin

[root@db output]#

截图如下:

wps_clip_image-7


后续我们将研究, 本地的伪分布式配置,最后我们研究集群下工作情况.

wordpress的CP Media Player

Audio Player and Video Player features:

♪ Publish an Audio player and Video player anywhere
♪ Support for audio and video files: MP4, OGG, WebM, WMV, MP3, WAV, WMA 
♪ Support WebSRT subtitle files
♪ Allow playlist
♪ Supported by web browser: IE, Firefox, Chrome, Safari, Opera
♪ Supported by mobile devices: iPhone, iPad and Android devices

CP Media Player - Audio Player and Video Player allows to publish files: MP4, OGG, WebM, WMV, MP3, WAV, WMA and WebSRT subtitle files. CP Media Player - Audio Player and Video Player is based on MediaElement.js which guarantees support for all browsers that implement the HTML5 standard. For older browsers, it supports Flash and Silverlight. CP Media Player - Audio Player and Video Player allows to associate a playlist to your media player and change its looks to match the design of your blog as closely as possible.

More about the Main Features

  • Allows to publish an Audio player and Video player anywhere(a post, page, other post types, or directly on templates).
  • Support for audio and video files: MP4, OGG, WebM, WMV, MP3, WAV, WMA, FLV and WebSRT subtitle files.
  • Allows to associate a playlist to your CP Media Player - Audio Player and Video Player.
  • Offers several skins to adjust the design of the CP Media Player - Audio Player and Video Player to your web design.
  • Supports all the popular browsers on the web: Internet Explorer, Firefox, Chrome, Safari, Opera, as well as mobile devices such as iPhone, iPad and Android. In new versions of browsers, the CP Media Player - Audio Player and Video Player tries to use the html5 tags: audio and video, for older browsers, the media player provides support for Flash and Silverlight.

The base plugin, available for free from the WordPress Plugin Directory has all the features you need to create an CP Media Player - Audio Player and Video Player on your website.

Premium Features

Premium features are available in the pro version to extend the capabilities of this plugin:

  • Allows to publish multiple CP Media Player - Audio Player and Video Player.
  • Allows to sell a file for each player, using PayPal as payment gateway.
  • Display a sales report to check easily the amount of sales.

If you want more information about this plugin CP Media Player - Audio Player and Video Player, or another one don't doubt to visit my website:

http://www.tsplayer.com/html5-audio-and-video-player


  1. audio-and-video-player screenshot 1

    CP Media Player - Audio Player and Video Player

  2. audio-and-video-player screenshot 2

    Creation page

  3. audio-and-video-player screenshot 3

    CP Media Player - Audio Player and Video Player insertion


Instalation

To install CP Media Player - Audio Player and Video Player, follow these steps:

  1. Download and unzip the plugin
  2. Upload the Entire html5-audio-and-video-player / directory to the / wp-content/plugins / directory
  3. Activate the plugin through the Plugins menu in WordPress

To install new skins in your media player:

  1. Download and unzip the skin.
  2. Upload the desired skin directory to /wp-content/plugins/html5-audio-and-video-player/skins/
  3. Associate the skin with your CP Media Player - Audio Player and Video Player through the plugin management page.
Interface

The video includes the features of free and premium versions of plugin, please, check the features list to detect each of them.

** CP Media Player - Audio Player and Video Player ** has an extensive set of configuration variables that provides great flexibility to this plugin. Media players are first generated on the ** CP Media Player - Audio Player and Video Player ** page. Then they are to be inserted into your blog directly from the Post/Page editing interface. Generating all CP Media Player - Audio Player and Video Player in the same environment will facilitate editing of media players and inserting of the same audio or video player on different pages of your website or blog.

Editing a CP Media Player - Audio Player and Video Player

On the ** CP Media Player - Audio Player and Video Player ** page, you will see the already generated media players and the button to create a new audio player or video player. To create a new audio player or video player just select the type of player: Audio player or Video player - and press the button "Create new media player." To edit an existing CP Media Player - Audio Player and Video Player, just select it in the list of existing media players and press "Edit media player".

Creating and Editing of Audio Player or Video Player

Select the player skin: the first skin will be selected by default. All the previously purchased skins will be loaded here, as well as the skins available for the audio and video player.

Player name: mandatory field that will allow to identify the media player for the insertion process on your website.

Width: Enter the width of the audio player or video player. Under the field you will see the values recommended for the selected skin. Every skin has a different recommended value.

Height: Enter the height of the audio player or video player. Under the field you will see the values recommended for the selected skin. Every skin has a different recommended value. If you are creating an audio player, the recommended height will be lower than height recommended for a video player.

Autoplay: Mark the checkbox if you want your CP Media Player - Audio Player and Video Player to initialize in "ON" mode.

Note: Some devices do not support autoplay.

Loop: Allows cyclical playback of the playlist. This feature may be limited on devices that do not support autoplay.

Preload: Allows you to pre-load audio and video files to streamline the playback process. Some mobile devices do not allow file preload.

Show playlist: Displays or hides the playlist.

To create a playlist please press "Create New Item". The data associated with a playlist item are:

Title: mandatory field that will identify the item in the playlist.

Associated link: URL to a web page with information associated to the item.

Poster: URL to an image associated to the item, only available for the video player.

Songs / Videos: mandatory field where you enter the URL to the audio or video file. Browsers support different multimedia file formats, therefore it is advisable to enter different formats for the same item, enabling each browser to select the file format that it supports. The audio and video formats supported by the player are MP4, OGG, WebM, WMV, FLV, MP3, WAV, WMA.

Subtitles: Enter the URL to the subtitle file and the subtitle language. WebSRT is the format of subtitle file supported by the media player.

After entering all data item press "Insert / Update item on playlist"

For Sale (the next options are available only for Premium version of CP Media Player - Audio Player and Video Player)

Select the file: Select the file for sale.

Enter price: Enter the file's price.

Promotional text: Enter a promotional text.

Inserting CP Media Player - Audio Player and Video Player in posts or pages

To insert CP Media Player - Audio Player and Video Player in your website go to the editing of posts / pages and click the icon for ** CP Media Player - Audio Player and Video Player ** in the web editor. This will load a window for select the audio player or video player by the name entered in player creation. After inserting the media player in your post save the changes on the website.

Configure PayPal account (only for Premium version)

The premium version of CP Media Player - Audio Player and Video Player allows to enter a file for selling, it uses PayPal as payment gateway. For selling files associated to the players, is required configure the PayPal account in the settings page of "CP Media Player - Audio Player and Video Player"

Enable Paypal Payments?: Enable the PayPal account. If this option is unchecked, CP Media Player - Audio Player and Video Player can't be used to commercialize the media files.

Paypal email: Enter the email addresss associated to the PayPal account.

Currency: Select the currency for selling.

Currency Symbol: Enter the currency symbol.

Paypal language: Select the PayPal interface's language.

Paypal button for instant purchases: Select the PayPal button to use in website.

Download link valid for: Enter the number of days to restrict the download link.

Notification "from" email: Enter the email address to use as "from" attribute in the notification emails.

Send notification to email: Enter the email address to receive the sales notifications.

Email subject confirmation to user: Enter the subject of notification emails sent to the buyers.

Email confirmation to user: Enter the content of notification emails sent to the buyers ( don't remove the text %INFORMATION%, it will be replaced by product's information)

Email subject notification to admin: Enter the subject of notification emails sent to the seller.

Email notification to admin: Enter the content of notification emails sent to the seller ( don't remove the text %INFORMATION%, it will be replaced by product's information)

Checking the sales reports (only for Premium version)

The sales report displays the list of sales in the selected interval of time and the total amount distributed by currencies. For checking the sales reports, press the menu option "Sales Report" and selects the interval of time for checking.

In a commerce is common for some sales ending in refund, in this case the sale reports may be different to the actual sales amount. The delete button allows to remove a sell from the system to correct the sales report.