一。 什么flume
当前Flume有两个版本Flume 0.9X版本的统称Flume-og,Flume1.X版本的统称Flume-ng。由于Flume-ng经过重大重构,与Flume-og有很大不同,使用时请注意区分。
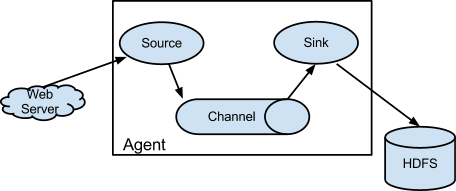
Flume is a distributed, reliable, and available service for efficiently collecting, aggregating, and moving large amounts of log data. It has a simple and flexible architecture based on streaming data flows. It is robust and fault tolerant with tunable reliability mechanisms and many failover and recovery mechanisms. It uses a simple extensible data model that allows for online analytic application.
二。参见用法
1. Setting multi-agent flow(设置多流)

In order to flow the data across multiple agents or hops, the sink of the previous agent and source of the current hop need to be avro type with the sink pointing to the hostname (or IP address) and port of the source.
2. Consolidation(合并)
A very common scenario in log collection is a large number of log producing clients sending data to a few consumer agents that are attached to the storage subsystem. For example, logs collected from hundreds of web servers sent to a dozen of agents that write to HDFS cluster.
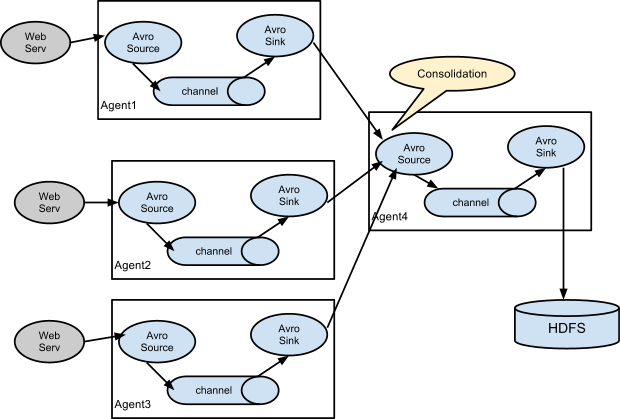
This can be achieved in Flume by configuring a number of first tier agents with an avro sink, all pointing to an avro source of single agent (Again you could use the thrift sources/sinks/clients in such a scenario). This source on the second tier agent consolidates the received events into a single channel which is consumed by a sink to its final destination.
3. Multiplexing the flow(复用流)
Flume supports multiplexing the event flow to one or more destinations. This is achieved by defining a flow multiplexer that can replicate or selectively route an event to one or more channels.
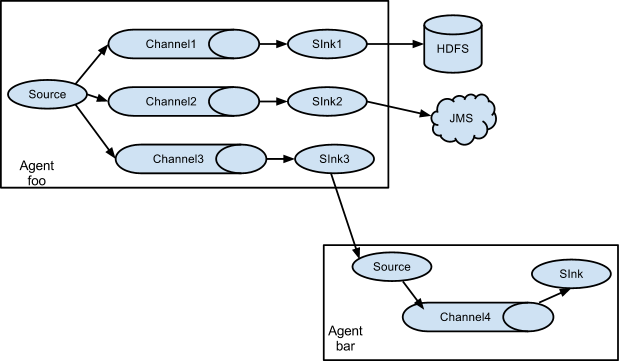
The above example shows a source from agent “foo” fanning out the flow to three different channels. This fan out can be replicating or multiplexing. In case of replicating flow, each event is sent to all three channels. For the multiplexing case, an event is delivered to a subset of available channels when an event’s attribute matches a preconfigured value. For example, if an event attribute called “txnType” is set to “customer”, then it should go to channel1 and channel3, if it’s “vendor” then it should go to channel2, otherwise channel3. The mapping can be set in the agent’s configuration file.
三。 用法举例
1. Flume 收集Nginx日志到Hdfs Tail-to-hdfs sink
nginx,access.log日志约8000条/s,每100w条数据约253M,需要2min
agent1.sources = source1
agent1.sinks = sink1
agent1.channels = channel1

# Describe/configure spooldir source1
#agent1.sources.source1.type = spooldir
#agent1.sources.source1.spoolDir = /var/log/apache/flumeSpool1
#agent1.sources.source1.fileHeader = true

# Describe/configure tail -F source1
agent1.sources.source1.type = exec
agent1.sources.source1.command = tail -F /tmp/log.log
agent1.sources.source1.channels = channel1

# Describe/configure nc source1
#agent1.sources.source1.type = netcat
#agent1.sources.source1.bind = localhost
#agent1.sources.source1.port = 44444

#configure host for source
agent1.sources.source1.interceptors = i1
agent1.sources.source1.interceptors.i1.type = host
agent1.sources.source1.interceptors.i1.hostHeader = hostname

# Describe sink1
#agent1.sinks.sink1.type = logger

agent1.sinks.sink1.type = hdfs
#a1.sinks.k1.channel = c1
#agent1.sinks.sink1.hdfs.path =hdfs://xxx:9000/tmp/tail/%y-%m-%d/%H%M%S
agent1.sinks.sink1.hdfs.path =hdfs://xxx:9000/tmp/tail/%y-%m-%d/%H
agent1.sinks.sink1.hdfs.filePrefix = %{hostname}/events-
agent1.sinks.sink1.hdfs.maxOpenFiles = 5000
agent1.sinks.sink1.hdfs.batchSize= 500
agent1.sinks.sink1.hdfs.fileType = DataStream
agent1.sinks.sink1.hdfs.writeFormat =Text
agent1.sinks.sink1.hdfs.rollSize = 0
agent1.sinks.sink1.hdfs.rollCount = 1000000
agent1.sinks.sink1.hdfs.rollInterval = 600
#agent1.sinks.sink1.hdfs.round = true
#agent1.sinks.sink1.hdfs.roundValue = 10
#agent1.sinks.sink1.hdfs.roundUnit = minute
agent1.sinks.sink1.hdfs.useLocalTimeStamp = true

# Use a channel which buffers events in memory
agent1.channels.channel1.type = memory
agent1.channels.channel1.keep-alive = 120
agent1.channels.channel1.capacity = 500000
agent1.channels.channel1.transactionCapacity = 600

# Bind the source and sink to the channel
agent1.sources.source1.channels = channel1
agent1.sinks.sink1.channel = channel1
2.flume中sink到hdfs,文件系统频繁产生文件,文件滚动配置不起作用
在测试hdfs的sink,发现sink端的文件滚动配置项起不到任何作用,配置如下:
a1.sinks.k1.type=hdfs
a1.sinks.k1.channel=c1
a1.sinks.k1.hdfs.useLocalTimeStamp=true
a1.sinks.k1.hdfs.path=hdfs://192.168.11.177:9000/flume/events/%Y/%m/%d/%H/%M
a1.sinks.k1.hdfs.filePrefix=XXX
a1.sinks.k1.hdfs.rollInterval=60
a1.sinks.k1.hdfs.rollSize=0
a1.sinks.k1.hdfs.rollCount=0
a1.sinks.k1.hdfs.idleTimeout=0
这里配置的是60秒,文件滚动一次,也就每隔60秒,会新产生一个文件【前提,flume的source端有数据来】但是当我启动flume的时候,运行十几秒,不断写入数据,发现hdfs端频繁的产生文件,每隔几秒就有新文件产生
而且在flume的日志输出可以频繁看到这句:
[WARN] Block Under-replication detected. Rotating file.
只要有这句,就会产生一个新的文件
意思就是检测到复制块正在滚动文件,结合源码看下:
private boolean shouldRotate() {
    boolean doRotate = false;

    if (writer.isUnderReplicated()) {
      this.isUnderReplicated = true;
      doRotate = true;
    } else {
      this.isUnderReplicated = false;
    }

    if ((rollCount > 0) && (rollCount <= eventCounter)) {
      LOG.debug("rolling: rollCount: {}, events: {}", rollCount, eventCounter);
      doRotate = true;
    }

    if ((rollSize > 0) && (rollSize <= processSize)) {
      LOG.debug("rolling: rollSize: {}, bytes: {}", rollSize, processSize);
      doRotate = true;
    }

    return doRotate;
  }
这是判断是否滚动文件,但是这里面的第一判断条件是判断是否当前的HDFSWriter正在复制块
public boolean isUnderReplicated() {
    try {
      int numBlocks = getNumCurrentReplicas();
      if (numBlocks == -1) {
        return false;
      }
      int desiredBlocks;
      if (configuredMinReplicas != null) {
        desiredBlocks = configuredMinReplicas;
      } else {
        desiredBlocks = getFsDesiredReplication();
      }
      return numBlocks < desiredBlocks;
    } catch (IllegalAccessException e) {
      logger.error("Unexpected error while checking replication factor", e);
    } catch (InvocationTargetException e) {
      logger.error("Unexpected error while checking replication factor", e);
    } catch (IllegalArgumentException e) {
      logger.error("Unexpected error while checking replication factor", e);
    }
    return false;
  }
通过读取的配置复制块数量和当前正在复制的块比较,判断是否正在被复制
if (shouldRotate()) {
      boolean doRotate = true;

      if (isUnderReplicated) {
        if (maxConsecUnderReplRotations > 0 &&
            consecutiveUnderReplRotateCount >= maxConsecUnderReplRotations) {
          doRotate = false;
          if (consecutiveUnderReplRotateCount == maxConsecUnderReplRotations) {
            LOG.error("Hit max consecutive under-replication rotations ({}); " +
                "will not continue rolling files under this path due to " +
                "under-replication", maxConsecUnderReplRotations);
          }
        } else {
          LOG.warn("Block Under-replication detected. Rotating file.");
        }
        consecutiveUnderReplRotateCount++;
      } else {
        consecutiveUnderReplRotateCount = 0;
      }
以上方法,入口是shouldRotate()方法,也就是如果你配置了rollcount,rollsize大于0,会按照你的配置来滚动的,但是在入口进来后,发现,又去判断了是否有块在复制;
里面就读取了一个固定变量maxConsecUnderReplRotations=30,也就是正在复制的块,最多之能滚动出30个文件,如果超过了30次,该数据块如果还在复制中,那么数据也不会滚动了,doRotate=false,不会滚动了,所以有的人发现自己一旦运行一段时间,会出现30个文件再结合上面的源码看一下:
如果你配置了10秒滚动一次,写了2秒,恰好这时候该文件内容所在的块在复制中,那么虽然没到10秒,依然会给你滚动文件的,文件大小,事件数量的配置同理了。
为了解决上述问题,我们只要让程序感知不到写的文件所在块正在复制就行了,怎么做呢??
只要让isUnderReplicated()方法始终返回false就行了
该方法是通过当前正在被复制的块和配置中读取的复制块数量比较的,我们能改的就只有配置项中复制块的数量,而官方给出的flume配置项中有该项
hdfs.minBlockReplicas
Specify minimum number of replicas per HDFS block. If not specified, it comes from the default Hadoop config in the classpath.
a1.sinks.k1.type=hdfs
a1.sinks.k1.channel=c1
a1.sinks.k1.hdfs.useLocalTimeStamp=true
a1.sinks.k1.hdfs.path=hdfs://192.168.11.177:9000/flume/events/%Y/%m/%d/%H/%M
a1.sinks.k1.hdfs.filePrefix=cmcc
a1.sinks.k1.hdfs.minBlockReplicas=1
#a1.sinks.k1.hdfs.fileType=DataStream
#a1.sinks.k1.hdfs.writeFormat=Text
a1.sinks.k1.hdfs.rollInterval=60
a1.sinks.k1.hdfs.rollSize=0
a1.sinks.k1.hdfs.rollCount=0
a1.sinks.k1.hdfs.idleTimeout=0
这样程序就永远不会因为文件所在块的复制而滚动文件了,只会根据你的配置项来滚动文件了,试试吧!!