分类目录归档:java资料

java之nslookup小程序–查询IP地址以及对应域名

本文主要介绍使用java实现nslookup小程序,nslookup主要用于查询IP和使用IP反查域名:

  1. 主要就是使用java.net.*这个大类(具体的类就不细讲)
  2. 输入域名输出IP
  3. 输入IP输出域名
  4. 第一个程序实现功能较为简单,第二个程序实现了更多功能
  5. 最后附录一个查询域名具体信息的网址
import java.net.*;
import java.util.regex.Pattern;
import java.io.*;

public class nslookup {
    public static void main(String[] args) {
        if (args.length > 0) {
            for (int i = 0; i < args.length; i++) {
                lookup(args[i]);
            }
        } else {
            BufferedReader in = new BufferedReader(new InputStreamReader(System.in));
            System.out.println("Enter the domain names or IP addresses. Enter \"exit\" to quit.");
            try {
                while (true) {
                    String host = in.readLine();
                    if (host.equalsIgnoreCase("exit")) {
                        break;
                    }
                    lookup(host);
                }
            } catch (IOException e) {
                e.printStackTrace();
            }
        }
    }

    private static void lookup(String host) {
        if(isDomain(host)) {
            try{
                InetAddress address = InetAddress.getByName(host);
                System.out.print("Address: ");
                System.out.println(address.getHostAddress());
            }catch(UnknownHostException e){
                e.printStackTrace();
            }
            // TODO Auto-generated method stub
        } else {
            try{
                InetAddress address = InetAddress.getByName(host);
                String hostName = address.getHostName();
                if(hostName.equals(host)){
                    System.out.println(host + "'s domain cant find");
                }else{
                    System.out.print("Domain: ");
                    System.out.println(hostName);
                }
            }catch(UnknownHostException e){
                e.printStackTrace();
            }
            // TODO Auto-generated method stub
        }
    }

    private static boolean isDomain(String host) {
        String[] part = host.split("\\.");
        if (part.length == 4) {
            for (String pa : part) {
                if (!isNumeric(pa)) {
                    return true;
                }
            }
            return false;
        } else {
            return true;
        }
    }

    public static boolean isNumeric(String str) {
        Pattern pattern = Pattern.compile("[0-9]*");
        return pattern.matcher(str).matches();
    }
}

这里写图片描述

import java.io.BufferedReader;
import java.io.IOException;
import java.io.InputStreamReader;
import java.net.InetAddress;
import java.net.NetworkInterface;
import java.net.SocketException;
import java.net.UnknownHostException;
import java.util.regex.Pattern;

public class nslookupAdvanced {
    public static void main(String[] args) {
        if (args.length > 0) {
            for (int i = 0; i < args.length; i++) {
                lookup(args[i]);
            }
        } else {
            BufferedReader in = new BufferedReader(new InputStreamReader(System.in));
            System.out.println("Enter the domain names or IP addresses. Enter \"exit\" to quit.");
            try {
                while (true) {
                    String host = in.readLine();
                    if (host.equalsIgnoreCase("exit")) {
                        break;
                    }
                    lookup(host);
                }
            } catch (IOException e) {
                e.printStackTrace();
            }
        }
    }

    private static void lookup(String host) {
        if(isDomain(host)) {
            try {
                InetAddress[] address = InetAddress.getAllByName(host);
                System.out.println("Address: ");
                for (int i = 0; i < address.length; i++) {
                    System.out.println(address[i].getHostAddress());
                }
                //判断是否本地
                NetworkInterface ni = NetworkInterface.getByInetAddress(address[0]);
                if (ni != null) {
                    System.out.print("This is local address.  ");
                    System.out.println(ni.getName());
                } else {
                    System.out.println("This is not local address.");
                }
            } catch (SocketException e) {
                e.printStackTrace();
            } catch (UnknownHostException e) {
                e.printStackTrace();
            }
            // TODO Auto-generated method stub
        } else {
            try {
                InetAddress address = InetAddress.getByName(host);
                System.out.println("Domain: ");
                String hostName = address.getHostName();
                if (hostName.equals(host)){
                    System.out.println(host + "'s domain can't be find!");
                }else{
                    System.out.println(hostName);
                }
                //判断是否本地
                NetworkInterface ni = NetworkInterface.getByInetAddress(address);
                if (ni != null) {
                    System.out.print("This is local address.  ");
                    System.out.println(ni.getName());
                } else {
                    System.out.println("This is not local address.");
                }
            } catch (SocketException e) {
                e.printStackTrace();
            } catch (UnknownHostException e) {
                e.printStackTrace();
            }
            // TODO Auto-generated method stub
        }
    }

    private static boolean isDomain(String host) {
        String[] part = host.split("\\.");
        if (part.length == 4) {
            for (String pa : part) {
                if (!isNumeric(pa)) {
                    return true;
                }
            }
            return false;
        } else {
            return true;
        }
    }

    public static boolean isNumeric(String str) {
        Pattern pattern = Pattern.compile("[0-9]*");
        return pattern.matcher(str).matches();
    }

}

这里写图片描述

spring mvc 2.5.6两例

spring 2.5.6用的已经很少了, 相关例子已经很少也不好找, 完整的能好用的就更少了, 下面是两个相对完整的, 并且有源代码的

另外, 下面项目最好在 jdk1.6的环境运行, 高版本的jdk可能有些问题, 例如jdk1.8  会报异常

Spring MVC hello world annotation example

This tutorial is based on Spring 2.5.6, quite outdated. Try considering the new tutorials :

  1. Gradle + Spring 4 MVC Hello World
  2. Maven + Spring 3 MVC Hello World

In this tutorial, we will take the previous Spring MVC hello world XML-based, and convert it to a annotation-based project.

Technologies used :

  1. Spring 2.5.6
  2. JDK 1.6
  3. Maven 3
  4. Eclipse 3.6

1. Directory Structure

如下图
s1

2. Maven

Spring’s annotation is bundled in the same spring-webmvc.jar.

pom.xml
<project xmlns="http://maven.apache.org/POM/4.0.0" 
	xmlns:xsi="http://www.w3.org/2001/XMLSchema-instance"
	xsi:schemaLocation="http://maven.apache.org/POM/4.0.0 
	http://maven.apache.org/maven-v4_0_0.xsd">
	<modelVersion>4.0.0</modelVersion>
	<groupId>com.mkyong.common</groupId>
	<artifactId>spring2-mvc-annotation-hello-world</artifactId>
	<packaging>war</packaging>
	<version>1.0-SNAPSHOT</version>
	<name>Spring 2 MVC</name>
	
	<properties>
		<jdk.version>1.6</jdk.version>
		<spring.version>2.5.6</spring.version>
		<jstl.version>1.2</jstl.version>
		<servletapi.version>2.5</servletapi.version>
	</properties>
	
	<dependencies>

		<!-- Spring MVC framework -->
		<dependency>
			<groupId>org.springframework</groupId>
			<artifactId>spring-webmvc</artifactId>
			<version>${spring.version}</version>
		</dependency>

		<!-- JSTL -->
		<dependency>
			<groupId>javax.servlet</groupId>
			<artifactId>jstl</artifactId>
			<version>${jstl.version}</version>
		</dependency>

		<!-- for compile only, your container should have this -->
		<dependency>
			<groupId>javax.servlet</groupId>
			<artifactId>servlet-api</artifactId>
			<version>${servletapi.version}</version>
			<scope>provided</scope>
		</dependency>
		
	</dependencies>

	<build>
		
	  <plugins>
		<plugin>
			<groupId>org.apache.maven.plugins</groupId>
			<artifactId>maven-compiler-plugin</artifactId>
			<version>3.3</version>
			<configuration>
				<source>${jdk.version}</source>
				<target>${jdk.version}</target>
			</configuration>
		</plugin>

		<plugin>
			<groupId>org.eclipse.jetty</groupId>
			<artifactId>jetty-maven-plugin</artifactId>
			<version>9.2.11.v20150529</version>
			<configuration>
				<scanIntervalSeconds>10</scanIntervalSeconds>
				<webApp>
					<contextPath>/spring2</contextPath>
				</webApp>
			</configuration>
		</plugin>

		<plugin>
			<groupId>org.apache.maven.plugins</groupId>
			<artifactId>maven-eclipse-plugin</artifactId>
			<version>2.9</version>
			<configuration>
				<downloadSources>true</downloadSources>
				<downloadJavadocs>true</downloadJavadocs>
				<wtpversion>2.0</wtpversion>
				<wtpContextName>spring2</wtpContextName>
			</configuration>
		</plugin>
			
	  </plugins>
		
	</build>

</project>

3. Controller & Handler Mapping

Now, you can use @Controller and @RequestMapping to replace the XML configuration.

  1. Controller – The controller class is no longer need to extend the base controller like AbstractController or SimpleFormController, just simply annotate the class with a @Controller annotation.
  2. Handler Mapping – No more declaration for the handler mapping like BeanNameUrlHandlerMapping, ControllerClassNameHandlerMapping or SimpleUrlHandlerMapping, all are replaced with a standard @RequestMapping annotation.
HelloWorldController.java
package com.mkyong.common.controller;
 
import org.springframework.stereotype.Controller;
import org.springframework.web.bind.annotation.RequestMapping;
import org.springframework.web.bind.annotation.RequestMethod;
import org.springframework.web.servlet.ModelAndView;

@Controller
@RequestMapping("/welcome")
public class HelloWorldController{
 
	@RequestMapping(method = RequestMethod.GET)
	public ModelAndView helloWorld(){
 
		ModelAndView model = new ModelAndView("HelloWorldPage");
		model.addObject("msg", "hello world");
 
		return model;
	}
}

If the @RequestMapping is applied at the class level (can apply at method level with multi-actions controller), it required to put a RequestMethod to indicate which method to handle the mapping request.

In this case, if a URI pattern /welcome is requested, it will map to this HelloWorldController, and handle the request with helloWorld() method.

4. Spring XML Configuration

You still need to configure the view resolver and component scanning in XML file.

/WEB-INF/spring-mvc-config.xml
<beans xmlns="http://www.springframework.org/schema/beans"
	xmlns:xsi="http://www.w3.org/2001/XMLSchema-instance" 
	xmlns:context="http://www.springframework.org/schema/context"
	xsi:schemaLocation="http://www.springframework.org/schema/beans 

http://www.springframework.org/schema/beans/spring-beans-2.5.xsd


http://www.springframework.org/schema/context

	http://www.springframework.org/schema/context/spring-context-2.5.xsd">

	<bean id="viewResolver"
		class="org.springframework.web.servlet.view.InternalResourceViewResolver">
		<property name="prefix">
			<value>/WEB-INF/pages/</value>
		</property>
		<property name="suffix">
			<value>.jsp</value>
		</property>
	</bean>
	
	<context:component-scan base-package="com.mkyong.common.controller" />

</beans>

5. JSP Page

A simple JSP page for demonstration.

HelloWorldPage.jsp.
<%@ taglib prefix="c" uri="http://java.sun.com/jsp/jstl/core"%>
<html>
<body>
	<h1>Spring MVC Hello World Annotation Example</h1>

	<h2>${msg}</h2>
</body>
</html>

6. web.xml

web.xml
<web-app id="WebApp_ID" version="2.4"
	xmlns="http://java.sun.com/xml/ns/j2ee" 
	xmlns:xsi="http://www.w3.org/2001/XMLSchema-instance"
	xsi:schemaLocation="http://java.sun.com/xml/ns/j2ee 
	http://java.sun.com/xml/ns/j2ee/web-app_2_4.xsd">

	<display-name>Spring Web MVC Application</display-name>

	<servlet>
		<servlet-name>mvc-dispatcher</servlet-name>
		<servlet-class>org.springframework.web.servlet.DispatcherServlet</servlet-class>
		<init-param>
			<param-name>contextConfigLocation</param-name>
			<param-value>/WEB-INF/spring-mvc-config.xml</param-value>
		</init-param>
		<load-on-startup>1</load-on-startup>
	</servlet>

	<servlet-mapping>
		<servlet-name>mvc-dispatcher</servlet-name>
		<url-pattern>*.htm</url-pattern>
	</servlet-mapping>

</web-app>

7. Demo

6.1 To run with the embedded Jetty, type :

$ mvn jetty:run

URL : http://localhost:8080/spring2/welcome.htm

s2

6.2 To import into Eclipse IDE.

$ mvn eclipse:eclipse
Note
If you compare this Spring MVC annotation-based hello world example with previously XML-based example, you can see that this annotation approach is easier and flexible in wiring the controller class and URL handler mapping, because you do not need to declare the controller class explicitly or extends any particular class.

Download Source Code

Download it – spring2-mvc-annotation.zip (15 KB)

References

  1. Controller Javadoc
  2. RequestMapping Javadoc
  3. Spring MVC hello world XML-based example
  4. Spring auto scanning components

SpringMVC DispatcherServlet代码分析及运行过程

1          首先该类有一静态语块,用以加载缺省策略。

    static {

            ClassPathResource resource = new ClassPathResource(DEFAULT_STRATEGIES_PATH, DispatcherServlet.class);

            defaultStrategies = PropertiesLoaderUtils.loadProperties(resource);

}

缺省的策略文件为当前包下的DispatcherServlet.properties,主要包括

LocaleResolver(本地化解析器,AcceptHeaderLocaleResolver)

ThemeResolver(主题解析器,FixedThemeResolver)

HandlerMapping(处理器映射,BeanNameUrlHandlerMapping)

HandlerAdapter(控制适配器,多个)

ViewResolver(视图解析器,InternalResourceViewResolver)

RequestToViewNameTranslator(请求到视图名的翻译器,DefaultRequestToViewNameTranslator)

2 通过继承关系调用HttpServletBean类的init()初始化方法


在该方法体内,首先将这个servlet视为一个bean对其包装并将配置文件中当前servlet下的初始参数值赋倒这个servlet中。然后调用子类(FrameworkServlet)的initServletBean(),而子类通过模板模式再调用其子类(DispatcherServlet)的initFrameworkServlet()方法。在initServletBean()方法中主要代码片段如下:

            this.webApplicationContext = initWebApplicationContext();

            initFrameworkServlet();

而在initWebApplicationContext()中,它首先是从ServletContext中获得由ContextLoader类设置进的key为WebApplicationContext.ROOT_WEB_APPLICATION_CONTEXT_ATTRIBUTE属性的值(即Spring容器的实例),然后以实例为parent创建一个新的容器。这也是为什么说一个DispatcherServlet就对应一个WebApplicationContext(每个DispatcherServlet都有各自的上下文)。最后将该WebApplicationContext绑定到到ServletContext上,如果允许发布话。

由此可以看出:

WebApplicationContextUtils.getWebApplicationContext(servletContext)与

servletContext.getAttribute(SERVLET_CONTEXT_PREFIX+ getServletName())之间的主要区别在于:后者包括了该servlet的所有配置信息而前者是全局性的没有这部分信息

3          类DispatcherServletinitFrameworkServlet()方法初始化工作

        initMultipartResolver();

        initLocaleResolver();

        initThemeResolver();

        initHandlerMappings();

        initHandlerAdapters();

        initHandlerExceptionResolvers();

        initRequestToViewNameTranslator();

        initViewResolvers();

    如果在配置文件没有设置将缺省的策略文件DispatcherServlet.properties。由此可见,因为DispatcherServlet是单例的,所以设置的信息是全局的也就是所有的解析器不能动态的变化。

4          当调用类FrameworkServlet中的doGet()/doPost()/doPut()/doDelete()方法时

以上方法均调用相同方法processRequest(request, response)。注意:Spring放弃了对HttpServlet中service()方法的覆盖而用具体的操作方法取代。

5          调用类FrameworkServlet中的processRequest(request, response)方法

        try {

        doService(request, response);

     }

        finally {

            if (isPublishEvents()) {

                this.webApplicationContext.publishEvent(

                    new ServletRequestHandledEvent(this,

                    request.getRequestURI(), request.getRemoteAddr(),

                    request.getMethod(), getServletConfig().getServletName(),

                    WebUtils.getSessionId(request), getUsernameForRequest(request),

                                processingTime, failureCause));

            }

     }

通过代码摘要可以看出该类有一个webApplicationContext引用,除了执行doService()这个核心方法外,每次都会发布一个ServletRequestHandledEvent事件如果publishEvents为true,其值可以在web.xml文件中增加添加context参数,或servlet初始化参数(

<init-param>

<param-name>contextConfigLocation</param-name> <param-value>/WEB-INF/application.xml</param-value>

</init-param>)。

DispatcherServlet初始化参数

参数

描述

contextClass

实现WebApplicationContext接口的类,当前的servlet用它来创建上下文。如果这个参数没有指定,默认使用XmlWebApplicationContext。

contextConfigLocation

传给上下文实例(由contextClass指定)的字符串,用来指定上下文的位置。这个字符串可以被分成多个字符串(使用逗号作为分隔符)来支持多个上下文(在多上下文的情况下,如果同一个bean被定义两次,后面一个优先)。

namespace

WebApplicationContext命名空间。默认值是[server-name]-servlet。

publishContext

我们发布的context是作为ServletContext的一个属性吗?默认值为true,属性名为SERVLET_CONTEXT_PREFIX+ getServletName()

publishEvents

在执行每个请求后是否发布一个ServletRequestHandledEvent事件?默认值为true

    以上参数的初始加载是在HttpServletBean类的init()中,而所有DispatcherServlet的解析器是在initFrameworkServlet()方法中。

由此可见,DispatcherServlet的初始参数加载来源可分为两部分,

5.1       在web.xml文件对于该servlet配置的<init-param>初始参数中

5.2       通过Spring的IOC容器实例化后,通过该类的初始化方法,将容器内的实例一一引用

6          调用类DispatcherServlet中的doService(request, response)方法

暴露在request属性中DispatchServlet的一些特性,并且调用doDispatch(request, response)方法执行真正的分发动作。

         request.setAttribute(WEB_APPLICATION_CONTEXT_ATTRIBUTE, getWebApplicationContext());

request.setAttribute(LOCALE_RESOLVER_ATTRIBUTE, this.localeResolver);

    request.setAttribute(THEME_RESOLVER_ATTRIBUTE, this.themeResolver);

    request.setAttribute(THEME_SOURCE_ATTRIBUTE, getThemeSource());

    try {

        doDispatch(request, response);

    }

7          调用类DispatcherServlet中的doDispatch(request, response)方法

7.1         在区域上下文持有者(LocaleContextHolder中当前线程下的值做一次替换。暴露当前localeResolver与request中的Locale

        LocaleContext previousLocaleContext = LocaleContextHolder.getLocaleContext();

        LocaleContextHolder.setLocaleContext(new LocaleContext() {

            public Locale getLocale() {

                returnlocaleResolver.resolveLocale(request);

            }});

由源码可见,将当前线程下的LocaleContext取出,再从当前区域解析器(LocaleResolver)中得到Locale前创建为LocaleContext后再赋到LocaleContextHolder中

7.2       在请求上下文持有者(RequestContextHolder中当前线程下的值做一次替换。暴露当前RequestAttributes到当前线程中

RequestAttributes previousRequestAttributes = RequestContextHolder.getRequestAttributes();

ServletRequestAttributes requestAttributes = new ServletRequestAttributes(request);

RequestContextHolder.setRequestAttributes(requestAttributes);

    在此注意,ServletRequestAttributes类只能获得session或request有属性,而无法获得request的参数(parameter)

7.3       转换request为MultipartHttpServletRequest类型的实例,如果不是就简单的返回

        protected HttpServletRequest checkMultipart(HttpServletRequest request) {

if (this.multipartResolver != null && this.multipartResolver.isMultipart(request)) {

            if (request instanceof MultipartHttpServletRequest) {

            }

            else

                returnthis.multipartResolver.resolveMultipart(request);

            }

        return request;

    }

由代码可以看出,如果要支持文件上传要有两个前提

1.在应用的配置文件中添加MultipartResolver(分段文件解析器),目前Spring支持两种上传文件的开源项目Commons FileUpload(http://jakarta.apache.org/commons/fileupload)和COSFileUpload (http://www.servlets.com/cos)

<bean id="multipartResolver" class="org.springframework.web.multipart.commons.CommonsMultipartResolver"/>

<bean id="multipartResolver" class="org.springframework.web.multipart.cos.CosMultipartResolver"/>

注意:Bean的id必须为’multipartResolver’, DispatcherServlet中的成员属性this.multipartResolver是在初始化时与容器中的实例引用在一起的。

2. 通过multipartResolver.isMultipart(request)判断request的ContextType是否是’multipart/form-data’。所以表单格式应为

<form method="post" action="upload.form" enctype="multipart/form-data">

<input type="file" name="file"/><input type="submit"/>

这个元素的名字(“file”)和服务器端处理这个表单的bean(在下面将会提到)中类型为byte[]的属性名相同。在这个表单里我们也声明了编码参数(enctype="multipart/form-data")以便让浏览器知道如何对这个文件上传表单进行编码

最后由相应的MultipartResolver(分段文件解析器)将request封装为与解析器对应的MultipartHttpServletRequest实例并返回

7.4       根据当前请求URL为其找到指定的处理器(handler)与栏截器(HandlerInterceptor),并将它们封装为HandlerExecutionChain实例。

HandlerExecutionChain mappedHandler = getHandler(processedRequest, false);

在此过程中分为如下几个步骤

1.    循环所有已注册的HandlerMapping(处理器映射),对于不同的处理器映射对其映射的处理方式不同。BeanNameUrlHandlerMapping只要在配置文件中bean元素的name属性以/开头它都认为是一个映射如<bean name=”/editaccount”>。而SimpleUrlHandlerMapping只关注自身定义的<property name=”mappings”>下的那些映射,而且支持Ant风格的定义

2.    通过客户请求的URL与处理器映映射的键值做匹配(也可以使用Ant风格匹配,参见AbstractUrlHandlerMapping.lookupHandler()方法),如果满足匹配条件,就返回与其对应的处理器(Handler),一般情况下,都是Controller(控制器)接口子孙类的实例。

3.    根据匹配上的处理器映射取得拦截器数组,并与找到的处理器一同作为构建函数的参数创建出HandlerExecutionChain实例

7.5       执行所有拦截器的前置方法

HandlerInterceptor接口提供了如下三个方法:

1.    preHandle(…)前置方法,在处理器执行前调用,当返回false时,DispatcherServlet认为该拦截器已经处理完了请求,而不再继续执行执行链中的其它拦截器和处理器

2.    postHandle(…)后置方法,在处理器执行后调用

3.    afterCompletion(…)完成前置方法,在整个请求完后调用。注意如果第n个拦截器的preHandle方法返回的是false则只会调用第n个拦截器之前所有该方法,而n++不会被调用

另:Spring还提供了一个adapter类HandlerInterceptorAdapter让用户更方便的扩展HandlerInterceptor接口

7.6       获得与当前处理器相匹配的HandlerAdapter(处理器适配器),

    protected HandlerAdapter getHandlerAdapter(Object handler) throws ServletException {

        Iterator it = this.handlerAdapters.iterator();

        while (it.hasNext()) {

            HandlerAdapter ha = (HandlerAdapter) it.next();

            if (ha.supports(handler)) {

                return ha;

            }

    }

循环所有已注册的HandlerAdapter(处理器适配器),如果该适配器支持ha.supports(handler)当前处理器,就返回。由此可见,Spring通过HandlerAdapter使处理器解耦,实处理器(Handler)不只是仅仅局限于控制器(Controller)这一种形式。目前Spring可以支持,ServletHttpRequestHandlerThrowawayControllerController,从这一点上看Spring已为客户留出了很大空间作为扩展的口子。

7.7       根据处理器适配器调用处理器的指定方法,执行真正的处理操作。如Controller(控制器)接口调用handleRequest() 、ThrowawayController接口调用execute()、Servlet接口调用service()….但无论调用那种自理器,HandlerAdapter中的handle()方法都要求返回ModelAndView的一个实例

mv = ha.handle(processedRequest, response, mappedHandler.getHandler());

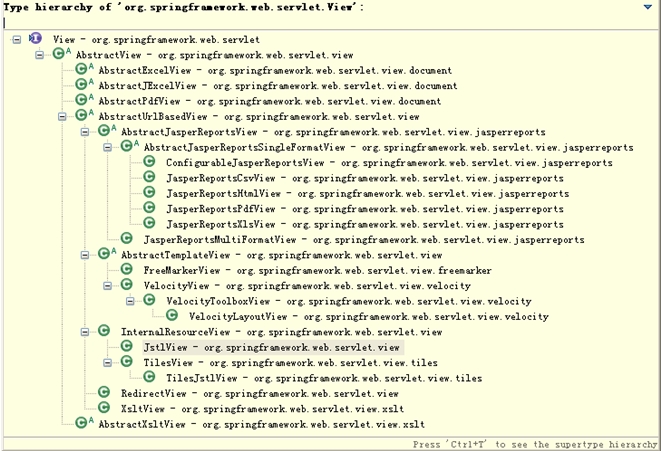
在Spring中最常用的处理器是以Controller接口下的所有子孙类控制器,继承结构如图


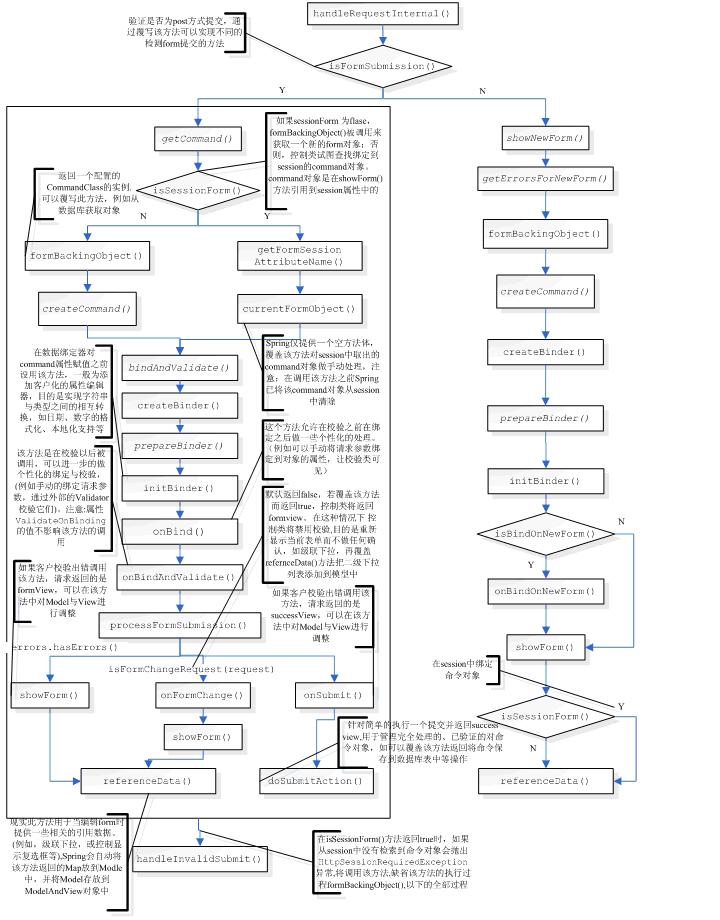
在这些控制器中又以SimpleFormController控制器最为常用,下图为该类的完整执行过程


7.8       执行所有拦截器的后置方法

7.9       根据处理器(Handle)返回的ModelAndView对象,找到或创建View对象,并调用View对象的render()方法

render(mv, processedRequest, response)

在此有几个关键性的概念:

ModelAndView:它是模形(Model,实际上只是一个Map,最终会将模形存放到request的属性中,以Map的key为request属性的键,Map的value为值)与视图(View)的持有者。而View又提供了两种形态,即以View接口为祖先的实例对象,以字符串的视图的名字。该类通过isReference()方法判断是一个字符串的引用还是一个真正的View对象。注意:该类有些奇怪:它将有状态的Model与无状态的View合并到一个类中,这就导致每次请求都到对该类型的实例进行创建,而不无缓存。View对象Spring提供了缓存功能。

ViewResolver(视图解析器):主要提供的功能是从视图名称到实际视图的映射。也就是说只有ModelAndView的isReference()返回true时,才会对视图的名字做解析工作。这使视图解析与真正的视图相分离,这样我们就可以通过不同的方式配置视图,如可以采用properties、xml或是提供URI的前、后缀等形式配置视图。但要注意视图解析器与视图之间还是紧密的关系,Sping在此没实现全部的完全解耦

ViewResolver

描述

AbstractCachingViewResolver

抽象视图解析器实现了对视图的缓存。在视图被投入使用之前,通常需要进行一些准备工作。从它继承的视图解析器将对要解析的视图进行缓存。

InternalResourceViewResolver

作为UrlBasedViewResolver的子类,它支持InternalResourceView(对Servlet和JSP的包装),以及其子类JstlViewTilesView。通过setViewClass方法,可以指定用于该解析器生成视图使用的视图类。

UrlBasedViewResolver

UrlBasedViewResolver实现ViewResolver,将视图名直接解析成对应的URL,不需要显式的映射定义。如果你的视图名和视图资源的名字是一致的,就可使用该解析器,而无需进行映射。

ResourceBundleViewResolver

ResourceBundleViewResolver实现ViewResolver,在一个ResourceBundle中寻找所需bean的定义。这个bundle通常定义在一个位于classpath中的属性文件中。默认的属性文件是views.properties

XmlViewResolver

XmlViewResolver实现ViewResolver,支持XML格式的配置文件。该配置文件必须采用与Spring XML Bean Factory相同的DTD。默认的配置文件是/WEB-INF/views.xml

VelocityViewResolver / FreeMarkerViewResolver

作为UrlBasedViewResolver的子类,它能支持VelocityView(对Velocity模版的包装)和FreeMarkerView以及它们的子类。

View(视图):处理请求的准备工作,并将该请求提交给某种具体的视图技术。

如,InternalResourceView会通过RequestDispatcher类调用include()或forward()方法

  RedirectView会通过HttpServletResponse类调用sendRedirect()方法

AbstractExcelView会产生一个输出流

区别:

1、forward与include区别在于forward本意是让第一个页面处理request,第二个页面处理response.调用第二个页面后,程序还会返回第一个页面继续执行,但是此时再使用response输出已经没有作用了;include服务器端的动态加载,执行完第二个页面的程序后可以回到第一个页面继续输出,即将第二个页面的输出拉到第一个页面中。

2、forward与include共享Request范围内的对象,而redirect则不行,即:如果一个javabean被声明为request范围的话,则被forward到的资源也可以访问这个javabean,而redriect则不行。

3、forward与include基本上都是转发到context内部的资源,而redirect可以重定向到外部的资源,如: req.sendRedriect("http://www.mocuai.com");


来源: http://www.cnblogs.com/j-hi/archive/2011/03/13/1982584.html

Spring定时任务的几种实现

来源:http://gong1208.iteye.com/blog/1773177
近日项目开发中需要执行一些定时任务,比如需要在每天凌晨时候,分析一次前一天的日志信息,借此机会整理了一下定时任务的几种实现方式,由于项目采用spring框架,所以我都将结合

spring框架来介绍。

一.分类

  • 从实现的技术上来分类,目前主要有三种技术(或者说有三种产品):

  1. Java自带的java.util.Timer类,这个类允许你调度一个java.util.TimerTask任务。使用这种方式可以让你的程序按照某一个频度执行,但不能在指定时间运行。一般用的较少,这篇文章将不做详细介绍。
  2. 使用Quartz,这是一个功能比较强大的的调度器,可以让你的程序在指定时间执行,也可以按照某一个频度执行,配置起来稍显复杂,稍后会详细介绍。
  3. Spring3.0以后自带的task,可以将它看成一个轻量级的Quartz,而且使用起来比Quartz简单许多,稍后会介绍。
  • 从作业类的继承方式来讲,可以分为两类:

  1. 作业类需要继承自特定的作业类基类,如Quartz中需要继承自org.springframework.scheduling.quartz.QuartzJobBean;java.util.Timer中需要继承自java.util.TimerTask。
  2. 作业类即普通的java类,不需要继承自任何基类。

注:个人推荐使用第二种方式,因为这样所以的类都是普通类,不需要事先区别对待。


  • 从任务调度的触发时机来分,这里主要是针对作业使用的触发器,主要有以下两种:
  1. 每隔指定时间则触发一次,在Quartz中对应的触发器为:org.springframework.scheduling.quartz.SimpleTriggerBean
  2. 每到指定时间则触发一次,在Quartz中对应的调度器为:org.springframework.scheduling.quartz.CronTriggerBean

注:并非每种任务都可以使用这两种触发器,如java.util.TimerTask任务就只能使用第一种。Quartz和spring task都可以支持这两种触发条件。


二.用法说明

详细介绍每种任务调度工具的使用方式,包括Quartz和spring task两种。

Quartz

第一种,作业类继承自特定的基类:org.springframework.scheduling.quartz.QuartzJobBean。

第一步:定义作业类


  1. import org.quartz.JobExecutionContext;
  2. import org.quartz.JobExecutionException;
  3. import org.springframework.scheduling.quartz.QuartzJobBean;
  4. public class Job1 extends QuartzJobBean {
  5. private int timeout;
  6. private static int i = 0;
  7. //调度工厂实例化后,经过timeout时间开始执行调度
  8. public void setTimeout(int timeout) {
  9. this.timeout = timeout;
  10. }
  11. /**
  12. * 要调度的具体任务
  13. */
  14. @Override
  15. protected void executeInternal(JobExecutionContext context)
  16. throws JobExecutionException {
  17.   System.out.println("定时任务执行中…");
  18. }
  19. }

 第二步:spring配置文件中配置作业类JobDetailBean

  1. <bean name="job1" class="org.springframework.scheduling.quartz.JobDetailBean">
  2. <property name="jobClass" value="com.gy.Job1" />
  3. <property name="jobDataAsMap">
  4. <map>
  5. <entry key="timeout" value="0" />
  6. </map>
  7. </property>
  8. </bean>

说明:org.springframework.scheduling.quartz.JobDetailBean有两个属性,jobClass属性即我们在java代码中定义的任务类,jobDataAsMap属性即该任务类中需要注入的属性值。

第三步:配置作业调度的触发方式(触发器)

Quartz的作业触发器有两种,分别是

org.springframework.scheduling.quartz.SimpleTriggerBean

org.springframework.scheduling.quartz.CronTriggerBean

第一种SimpleTriggerBean,只支持按照一定频度调用任务,如每隔30分钟运行一次。

配置方式如下:


  1. <bean id="simpleTrigger" class="org.springframework.scheduling.quartz.SimpleTriggerBean">
  2. <property name="jobDetail" ref="job1" />
  3. <property name="startDelay" value="0" /><!-- 调度工厂实例化后,经过0秒开始执行调度 -->
  4. <property name="repeatInterval" value="2000" /><!-- 每2秒调度一次 -->
  5. </bean>

第二种CronTriggerBean,支持到指定时间运行一次,如每天12:00运行一次等。

配置方式如下:

  1. <bean id="cronTrigger" class="org.springframework.scheduling.quartz.CronTriggerBean">
  2. <property name="jobDetail" ref="job1" />
  3. <!—每天12:00运行一次 -->
  4. <property name="cronExpression" value="0 0 12 * * ?" />
  5. </bean>

关于cronExpression表达式的语法参见附录。

第四步:配置调度工厂 

  1. <bean class="org.springframework.scheduling.quartz.SchedulerFactoryBean">
  2. <property name="triggers">
  3. <list>
  4. <ref bean="cronTrigger" />
  5. </list>
  6. </property>
  7. </bean>

说明:该参数指定的就是之前配置的触发器的名字。

第五步:启动你的应用即可,即将工程部署至tomcat或其他容器。


第二种,作业类不继承特定基类。

Spring能够支持这种方式,归功于两个类:

org.springframework.scheduling.timer.MethodInvokingTimerTaskFactoryBean

org.springframework.scheduling.quartz.MethodInvokingJobDetailFactoryBean

这两个类分别对应spring支持的两种实现任务调度的方式,即前文提到到java自带的timer task方式和Quartz方式。这里我只写MethodInvokingJobDetailFactoryBean的用法,使用该类的好处是,我们的任 务类不再需要继承自任何类,而是普通的pojo。

第一步:编写任务类

  1. public class Job2 {
  2. public void doJob2() {
  3. System.out.println("不继承QuartzJobBean方式-调度进行中...");
  4. }
  5. }

可以看出,这就是一个普通的类,并且有一个方法。

第二步:配置作业类

  1. <bean id="job2"
  2. class="org.springframework.scheduling.quartz.MethodInvokingJobDetailFactoryBean">
  3. <property name="targetObject">
  4. <bean class="com.gy.Job2" />
  5. </property>
  6. <property name="targetMethod" value="doJob2" />
  7. <property name="concurrent" value="false" /><!-- 作业不并发调度 -->
  8. </bean>

说明:这一步是关键步骤,声明一个MethodInvokingJobDetailFactoryBean,有两个关键属性:targetObject指定任务类,targetMethod指定运行的方法。往下的步骤就与方法一相同了,为了完整,同样贴出。

第三步:配置作业调度的触发方式(触发器)

Quartz的作业触发器有两种,分别是

org.springframework.scheduling.quartz.SimpleTriggerBean

org.springframework.scheduling.quartz.CronTriggerBean

第一种SimpleTriggerBean,只支持按照一定频度调用任务,如每隔30分钟运行一次。

配置方式如下:

  1. <bean id="simpleTrigger" class="org.springframework.scheduling.quartz.SimpleTriggerBean">
  2. <property name="jobDetail" ref="job2" />
  3. <property name="startDelay" value="0" /><!-- 调度工厂实例化后,经过0秒开始执行调度 -->
  4. <property name="repeatInterval" value="2000" /><!-- 每2秒调度一次 -->
  5. </bean>

第二种CronTriggerBean,支持到指定时间运行一次,如每天12:00运行一次等。

配置方式如下:

  1. <bean id="cronTrigger" class="org.springframework.scheduling.quartz.CronTriggerBean">
  2. <property name="jobDetail" ref="job2" />
  3. <!—每天12:00运行一次 -->
  4. <property name="cronExpression" value="0 0 12 * * ?" />
  5. </bean>

以上两种调度方式根据实际情况,任选一种即可。

第四步:配置调度工厂 

  1. <bean class="org.springframework.scheduling.quartz.SchedulerFactoryBean">
  2. <property name="triggers">
  3. <list>
  4. <ref bean="cronTrigger" />
  5. </list>
  6. </property>
  7. </bean>

说明:该参数指定的就是之前配置的触发器的名字。

第五步:启动你的应用即可,即将工程部署至tomcat或其他容器。


到此,spring中Quartz的基本配置就介绍完了,当然了,使用之前,要导入相应的spring的包与Quartz的包,这些就不消多说了。

其实可以看出Quartz的配置看上去还是挺复杂的,没有办法,因为Quartz其实是个重量级的工具,如果我们只是想简单的执行几个简单的定时任务,有没有更简单的工具,有!

请看我第下文Spring task的介绍。


Spring-Task

上节介绍了在Spring 中使用Quartz,本文介绍Spring3.0以后自主开发的定时任务工具,spring task,可以将它比作一个轻量级的Quartz,而且使用起来很简单,除spring相关的包外不需要额外的包,而且支持注解和配置文件两种

形式,下面将分别介绍这两种方式。

第一种:配置文件方式

第一步:编写作业类

即普通的pojo,如下:

  1. import org.springframework.stereotype.Service;
  2. @Service
  3. public class TaskJob {
  4.     public void job1() {
  5.         System.out.println(“任务进行中。。。”);
  6.     }
  7. }

 第二步:在spring配置文件头中添加命名空间及描述

  1. <beans xmlns="http://www.springframework.org/schema/beans"
  2.     xmlns:task="http://www.springframework.org/schema/task"
  3.     。。。。。。
  4.     xsi:schemaLocation="http://www.springframework.org/schema/task http://www.springframework.org/schema/task/spring-task-3.0.xsd">

 第三步:spring配置文件中设置具体的任务

  1.  <task:scheduled-tasks>
  2.         <task:scheduled ref="taskJob" method="job1" cron="0 * * * * ?"/>
  3. </task:scheduled-tasks>
  4. <context:component-scan base-package=" com.gy.mytask " />

说明:ref参数指定的即任务类,method指定的即需要运行的方法,cron及cronExpression表达式,具体写法这里不介绍了,详情见上篇文章附录。

<context:component-scan base-package="com.gy.mytask" />这个配置不消多说了,spring扫描注解用的。

到这里配置就完成了,是不是很简单。

第二种:使用注解形式

也许我们不想每写一个任务类还要在xml文件中配置下,我们可以使用注解@Scheduled,我们看看源文件中该注解的定义:

  1. @Target({java.lang.annotation.ElementType.METHOD, java.lang.annotation.ElementType.ANNOTATION_TYPE})
  2. @Retention(RetentionPolicy.RUNTIME)
  3. @Documented
  4. public @interface Scheduled
  5. {
  6.   public abstract String cron();
  7.   public abstract long fixedDelay();
  8.   public abstract long fixedRate();
  9. }

可以看出该注解有三个方法或者叫参数,分别表示的意思是:

cron:指定cron表达式

fixedDelay:官方文档解释:An interval-based trigger where the interval is measured from the completion time of the previous task. The time unit value is measured in milliseconds.即表示从上一个任务完成开始到下一个任务开始的间隔,单位是毫秒。

fixedRate:官方文档解释:An interval-based trigger where the interval is measured from the start time of the previous task. The time unit value is measured in milliseconds.即从上一个任务开始到下一个任务开始的间隔,单位是毫秒。


下面我来配置一下。

第一步:编写pojo

  1. import org.springframework.scheduling.annotation.Scheduled;
  2. import org.springframework.stereotype.Component;
  3. @Component(“taskJob”)
  4. public class TaskJob {
  5.     @Scheduled(cron = "0 0 3 * * ?")
  6.     public void job1() {
  7.         System.out.println(“任务进行中。。。”);
  8.     }
  9. }

 第二步:添加task相关的配置:

  1. <?xml version="1.0" encoding="UTF-8"?>
  2. <beans xmlns="http://www.springframework.org/schema/beans"
  3.     xmlns:xsi="http://www.w3.org/2001/XMLSchema-instance" xmlns:aop="http://www.springframework.org/schema/aop"
  4.     xmlns:context="http://www.springframework.org/schema/context"
  5.     xmlns:tx="http://www.springframework.org/schema/tx"
  6.     xmlns:task="http://www.springframework.org/schema/task"
  7.     xsi:schemaLocation="
  8.         http://www.springframework.org/schema/beans http://www.springframework.org/schema/beans/spring-beans-3.0.xsd
  9.         http://www.springframework.org/schema/aop http://www.springframework.org/schema/aop/spring-aop-3.0.xsd
  10.         http://www.springframework.org/schema/context
  11. http://www.springframework.org/schema/jdbc/spring-jdbc-3.0.xsd
  12.         http://www.springframework.org/schema/tx http://www.springframework.org/schema/tx/spring-tx-3.0.xsd
  13.         http://www.springframework.org/schema/task http://www.springframework.org/schema/task/spring-task-3.0.xsd"
  14.     default-lazy-init="false">
  15.     <context:annotation-config />
  16.     <!—spring扫描注解的配置   -->
  17.     <context:component-scan base-package="com.gy.mytask" />
  18. <!—开启这个配置,spring才能识别@Scheduled注解   -->
  19.     <task:annotation-driven scheduler="qbScheduler" mode="proxy"/>
  20.     <task:scheduler id="qbScheduler" pool-size="10"/>

说明:理论上只需要加上<task:annotation-driven />这句配置就可以了,这些参数都不是必须的。


Ok配置完毕,当然spring task还有很多参数,我就不一一解释了,具体参考xsd文档http://www.springframework.org/schema/task/spring-task-3.0.xsd。

附录:

cronExpression的配置说明,具体使用以及参数请百度google

字段   允许值   允许的特殊字符

秒    0-59    , - * /

分    0-59    , - * /

小时    0-23    , - * /

日期    1-31    , - * ? / L W C

月份    1-12 或者 JAN-DEC    , - * /

星期    1-7 或者 SUN-SAT    , - * ? / L C #

年(可选)    留空, 1970-2099    , - * / 

- 区间  

* 通配符  

? 你不想设置那个字段

下面只例出几个式子


CRON表达式    含义 

"0 0 12 * * ?"    每天中午十二点触发 

"0 15 10 ? * *"    每天早上10:15触发 

"0 15 10 * * ?"    每天早上10:15触发 

"0 15 10 * * ? *"    每天早上10:15触发 

"0 15 10 * * ? 2005"    2005年的每天早上10:15触发 

"0 * 14 * * ?"    每天从下午2点开始到2点59分每分钟一次触发 

"0 0/5 14 * * ?"    每天从下午2点开始到2:55分结束每5分钟一次触发 

"0 0/5 14,18 * * ?"    每天的下午2点至2:55和6点至6点55分两个时间段内每5分钟一次触发 

"0 0-5 14 * * ?"    每天14:00至14:05每分钟一次触发 

"0 10,44 14 ? 3 WED"    三月的每周三的14:10和14:44触发 

"0 15 10 ? * MON-FRI"    每个周一、周二、周三、周四、周五的10:15触发 

LDAP服务器的概念和原理简单介绍

1. 目录服务

目录是一个为查询、浏览和搜索而优化的专业分布式数据库,它呈树状结构组织数据,就好象Linux/Unix系统中的文件目录一样。目录数据库和关系数据库不同,它有优异的读性能,但写性能差,并且没有事务处理、回滚等复杂功能,不适于存储修改频繁的数据。所以目录天生是用来查询的,就好象它的名字一样。

目录服务是由目录数据库和一套访问协议组成的系统。类似以下的信息适合储存在目录中:

  • 企业员工信息,如姓名、电话、邮箱等;
  • 公用证书和安全密钥;
  • 公司的物理设备信息,如服务器,它的IP地址、存放位置、厂商、购买时间等;

LDAP是轻量目录访问协议(Lightweight Directory Access Protocol)的缩写,LDAP是从X.500目录访问协议的基础上发展过来的,目前的版本是v3.0。与LDAP一样提供类似的目录服务软件还有ApacheDS、Active Directory、Red Hat Directory Service 。

2. LDAP特点

  • LDAP的结构用树来表示,而不是用表格。正因为这样,就不能用SQL语句了
  • LDAP可以很快地得到查询结果,不过在写方面,就慢得多
  • LDAP提供了静态数据的快速查询方式
  • Client/server模型,Server 用于存储数据,Client提供操作目录信息树的工具
  • 这些工具可以将数据库的内容以文本格式(LDAP 数据交换格式,LDIF)呈现在您的面前
  • LDAP是一种开放Internet标准,LDAP协议是跨平台的Interent协议

3. LDAP组织数据的方式

4. 基本概念

在浏览LDAP相关文档时经常会遇见一些概念,下面是常见概念的简单解释。

4.1 Entry

条目,也叫记录项,是LDAP中最基本的颗粒,就像字典中的词条,或者是数据库中的记录。通常对LDAP的添加、删除、更改、检索都是以条目为基本对象的。

dn:每一个条目都有一个唯一的标识名(distinguished Name ,DN),如上图中一个 dn:"cn=baby,ou=marketing,ou=people,dc=mydomain,dc=org" 。通过DN的层次型语法结构,可以方便地表示出条目在LDAP树中的位置,通常用于检索。

rdn:一般指dn逗号最左边的部分,如cn=baby。它与RootDN不同,RootDN通常与RootPW同时出现,特指管理LDAP中信息的最高权限用户。

Base DN:LDAP目录树的最顶部就是根,也就是所谓的“Base DN",如"dc=mydomain,dc=org"。

4.2 Attribute

每个条目都可以有很多属性(Attribute),比如常见的人都有姓名、地址、电话等属性。每个属性都有名称及对应的值,属性值可以有单个、多个,比如你有多个邮箱。

属性不是随便定义的,需要符合一定的规则,而这个规则可以通过schema制定。比如,如果一个entry没有包含在 inetorgperson 这个 schema 中的objectClass: inetOrgPerson,那么就不能为它指定employeeNumber属性,因为employeeNumber是在inetOrgPerson中定义的。

LDAP为人员组织机构中常见的对象都设计了属性(比如commonName,surname)。下面有一些常用的别名:

属性别名语法描述值(举例)
commonNamecnDirectory String姓名sean
surnamesnDirectory StringChow
organizationalUnitNameouDirectory String单位(部门)名称IT_SECTION
organization oDirectory String组织(公司)名称example
telephoneNumberTelephone Number电话号码110
objectClass内置属性organizationalPerson

4.3 ObjectClass

对象类是属性的集合,LDAP预想了很多人员组织机构中常见的对象,并将其封装成对象类。比如人员(person)含有姓(sn)、名(cn)、电话(telephoneNumber)、密码(userPassword)等属性,单位职工(organizationalPerson)是人员(person)的继承类,除了上述属性之外还含有职务(title)、邮政编码(postalCode)、通信地址(postalAddress)等属性。

通过对象类可以方便的定义条目类型。每个条目可以直接继承多个对象类,这样就继承了各种属性。如果2个对象类中有相同的属性,则条目继承后只会保留1个属性。对象类同时也规定了哪些属性是基本信息,必须含有(Must 活Required,必要属性):哪些属性是扩展信息,可以含有(May或Optional,可选属性)。

对象类有三种类型:结构类型(Structural)、抽象类型(Abstract)和辅助类型(Auxiliary)。结构类型是最基本的类型,它规定了对象实体的基本属性,每个条目属于且仅属于一个结构型对象类。抽象类型可以是结构类型或其他抽象类型父类,它将对象属性中共性的部分组织在一起,称为其他类的模板,条目不能直接集成抽象型对象类。辅助类型规定了对象实体的扩展属性。每个条目至少有一个结构性对象类。

对象类本身是可以相互继承的,所以对象类的根类是top抽象型对象类。以常用的人员类型为例,他们的继承关系:

下面是inetOrgPerson对象类的在schema中的定义,可以清楚的看到它的父类SUB和可选属性MAY、必要属性MUST(继承自organizationalPerson),关于各属性的语法则在schema中的attributetype定义。

# inetOrgPerson
# The inetOrgPerson represents people who are associated with an
# organization in some way.  It is a structural class and is derived
# from the organizationalPerson which is defined in X.521 [X521].
objectclass     ( 2.16.840.1.113730.3.2.2
    NAME 'inetOrgPerson'
        DESC 'RFC2798: Internet Organizational Person'
    SUP organizationalPerson
    STRUCTURAL
        MAY (
                audio $ businessCategory $ carLicense $ departmentNumber $
                displayName $ employeeNumber $ employeeType $ givenName $
                homePhone $ homePostalAddress $ initials $ jpegPhoto $
                labeledURI $ mail $ manager $ mobile $ o $ pager $
                photo $ roomNumber $ secretary $ uid $ userCertificate $
                x500uniqueIdentifier $ preferredLanguage $
                userSMIMECertificate $ userPKCS12 )
        )

4.4 Schema

对象类(ObjectClass)、属性类型(AttributeType)、语法(Syntax)分别约定了条目、属性、值,他们之间的关系如下图所示。所以这些构成了模式(Schema)——对象类的集合。条目数据在导入时通常需要接受模式检查,它确保了目录中所有的条目数据结构都是一致的。

schema(一般在/etc/ldap/schema/目录)在导入时要注意前后顺序。

4.5 backend & database

ldap的后台进程slapd接收、响应请求,但实际存储数据、获取数据的操作是由Backends做的,而数据是存放在database中,所以你可以看到往往你可以看到backenddatabase指令是一样的值如 bdb 。一个 backend 可以有多个 database instance,但每个 database 的 suffix 和 rootdn 不一样。openldap 2.4版本的模块是动态加载的,所以在使用backend时需要moduleload back_bdb指令。

bdb是一个高性能的支持事务和故障恢复的数据库后端,可以满足绝大部分需求。许多旧文档里(包括官方)说建议将bdb作为首选后端服务(primary backend),但2.4版文档明确说hdb才是被首先推荐使用的,这从 2.4.40 版默认安装后的配置文件里也可以看出。hdb是基于bdb的,但是它通过扩展的索引和缓存技术可以加快数据访问,修改entries会更有效率,有兴趣可以访问上的链接或slapd.backends。

另外config是特殊的backend,用来在运行时管理slapd的配置,它只能有一个实例,甚至无需显式在slapd.conf中配置。

4.6 TLS & SASL

分布式LDAP 是以明文的格式通过网络来发送信息的,包括client访问ldap的密码(当然一般密码已然是二进制的),SSL/TLS 的加密协议就是来保证数据传送的保密性和完整性。

SASL (Simple Authenticaion and Security Layer)简单身份验证安全框架,它能够实现openldap客户端到服务端的用户验证,也是ldapsearchldapmodify这些标准客户端工具默认尝试与LDAP服务端认证用户的方式(前提是已经安装好 Cyrus SASL)。SASL有几大工业实现标准:Kerveros V5、DIGEST-MD5、EXTERNAL、PLAIN、LOGIN。

Kerveros V5是里面最复杂的一种,使用GSSAPI机制,必须配置完整的Kerberos V5安全系统,密码不再存放在目录服务器中,每一个dn与Kerberos数据库的主体对应。DIGEST-MD5稍微简单一点,密码通过saslpasswd2生成放在sasldb数据库中,或者将明文hash存到LDAP dn的userPassword中,每一个authid映射成目录服务器的dn,常和SSL配合使用。参考将 LDAP 客户端配置为使用安全性

EXTERNAL一般用于初始化添加schema时使用,如ldapadd -Y EXTERNAL -H ldapi:/// -f /etc/openldap/schema/core.ldif

4.7 LDIF

LDIF(LDAP Data Interchange Format,数据交换格式)是LDAP数据库信息的一种文本格式,用于数据的导入导出,每行都是“属性: 值”对,见 openldap ldif格式示例

OpenLDAP(2.4.3x)服务器安装配置方法见这里。

参考

  • LDAP基础概念
  • LDAP-HOWTO
  • openldap doc admin24

原文链接地址:http://seanlook.com/2015/01/15/openldap_introduction/