月度归档:2019年10月

Android Studio最全快捷键和使用技巧

Android studio作为如今主流的Android开发平台,熟悉常用快捷键可以让我们开发更加高效便捷,如鱼得水。

本文翻译自 Android Studio Tips by Philippe Breault,一共收集了62个 Android Studio 使用小技巧和快捷键。 根据这些小技巧的使用场景,本文将这62个小技巧分为常用技巧(1 – 28)、编码技巧(29 – 49)和调试技巧(50 – 62),分成三个部分。

每个小技巧都配有 gif 动图,由于原图在 google photo 上,加载较慢,本文全部转存到七牛上了。

由于能力有限,翻译过程中难免有所疏漏,如发现错误或问题,请在评论中提出,谢谢。

常用技巧

1. 书签(Bookmarks)

  • 描述:这是一个很有用的功能,让你可以在某处做个标记(书签),方便后面再跳转到此处。
  • 调用:Menu → Navigate → Bookmarks
  • 快捷键:
    • 添加/移除书签:F3(OS X) 、F11(Windows/Linux);
    • 添加/移除书签(带标记):Alt + F3(OS X)、Ctrl + F11(Windows/Linux);
    • 显示全部书签:Cmd + F3(OS X) 、Shift + F11(Windows/Linux),显示所有的书签列表,并且是可以搜索的。
    • 上一个/下一个书签:无,可以在设置中设置快捷键。
  • 更多:当你为某个书签指定了标记,你可以使用快捷键 Ctrl + 标记 来快速跳转到标记处,比如输入Ctrl + 1,跳到标记为1的书签处。

2. 折叠/展开代码块(Collapse Expand Code Block)

  • 描述:该操作提供一种方法,让你隐藏你不关心的部分代码,以一种较为简洁的格式显示关键代码。一个有意思的用法是隐藏匿名内部类的代码,让其看起来像一个Lambda表达式。
  • 快捷键:Cmd + “+”/”-“(OS X)、Ctrl + Shift + “+”/”-“(Windows/Linux);
  • 更多:可以在Settig → Editor → General → Code Folding 中设置折叠规则。

最强 Android Studio 使用小技巧和快捷键

3. 与分支比对(Compare With Branch (Git))

  • 描述:假如你的项目是使用git来管理的,你可以将当前文件或者文件夹与其他的分支进行比对。比较有用的是可以让你了解到你与主分支有多少差别。
  • 调用:Menu → VCS → Git → Compare With Branch

最强 Android Studio 使用小技巧和快捷键

4. 与剪切板比对(Compare With Clipboard)

  • 描述:将当前选中的部分与剪切板上的内容进行比对。
  • 调用:右键选中的部分,在右键菜单中选择“Compare With Clipboard”。

最强 Android Studio 使用小技巧和快捷键

5. 上下文信息(Context Info)

  • 描述:当前作用域定义超过滚动区域,执行该操作将显示所在的上下文信息,通常它显示的是类名或者内部类类名或者当前所在的方法名。该操作在xml文件中同样适用。
  • 调用:Menu → View → Context Info
  • 快捷键:Alt + Q (Windows/Linux)
  • 更多:个人认为,这个功能更好的用法是快速查看当前类继承的父类或者实现的接口。

最强 Android Studio 使用小技巧和快捷键

6. 查找操作(Find Action)

  • 描述:输入某个操作的名称,快速查找,对于没有快捷键的部分操作这是一个很有用的技巧。
  • 快捷键:Cmd +Shift + A(OS X)、Ctrl + Shift + A(Windows/Linux);
  • 更多:当某个操作是有快捷键的,会显示在旁边。

最强 Android Studio 使用小技巧和快捷键

7. 查找补全(Find Complection)

  • 描述:当你在一个文件中进行查找时,使用自动补全快捷键可以给出在当前文件中出现的建议单词;
  • 快捷键:Cmd + F(OS X),Ctrl + F(Windows/Linux),输入一些字符,然后使用自动补全;

最强 Android Studio 使用小技巧和快捷键

8. 隐藏所有面板(Hide All Panels)

  • 描述:切换编辑器铺满整个程序界面,隐藏其他的面板。再次执行该操作,将会回到隐藏前的状态。
  • 调用:Menu → Window → Active Tool Window → Hide All Windows;
  • 快捷键:Cmd +Shift + F12(OS X)、Ctrl + Shift + F12(Windows/Linux);

最强 Android Studio 使用小技巧和快捷键

9. 高亮一切(Hightlight All the Things)

  • 描述:该操作将会高亮某个字符在当前文件中所有出现的地方。这不仅仅是简单的匹配,实际上它会分析当前的作用域,只高亮相关的部分。
  • 调用:Menu → Edit → Find → Highlight Usages in File;
  • 定位到上一处/下一处:Menu → Edit → Find → Find Next/Previous;
  • 快捷键:相关快捷键请在菜单中查看;
  • 更多:
    • 如果高亮一个方法的returnthrow语句,将会高亮这个方法的所有出口/结束点;
    • 如果高亮某个类定义处的extendimplements语句,将会高亮继承的或实现的方法;
    • 高亮一个import语句也会高亮使用到的地方;
    • 按下Esc可以退出高亮模式;

最强 Android Studio 使用小技巧和快捷键

10. 回到上一个工具窗口(Jump to Last Tool Window)

  • 描述:有时候你会从某个工具窗口跳到编辑器里面,然后又需要重新回到刚才操作的那个工具窗,比如你查找使用情况的时,使用该操作可以在不使用鼠标的情况下跳转到之前的工具窗口。
  • 快捷键:F12;

最强 Android Studio 使用小技巧和快捷键

11. 上一个编辑位置(Last Edit Location)

  • 描述:该操作将使得你导航到上一处你改动过的地方,这与点击工具栏上的返回箭头回到上一个定位位置是不一样的,该操作将会返回到上一个编辑的位置。
  • 快捷键: Cmd + Shift + Delete(OS X)、Ctrl + Shift + Backspace(Windows/Linux);

最强 Android Studio 使用小技巧和快捷键

12. 在方法和内部类之间跳转(Move Between Methods and Inner Classes)

  • 描述:该操作让光标在当前文件的方法或内部类的名字间跳转。
  • 调用:Navigate → Next Method/Previous Method;
  • 快捷键:Ctrl + Up/Down(OS X)、Alt + Up/Down(Windows/Linux);

最强 Android Studio 使用小技巧和快捷键

13. 定位到嵌套文件(Navigate to Nested File)

  • 描述:有时你有一堆存放在不同目录下的同名文件,例如不同模块下的AndroidManifest.xml文件,当你想定位到其中的一个文件,你会得到一堆搜索结果,你还得辨认哪个才是你需要的。通过在检索框中输入部分路径的前缀,并添加斜杠号,你就可以在第一次尝试的时候就找到正确的那个。
  • 快捷键:Shift + Cmd + O(OS X)、Shift + Ctrl + N(Windows/Linux);

最强 Android Studio 使用小技巧和快捷键

14. 定位到父类(Navigate to parent)

  • 描述:如果光标是在一个继承父类重写的方法里,这个操作将定位到父类实现的地方。如果光标是在类名上,则定位到父类类名。
  • Menu → Navigate → Super Class/Method
  • 快捷键:Cmd + U(OS X)、Ctrl + U(Windows/Linux);

最强 Android Studio 使用小技巧和快捷键

15. 根据编号打开面板(Open a Panel by Its Number)

  • 描述:你可能已经注意到某些面板的名称左边有一个数字,这里有个快捷操作可以打开它们。如果你没看到面板的名称,请点击IDE的左下角的切换按钮。
  • 快捷键:Cmd + 数字(OS X)、Alt + 数字(Windows/Linux);

16. 在外部打开文件(Open File Externally)

  • 描述:通过这个快捷键,简单地点击Tab,就可以打开当前文件所在的位置或者该文件的任意上层路径。
  • 快捷键:Cmd + 单击Tab(OS X)、Ctrl + 点击Tab(Windows/Linux);

最强 Android Studio 使用小技巧和快捷键

17. 参数信息(Parameter Info)

  • 描述:这个操作将显示和你在方法声明处写一样的参数列表,当你想看某个存在的方法的参数,这是一个很有用的操作。光标下的参数显示为黄色,如果没有参数显示黄色,意味着你的方法调用是无效的,很可能是某个参数分配不对。(例如一个浮点数赋值给了整型参数)。如果你正在写一个方法调用,突然离开编辑的地方,再返回的时候,输入一个逗号,就可以重新触发参数信息。
  • 快捷键:Cmd + P(OS X)、Ctrl + U(Windows/Linux);

最强 Android Studio 使用小技巧和快捷键

18. 快速查看定义(Quick Definition Lookup)

  • 描述:你曾经是否想查看一个方法或者类的具体实现,但是不想离开当前界面? 该操作可以帮你搞定。
  • 快捷键:Alt + Space / Cmd + Y(OS X)、Ctrl + Shift + I(Windows/Linux)

最强 Android Studio 使用小技巧和快捷键

19. 最近修改的文件(Recently Changed Files)

  • 描述:该操作类似于“最近访问(Recents)”弹窗,会显示最近本地修改过的文件列表,根据修改时间排列。可以输入字符来过滤列表结果。
  • 快捷键:Cmd + Shift + E(OS X)、Ctrl + Shift + E(Windows/Linux)

最强 Android Studio 使用小技巧和快捷键

20. 最近访问(Recents)

  • 描述:该操作可以得到一个最近访问文件的可搜索的列表。
  • 快捷键:Cmd + E(OS X)、Ctrl + E(Windows/Linux)

最强 Android Studio 使用小技巧和快捷键

21. 相关文件(Related File)

  • 描述:该操作有助于在布局文件和Activity/Fragment之间轻松跳转。这也是一个快捷操作,在类名/布局顶端的左侧。
  • 快捷键:Ctrl + Cmd + Up(OS X)、Ctrl + Alt + Home(Windows/Linux)

最强 Android Studio 使用小技巧和快捷键

22. 返回到编辑器(Return to the Editor)

  • 描述:一大堆快捷键操作会把你从编辑器带走(type hierarchy, find usages, 等等)。如果你想返回到编辑器,你有两个选项:
    1. Esc:该操作仅仅把光标移回编辑器。
    2. Shift + Esc:该操作会关闭当前面板,然后把光标移回到编辑器。
  • 快捷键:
    • 返回但保留打开的面板:Esc
    • 关闭面板并返回:Shift + Esc

最强 Android Studio 使用小技巧和快捷键

23. Select In

  • 描述:拿着当前文件然后问你在哪里选中该文件。恕我直言,最有用的就是在项目结构或者资源管理器中打开该文件。每一个操作都有数字或者字母作为前缀,可以通过这个前缀来快速跳转。通常,我会 Alt + F1 然后 回车(Enter) 来打开项目视图,然后 再用 Alt + F1 在OS X的Finder里找到文件。你可以在文件中或者直接在项目视图里使用该操作。
  • 快捷键:Alt + F1;

最强 Android Studio 使用小技巧和快捷键

24. 扩大/缩小选择(Extend/Shrink Selection)

  • 描述:该操作会在上下文逐渐扩大/缩小当前选择范围。例如,它会先选中当前变量,再选中当前语句,然后选中整个方法,缩小选择则相反。
  • 快捷键:Alt + 上/下 (OS X)、Ctrl+W / Ctrl + Shift + W(Windows、Linux)

最强 Android Studio 使用小技巧和快捷键

25. Sublime Text式的多处选择(Sublime Text Multi Selection)

  • 描述:这个功能超级赞!该操作会识别当前选中字符串,选择下一个同样的字符串,并且添加一个光标。这意味着你可以在同一个文件里拥有多个光标,你可以同时在所有光标处输入任何东西。
  • 快捷键:Ctrl + G(OS X)、Alt + J(Windows、Linux)

最强 Android Studio 使用小技巧和快捷键

26. 文件结构弹窗(The File Structure Popup)

  • 描述:该操作可以展示当前类的大纲,并且可以快速跳转。你还可以通过键盘输入来过滤结果。这是一种很高效的方法来跳转到指定方法。
  • 更多:
    • 你在输入字符的时候可以用驼峰风格来过滤选项。比如输入”oCr”会找到”onCreate”
    • 你可以通过勾选多选框来决定是否显示匿名类。这在某些情况下很有用,比如你想直接跳转到一个OnClickListener的onClick方法。
  • 快捷键:Cmd + F12(OS X)、Ctrl + F12(Windows/Linux)
  • 调用:Menu → Navigate → File Structure

最强 Android Studio 使用小技巧和快捷键

27. 切换器(The Switcher)

  • 描述:该快捷键基本上就是IDE的alt+tab/cmd+tab命令。你可以用它在导航tab或者面板切换。一旦打开这个窗口,只要一直按着ctrl键,你可以通过对应的数字或者字母快捷键快速选择。你也可以通过backspace键来关闭一个已选中的tab或者面板。
  • 快捷键:Ctrl + Tab

最强 Android Studio 使用小技巧和快捷键

28. 版本控制操作弹窗(VCS Operations Popup)

  • 描述:该操作会给你显示最常用的版本控制操作。如果你的项目没有用git等版本控制软件进行管理,它至少会给你提供一个由IDE维护的本地历史记录。
  • 快捷键:Ctrl + V(OS X)、Alt + `(Windows/Linux)

最强 Android Studio 使用小技巧和快捷键


编码技巧


29. 列选择/块选择(Column Selection)

  • 描述:正常选择时,当你向下选择时,会直接将当前行到行尾都选中,而块选择模式下,则是根据鼠标选中的矩形区域来选择。
  • 调用:按住Alt,然后拖动鼠标选择。
  • 开启/关闭块选择:Menu → Edit → Column Selection Mode
  • 快捷键:切换块选择模式:Cmd + Shift + 8(OS X)、Shift + Alt + Insert(Windows/Linux);

最强 Android Studio 使用小技巧和快捷键

30. 语句补全(Complete Statement)

  • 描述:这个方法将会生成缺失的代码来补全语句,常用的使用场景如下:
    • 在行末添加一个分号,即使光标不在行末;
    • 为if、while、for 语句生成圆括号和大括号;
    • 方法声明后,添加大括号;
  • 调用:Menu → Edit → Compelete Current Statement
  • 快捷键:Cmd + Shift + Enter(OS X)、Ctrl + Shift + Enter(Windows/Linux);
  • 更多:如果一个语句已经补全,当你执行该操作时,则会直接跳到下一行,即使光标不在当前行的行末。

最强 Android Studio 使用小技巧和快捷键

31. 删除行(Delete Line)

  • 描述:如果没选中,则删除光标所在行,如果选中,则会删除选中所在的所有行。
  • 快捷键:Cmd + Delete(OS X)、Ctrl + Y(Windows/Linux)

最强 Android Studio 使用小技巧和快捷键

32. 行复制(Duplicate Line)

  • 描述:复制当前行,并粘贴到下一行,这个操作不会影响剪贴板的内容。这个命令配合移动行快捷键非常有用。
  • 快捷键:Cmd + D(OS X)、Ctrl + D(Windows/Linux)

最强 Android Studio 使用小技巧和快捷键

33. 编写正则表达式(Edit Regex)

  • 描述:使用Java编写正则表达式是一件很困难的事,主要原因是:
    • 你必须得避开反斜杠;
    • 说实话,正则很难;
    • 看第二条。

IDE能帮我们干点啥呢?当然是一个舒服的界面来编写和测试正则啦~ - 快捷键:Alt + Enter → check regexp

最强 Android Studio 使用小技巧和快捷键

34. 使用Enter和Tab进行代码补全的差别(Enter vs Tab for Code Completion)

  • 描述:代码补全时,可以使用Enter或Tab来进行补全操作,但是两者是有差别的。
  • 使用Enter时:从光标处插入补全的代码,对原来的代码不做任何操作。
  • 使用Tab时:从光标处插入补全的代码,并删除后面的代码,直到遇到点号、圆括号、分号或空格为止。

最强 Android Studio 使用小技巧和快捷键

35. 提取方法(Extract Method)

  • 描述:提取一段代码块,生成一个新的方法。当你发现某个方法里面过于复杂,需要将某一段代码提取成单独的方法时,该技巧是很有用的。
  • 调用:Menu → Refactor → Extract → Method
  • 快捷键:Cmd + Alt + M(OS X)、Ctrl + Alt + M(Windows/Linux);
  • 更多:在提取代码的对话框,你可以更改方法的修饰符和参数的变量名。

最强 Android Studio 使用小技巧和快捷键

36. 提取参数(Extract Parameter)

  • 描述:这是一个提取参数的快捷操作。当你觉得可以通过提取参数来优化某个方法的时候,这个技巧将很有用。该操作会将当前值作为一个方法的参数,将旧的值放到方法调用的地方,作为传进来的参数。
  • 调用:Menu → Refactor → Extract → Parameter
  • 快捷键:Cmd + Alt + P(OS X)、Ctrl + Alt + P(Windows/Linux);
  • 更多:通过勾选“delegate”,可以保持旧的方法,重载生成一个新方法。

最强 Android Studio 使用小技巧和快捷键

37. 提取变量(Extract Variable)

  • 描述:这是一个提取变量的快捷操作。当你在没有写变量声明的直接写下值的时候,这是一个很方便生成变量声明的操作,同时还会给出一个建议的变量命名。
  • 调用:Menu → Refactor → Extract → Variable
  • 快捷键:Cmd + Alt + V(OS X)、Ctrl + Alt + V(Windows/Linux);
  • 更多:当你需要改变变量声明的类型,例如使用 List 替代 ArrayList,可以按下Shift + Tab,就会显示所有可用的变量类型。

最强 Android Studio 使用小技巧和快捷键

38. 内置(Inline)

  • 描述:当你开始对提取操作有点兴奋的时候,突然觉得东西太多了,怎么办呢?这是一个和提取相反的操作。该操作对方法、字段、参数和变量均有效。
  • 调用:Menu → Refactor → Inline
  • 快捷键:Cmd + Alt + N(OS X)、Ctrl + Alt + N(Windows/Linux);

最强 Android Studio 使用小技巧和快捷键

39. 合并行和文本(Join Lines and Literals)

  • 描述:这个操作比起在行末使劲按删除键爽多了!该操作遵守格式化规则,同时:
    • 合并两行注释,同时移除多余的//
    • 合并多行字符串,移除+和双引号;
    • 合并字段的声明和初始化赋值;
  • 快捷键:Ctrl + Shift + J;

最强 Android Studio 使用小技巧和快捷键

40. 动态模板(Live Templates)

  • 描述:动态模板是一种快速插入代码片段的方法,使用动态模板比较有意思的是你可以使用合适的默认值将模板参数化,当你插入代码片段时,这可以指导你完成参数。
  • 更多:如果你知道模板的缩写,就可以不必使用快捷键,只需要键入缩写并使用Tab键补全即可。
  • 快捷键:Cmd + J(OS X)、Ctrl + J(Windows/Linux);

最强 Android Studio 使用小技巧和快捷键

41. 上下移动行(Move Lines Up Down)

  • 描述:不需要复制粘贴就可以上下移动行了。
  • 快捷键:Alt + Shift + Up/Down;

最强 Android Studio 使用小技巧和快捷键

42. 移动方法(Move Methods)

  • 描述:这个操作和移动行操作很类似,不过该操作是应用于整个方法的,在不需要复制、粘贴的情况下,就可以将整个方法块移动到另一个方法的前面或后面。该操作的实际叫做“移动语句”,这意味着你可以移动任何类型的语句,你可以方便地调整字段或内部类的顺序。
  • 快捷键:Cmd + Alt + Up/Down(OS X)、Ctrl + Shift + Up/Down(Windows/Linux);

最强 Android Studio 使用小技巧和快捷键

43. 取反补全(Negation Completion)

  • 描述:有时你自动补全一个布尔值,然后回到该值的前面添加一个感叹号来完成取反操作,现在通过使用输入!代替enter完成补全操作,就可以跳过这些繁琐的操作了。
  • 快捷键:代码补全的时候,按下!即可(有时需要上下键选中候选项);

最强 Android Studio 使用小技巧和快捷键

44. 后缀补全(Postfix Completion)

  • 描述:你可以认为该操作是一种代码补全,它会在点号之前生成代码,而不是在点号之后。实际上你调用这个操作和正常的代码补全操作一样:在一个表达式之后输入点号。

例如对一个列表进行遍历,你可以输入myList.for,然后按下Tab键,就会自动生成for循环代码。

  • 调用: 你可以在某个表达式后面输入点号,出现一个候选列表,在常规的代码补全提示就可以看到一系列后缀补全关键字,同样的,你也可以在Editor → Postfix Completion中看到一系列后缀补全关键字。
  • 常用的有后缀补全关键字有:
    • .for (补全foreach语句)
    • .format (使用String.format()包裹一个字符串)
    • .cast (使用类型转化包裹一个表达式)

最强 Android Studio 使用小技巧和快捷键

45. 重构(Refactor This)

  • 描述:该操作可以显示所有对当前选中项可行的重构方法。这个列表可以用数字序号快速选择。
  • 快捷键:Ctrl + T(OS X)、Ctrl + Alt + Shift + T(Windows/Linux)

最强 Android Studio 使用小技巧和快捷键

46. 重命名(Rename)

  • 描述:你可以通过该操作重命名变量、字段、方法、类、包。当然了,该操作会确保重命名对上下文有意义,不会无脑替换掉所有文件中的名字;
  • 快捷键:Shift + F6
  • 更多:如果你忘记了这个快捷键,你可以使用快速修复(Quick Fix)的快捷键,它通常包含重命名选项。

最强 Android Studio 使用小技巧和快捷键

47. 分号/点 补全(Semicolon Dot Completion)

  • 描述:代码补全这个功能太棒啦!我们大概都对以下这种情况很熟悉:开始输入点什么东西,接着从IDE得到一些建议的选项,然后通过Enter或者Tab来选择我们想要的补全代码。其实还有另外一种方法来选择补全的代码:我们可以输入一个点(.)或者一个分号(;)。这样就会完成补全,添加所选字符。这在结束一条语句补全或者快速链式调用方法的时候特别有用。
  • 注意点:如果你要代码补全的方法需要参数,这些参数会被略过。
  • 快捷键:Autocomplete + “.” 或者 “;”

最强 Android Studio 使用小技巧和快捷键

48. 包裹代码(Surround With)

  • 描述: 该操作可以用特定代码结构包裹住选中的代码块,通常是if语句,循环,try/catch语句或者runnable语句。 如果你没有选中任何东西,该操作会包裹当前一整行。
  • 快捷键:Cmd + Alt + T(OS X)、Ctrl + Alt + T(Windows/Linux)

最强 Android Studio 使用小技巧和快捷键

49. 移除包裹代码(Unwrap Remove)

  • 描述:该操作会移除周围的代码,它可能是一条if语句,一个while循环,一个try/catch语句甚至是一个runnable语句。该操作恰恰和包裹代码(Surround With)相反。
  • 快捷键:Cmd + Shift + Delete(OS X)、Ctrl + Shift + Delete(Windows/Linux)

最强 Android Studio 使用小技巧和快捷键


调试技巧


50. 分析传入数据流(Analyze data flow to here)

  • 描述:这个操作将会根据当前选中的变量、参数或者字段,分析出其传递到此处的路径。 当你进入某段陌生的代码,试图明白某个参数是怎么传递到此处的时候,这是一个非常有用的操作。
  • 调用:Menu → Analyze → Analyze Data Flow to Here
  • 快捷键:无,可以在设置中指定。
  • 相反的操作:分析传出数据流(Analyze data flow from here),这个将会分析当前选中的变量往下传递的路径,直到结束。

51. 堆栈追踪分析(Analyze Stacktrace)

  • 描述: 这个操作读取一份堆栈追踪信息,并且使它像logcat中那样可以点击。当你从bug报告中或者终端复制了一份堆栈追踪,使用该操作可以很方便地调试。
  • 调用:Menu → Analyze → Analyze Stacktrace
  • 快捷键:无,可以在设置中指定。
  • 更多:通过使用“ProGuard Unscramble Plugin”插件,也可以分析混淆过的堆栈追踪。

最强 Android Studio 使用小技巧和快捷键

52. 关联调试程序(Attach Debugger)

  • 描述:随时启动调试程序,即使你没有以调试模式启动你的应用。这是一个很方便的操作,因为你不必为了调试程序而以调试模式重新部署你的应用。当别人正在测试应用,突然遇到一个bug而将设备交给你时,你也可以很快地进入调试模式。
  • 调用:点击工具栏图标或者Menu → Build → Attach to Android Process
  • 快捷键:无,可以在设置中指定,或者点击工具栏对应的图标。

最强 Android Studio 使用小技巧和快捷键

53. 条件断点(Conditional Breakpoints)

  • 描述:简单说,就是当设定的条件满足时,才会触发断点。你可以基于当前范围输入一个java布尔表达式,并且条件输入框内是支持代码补全的。
  • 调用:右键需要填写表达式的断点,然后输入布尔表达式。

最强 Android Studio 使用小技巧和快捷键

54. 禁用断点(Disable Breakpoints)

  • 这个操作将使得断点。当你有一个设置过复杂条件的断点或者是日志断点,当前不需要,但是下次又不用重新创建,该操作是很方便的。
  • 调用:按住Alt,然后单击断点即可。

最强 Android Studio 使用小技巧和快捷键

55. 计算表达式(Evaluate Expression)

  • 描述:这个操作可以用来查看变量的内容并且计算几乎任何有效的java表达式。需要注意的是,如果你修改了变量的状态,这个状态在你恢复代码执行后依然会保留。
  • 快捷键:处在断点状态时,光标放在变量处,按Alt + F8,即可显示计算表达式对话框。

最强 Android Studio 使用小技巧和快捷键

56. 审查变量(Inspect Variable)

  • 描述:该操作可以在不打开计算表达式对话框就能审查表达式的值。
  • 快捷键:调试状态下,按住Alt键,然后单击表达式即可。

57. 日志断点(Logging Breakpoints)

  • 描述:这是一种打印日志而不是暂停的断点,当你想打印一些日志信息但是不想添加log代码后重新部署项目,这是一个非常有用的操作。
  • 调用:在断点上右键,取消Suspend的勾选,然后勾选上Log evaluated Expression,并在输入框中输入你要打印的日志信息。

最强 Android Studio 使用小技巧和快捷键

58. 标记对象(Mark Object)

  • 描述:当你在调试的时候,这个操作可以让你给某个特殊的对象添加一个标签,方便你后面很快地辨认。在调试时,当你从一堆相似的对象中查看某个对象是否和之前是一样的,这就是一个非常有用的操作。
  • 调用:右键你需要标记的对象,选中Mark Object,输入标签;
  • 快捷键:选中对象时,按F3(OS X)、F11(Windows/Linux);

最强 Android Studio 使用小技巧和快捷键

59. 显示当前运行点(Show Execution Point)

  • 描述:该操作会立刻把你的光标移回到当前debug处。

通常的情况是: 1. 你在某处触发了断点 2. 然后在文件中随意浏览 3. 直接调用这个快捷键,快速返回之前逐步调试的地方。

  • 快捷键:(Debug时) Alt + F10;

最强 Android Studio 使用小技巧和快捷键

60. 终止进程(Stop Process)

  • 描述:该操作会终止当前正在运行的任务。如果任务数量大于一,则显示一个列表供你选择。在终止调试或者中止编译的时候特别有用!
  • 快捷键:Cmd + F2(OS X)、Ctrl + F2(Windows、Linux);

最强 Android Studio 使用小技巧和快捷键

61. 临时断点(Temporary Breakpoints)

  • 描述:通过该操作可以添加一个断点,这个断点会在第一次被命中的时候自动移除。
  • 快捷键:Alt + 鼠标左键 点击代码左侧(鼠标)、Cmd + Alt + Shift + F8(OS X)、Ctrl + Alt + Shift + F8(Windows/Linux)

最强 Android Studio 使用小技巧和快捷键

62. 调用层级树弹窗(The Call Hierarchy Popup)

  • 描述:该操作会给你展示 在一个方法的声明和调用之间所有可能的路径。
  • 快捷键:Ctrl + Alt + H

最强 Android Studio 使用小技巧和快捷键


来源:  https://blog.csdn.net/s1674521/article/details/78769936

Android定时任务的应用及实现

定时任务在Android中这算是一个常用的功能了。比如注册获取验证码时的倒计时,或者支付时候也会有倒计时。正计时大多也都用在定时唤醒或者延时做一些操作的情况。本文我会先整理一下定时任务的几种方法以及CountDownTimer这个专门用来倒计时的类,后面我们以最常用应用场景来演示一下验证码倒计时原理的实现,包装效果后如下图:

实现正定时的五种方法

方法1:通过Handler + Thread 的方式。代码如下。

MainActivity.java

public class MainActivity extends AppCompatActivity {
    private static final int TIMER = 999;
    private static boolean flag = true;

    @Override
    protected void onCreate(Bundle savedInstanceState) {
        super.onCreate(savedInstanceState);
        setContentView(R.layout.activity_main);

        setTimer();
    }

    private void setTimer(){
        new Thread(new Runnable() {
            @Override
            public void run() {
                while (flag){
                    try {
                        Thread.sleep(1000); //休眠一秒
                        mHanler.sendEmptyMessage(TIMER);
                    } catch (InterruptedException e) {
                        e.printStackTrace();
                    }
                }
            }
        }).start();
    }

    private Handler mHanler = new Handler(){
        @Override
        public void handleMessage(Message msg) {
            super.handleMessage(msg);
            switch (msg.what){
                case TIMER:
                    //去执行定时操作逻辑
                    break;
                default:
                    break;
            }
        }
    };

     private void stopTimer(){
         flag = false;
     }

    @Override
    protected void onDestroy() {
        super.onDestroy();
        stopTimer();
    } 
}

这是比较容易想到的方法,值得注意的是:如果在此Activity关闭之前,必须要终止线程内的循环,否则就会造成内存泄露

方法2:通过Handler + Message的方式。代码如下。

MainActivity.java

public class MainActivity extends AppCompatActivity {
    private static final int TIMER = 999;
    private static boolean flag = true;

    @Override
    protected void onCreate(Bundle savedInstanceState) {
        super.onCreate(savedInstanceState);
        setContentView(R.layout.activity_main);

        setTimer();
    }

    private void setTimer(){
        Message message = mHandler.obtainMessage(TIMER);     // Message
        mHandler.sendMessageDelayed(message, 1000);
    }

    private Handler mHandler = new Handler(){
        @Override
        public void handleMessage(Message msg) {
            super.handleMessage(msg);
            switch (msg.what){
                case TIMER:
                    //在这里去执行定时操作逻辑
                    
                    if (flag) {
                        Message message = mHandler.obtainMessage(TIMER);
                        mHandler.sendMessageDelayed(message, 1000);
                    }
                    break;
                default:
                    break;
            }
        }
    };

    private void stopTimer(){
         flag = false;
    }
}

这个方法来实现定时其实还是有些缺陷的,主要的问题不是看起来像是死循环,而是在执行定时操作之后才可以进行下一次定时启动,如果此操作是耗时操作了,必定会延后下一秒的启动。所以这个方法定时严格来说不精确,不推荐。

方法3:通过Handler + Runnable的方式。代码如下。

MainActivity.java

public class MainActivity extends AppCompatActivity {
    private static boolean flag = true;

    @Override
    protected void onCreate(Bundle savedInstanceState) {
        super.onCreate(savedInstanceState);
        setContentView(R.layout.activity_main);

        setTimer();
    }

    private void setTimer(){
        mHandler.postDelayed(runnable, 1000);
    }

    private Handler mHandler = new Handler();

    Runnable runnable = new Runnable() {
        @Override
        public void run() {
            //在这里执行定时需要的操作
            
            if (flag) {
                mHandler.postDelayed(this, 1000);
            }
        }
    };

    private void stopTimer(){
        flag = false;
    }

}

此方法和方法2很相似,缺点也相似,优点嘛~~简单!

方法4:通过Handler + TimerTask的方式。代码如下。

MainActivity.java

private static final int TIMER = 999;

    @Override
    protected void onCreate(Bundle savedInstanceState) {
        super.onCreate(savedInstanceState);
        setContentView(R.layout.activity_main);

        setTimer();
    }

    private void setTimer(){
        timer.schedule(task, 1000, 1000);       // timeTask
    }

    private Handler mHandler = new Handler(){
        @Override
        public void handleMessage(Message msg) {
            super.handleMessage(msg);
            switch (msg.what){
                case TIMER:
                //在此执行定时操作
                    
                    break;
                default:
                    break;
            }
        }
    };
    
    Timer timer = new Timer();

    TimerTask task = new TimerTask() {
        @Override
        public void run() {
            mHandler.sendEmptyMessage(TIMER);
        }
    };

    private void stopTimer(){
        timer.cancel();
        task.cancel();
    }

    @Override
    protected void onDestroy() {
        super.onDestroy();
        stopTimer();
    }
}

这里引用了timer和task两个新的类,配合handler使用是目前比较多的方式,but我也不推荐,因为下面这个是我推荐的封装方法。
MyTimeTask.java

public class MyTimeTask {
    private Timer timer;
    private TimerTask task;
    private long time;

    public MyTimeTask(long time, TimerTask task) {
        this.task = task;
        this.time = time;
        if (timer == null){
            timer=new Timer();
        }
    }
    
    public void start(){
        timer.schedule(task, 0, time);//每隔time时间段就执行一次
    }

    public void stop(){
        if (timer != null) {
            timer.cancel();
            if (task != null) {
                task.cancel();  //将原任务从队列中移除
            }
        }
    }
}

MainActivity.java

public class MainActivity extends AppCompatActivity {
    private static final int TIMER = 999;
    private MyTimeTask task;

    @Override
    protected void onCreate(Bundle savedInstanceState) {
        super.onCreate(savedInstanceState);
        setContentView(R.layout.activity_main);

        setTimer();
    }

    private void setTimer(){
        task =new MyTimeTask(1000, new TimerTask() {
            @Override
            public void run() {
                mHandler.sendEmptyMessage(TIMER);
                //或者发广播,启动服务都是可以的
            }
        });
        task.start();
    }

    private Handler mHandler = new Handler(){
        @Override
        public void handleMessage(Message msg) {
            super.handleMessage(msg);
            switch (msg.what){
                case TIMER:
                //在此执行定时操作

                    break;
                default:
                    break;
            }
        }
    };

    private void stopTimer(){
        task.stop();
    }

    @Override
    protected void onDestroy() {
        super.onDestroy();
        stopTimer();
    }
}

单独封装出来的定时任务工具,引入方式简单,方便取消停止定时任务。简单来说优点就是:把工具类直接复制粘贴,然后简单调用就能用!

方法5:采用AlarmManger实现长期精确的定时任务。

此方法设计需要细说的点有很多,不再列代码,最好是各位亲自去写一写,对此方法印象会深一些,可以给出一个非常常见的应用场景:每隔6个小时,检查一遍数据库内容,查看数据是否有变化,如果有则弹出显示框显示,若没有则无变化。

AlarmManger常用方法有三个:

set(int type,long startTime,PendingIntent pi)//一次性
setExact(int type, long triggerAtMillis, PendingIntent operation)//一次性的精确版
setRepeating(int type,long startTime,long intervalTime,PendingIntentpi)//精确重复
setInexactRepeating(int type,long startTime,longintervalTime,PendingIntent pi);//非精确,降低功耗

各个参数含义:type表示闹钟类型,startTime表示闹钟第一次执行时间,long intervalTime表示间隔时间,PendingIntent表示闹钟响应动作。

type闹钟类型分为:

    AlarmManager.ELAPSED_REALTIME:休眠后停止,相对开机时间
    AlarmManager.ELAPSED_REALTIME_WAKEUP:休眠状态仍可唤醒cpu继续工作,相对开机时间
    AlarmManager.RTC:同1,但时间相对于绝对时间
    AlarmManager.RTC_WAKEUP:同2,但时间相对于绝对时间
    AlarmManager.POWER_OFF_WAKEUP:关机后依旧可用,相对于绝对时间

startTime:闹钟的第一次执行时间,以毫秒为单位,一般使用当前时间。
intervalTime:执行时间间隔。
PendingIntent :PendingIntent用于描述Intent及其最终的行为.,这里用于获取定时任务的执行动作。

常见使用方式:利用AlarmManger+Service+BarocastReceiver来实现可唤醒cpu,甚至实现精确定时,适用于配合service在后台执行一些长期的定时行为

实现倒计时的方法

倒计时几种方法呢,这个不像正计时那样简单实现容易想到的那5种,甚至正计时通过总量减的方式全可以转化成倒计时。所以在此我想介绍另一个专门倒计时的类CountDownTimer来讲解。

构造方法:

         CountDownTimer (long millisInFuture, long countDownInterval)
         //millisInFuture:设置倒计时的总时间(毫秒)
         //countDownInterval:设置每次减去多少毫秒

验证码获取的示例代码如下:
MainActivity.java

public class MainActivity extends AppCompatActivity {
    private static final int LEFT_TIME = 999;
    private static final int TIME_OVER = 998;
    private Button bt_verify;

    @Override
    protected void onCreate(Bundle savedInstanceState) {
        super.onCreate(savedInstanceState);
        setContentView(R.layout.activity_main);
        bt_verify = (Button) findViewById(R.id.bt_verify);
        bt_verify.setOnClickListener(new View.OnClickListener() {
            @Override
            public void onClick(View view) {
                setTimer();
            }
        });
    }

    private void setTimer(){
       timer.start();
    }

    private Handler mHandler = new Handler(){
        @Override
        public void handleMessage(Message msg) {
            super.handleMessage(msg);
            switch (msg.what){
                case LEFT_TIME:
                    long left_time = (long) msg.obj;
                    bt_verify.setEnabled(false);//禁止button点击
                    bt_verify.setText((left_time / 1000) + " S");
                    break;
                case TIME_OVER:
                    bt_verify.setEnabled(true);
                    bt_verify.setText("点击重发");
                    break;
                default:
                    break;
            }
        }
    };

    private void stopTimer(){
        timer.cancel();
    }

    @Override
    protected void onDestroy() {
        super.onDestroy();
        stopTimer();
    }

    long millisInFuture = 60*1000;
    long countDownInterval =1000;
    CountDownTimer timer = new CountDownTimer(millisInFuture,countDownInterval) {

        @Override
        public void onTick(long millisUntilFinished) {
            //millisUntilFinished  剩余时间回调,这个是实时的(以countDownInterval为单位)
            Message msg = Message.obtain();
            msg.what = LEFT_TIME;
            msg.obj = millisUntilFinished;
            mHandler.sendMessage(msg);
        }

        @Override
        public void onFinish() {
            //结束时的回调
            mHandler.sendEmptyMessage(TIME_OVER);
        }
    };
}

activity_main.xml

<?xml version="1.0" encoding="utf-8"?>
<RelativeLayout xmlns:android="http://schemas.android.com/apk/res/android"
    android:layout_width="match_parent"
    android:layout_height="match_parent">

    <RelativeLayout
        android:layout_width="match_parent"
        android:layout_height="wrap_content"
        android:layout_marginLeft="5dp"
        android:layout_marginRight="5dp">

        <EditText
            android:layout_width="match_parent"
            android:layout_height="wrap_content"
            android:layout_centerVertical="true"
            android:layout_toLeftOf="@+id/bt_verify"
            android:layout_marginRight="5dp"/>

        <Button
            android:id="@+id/bt_verify"
            android:layout_width="wrap_content"
            android:layout_height="wrap_content"
            android:text="获取验证码"
            android:layout_alignParentRight="true"
            android:layout_centerVertical="true"/>
    </RelativeLayout>
</RelativeLayout>

需要注意的是:CountDownTimer如果使用不当,常常会报空指针异常,甚至造成严重的内存泄漏,不过解决办法也是有的:

一是在CountDownTimer的onTick方法中记得判空:
activity中:

    if(!activity.isFinishing()){
        //doing something...
    }

fragment中:

    if(getActivity()!=null){
       //doing something...
    }

二还需要在宿主Activity或fragment生命周期结束的时候,记得调用timer.cancle()方法:

    @Override
    public void onDestroy() {
        if(timer!=null){
            timer.cancel();
            timer = null;
        }
        super.onDestroy();
    }

总结:

短期的定时任务推荐用最后两种方式方式实现,长期或者有精确要求的定时任务则选择AlarmManger + Service在后台执行。最后把开始的展示图去壳之后内部实现了一遍,内容比较简单,整篇文中最值得注意的OOM问题是开发中常常忽视的,减少OOM和ANR的情况,才可以将代码的细节把控好!

来源:  https://www.jianshu.com/p/9304c8faf79f


另外, alarmManger相关情况如下:

系统服务之定时服务(AlarmManager)

AlarmManager提供了对系统定时服务的访问接口,使得开发者可以安排在未来的某个时间运行应用。当到达闹铃设定时间,系统就会广播闹铃之前注册的Intent。如果此时目标应用没有被启动,系统还会帮你自动启动目标应用。即使设备已经进入睡眠已注册的闹铃也会被保持,只有当设备关闭或是重启的时候会被清除。下面基于Android 8.0源码来一起学习一下。

闹铃类型

AlarmManager中一共提供了四种闹钟类型,前两种对应的System.currentTimeMillis()(系统当前时间)时间,后两种对应SystemClock.elapsedRealtime()(系统运行时间)时间,以WAKEUP结尾的类型能够唤醒设备,其他的类型不能唤醒设备,直到设备被唤醒才能出发警报提醒。

    public static final int RTC_WAKEUP = 0;
    public static final int RTC = 1;
    public static final int ELAPSED_REALTIME_WAKEUP = 2;
    public static final int ELAPSED_REALTIME = 3;

设置时间

在AlarmMananger中提供了setTime和setTimeZone方法分别用来设置系统时间和系统默认时区。其中,设置系统时间需要"android.permission.SET_TIME"权限。

返回值公开方法
voidsetTime(long millis)
voidsetTimeZone(String timeZone)

设置闹铃

返回值公开方法
voidset(int type, long triggerAtMillis, PendingIntent operation)
voidset(int type, long triggerAtMillis, String tag, AlarmManager.OnAlarmListener listener, Handler targetHandler)
voidsetAlarmClock(AlarmManager.AlarmClockInfo info, PendingIntent operation)
voidsetAndAllowWhileIdle(int type, long triggerAtMillis, PendingIntent operation)
voidsetExact(int type, long triggerAtMillis, PendingIntent operation)
voidsetExact(int type, long triggerAtMillis, String tag, AlarmManager.OnAlarmListener listener, Handler targetHandler)
voidsetExactAndAllowWhileIdle(int type, long triggerAtMillis, PendingIntent operation)
voidsetInexactRepeating(int type, long triggerAtMillis, long intervalMillis, PendingIntent operation)
voidsetRepeating(int type, long triggerAtMillis, long intervalMillis, PendingIntent operation)
voidsetWindow(int type, long windowStartMillis, long windowLengthMillis, PendingIntent operation)
voidsetWindow(int type, long windowStartMillis, long windowLengthMillis, String tag, AlarmManager.OnAlarmListener listener, Handler targetHandler)

以上是AlarmManager中提供的所有设置闹铃的方法,下面来详细介绍一下。

  • set
返回值公开方法
voidset(int type, long triggerAtMillis, PendingIntent operation)
voidset(int type, long triggerAtMillis, String tag, AlarmManager.OnAlarmListener listener, Handler targetHandler)

用于设置一次性闹铃,执行时间在设置时间附近,为非精确闹铃。方法一和方法二的区别:到达设定时间时方法一会广播PendingIntent中设定的Intent,而方法二会直接回调OnAlarmListener 中的onAlarm()方法。

  • setExact
返回值公开方法
voidsetExact(int type, long triggerAtMillis, PendingIntent operation)
voidsetExact(int type, long triggerAtMillis, String tag, AlarmManager.OnAlarmListener listener, Handler targetHandler)
voidsetAlarmClock(AlarmManager.AlarmClockInfo info, PendingIntent operation)

用于设置一次性闹铃,执行时间更为精准,为精确闹铃。方法一和二的区别参见上面set的区别。setAlarmClock方法等同于通过setExact方法设置的RTC_WAKEUP类型的闹铃,所以把他归在setExact中介绍。其中AlarmClockInfo实现了Android序列化接口Parcelable,里面包含了mTriggerTime(执行时间)和mShowIntent(执行动作)两个成员变量,可以看做是对闹铃事件的一个封装类。

  • setInexactRepeating和setRepeating
返回值公开方法
voidsetInexactRepeating(int type, long triggerAtMillis, long intervalMillis, PendingIntent operation)
voidsetRepeating(int type, long triggerAtMillis, long intervalMillis, PendingIntent operation)

setInexactRepeating和setRepeating两种方法都是用来设置重复闹铃的,setRepeating执行时间更为精准。在Android 4.4之后,Android系统为了省电把时间相近的闹铃打包到一起进行批量处理,这就使得setRepeating方法设置的闹铃不能被精确的执行,必须要使用setExact来代替。

  • setAndAllowWhileIdle和setExactAndAllowWhileIdle
返回值公开方法
voidsetAndAllowWhileIdle(int type, long triggerAtMillis, PendingIntent operation)
voidsetExactAndAllowWhileIdle(int type, long triggerAtMillis, PendingIntent operation)

使用setAndAllowWhileIdle和setExactAndAllowWhileIdle方法设置一次闹铃,可以在低功耗模式下被执行,setExactAndAllowWhileIdle执行时间更为精准。手机灭屏以后会进入低功耗模式(low-power idle modes),这个时候你会发现通过setExact设置的闹铃也不是100%准确了,需要用setExactAndAllowWhileIdle方法来设置,闹铃才能在低功耗模式下被执行。

  • setWindow
返回值公开方法
voidsetWindow(int type, long windowStartMillis, long windowLengthMillis, PendingIntent operation)
voidsetWindow(int type, long windowStartMillis, long windowLengthMillis, String tag, AlarmManager.OnAlarmListener listener, Handler targetHandler)

用于设置某个时间段内的一次闹铃。比如,我想在下午的2点到4点之间设置一次提醒。两个方法的区别同set。

取消闹铃

返回值公开方法
voidcancel(PendingIntent operation)
voidcancel(AlarmManager.OnAlarmListener listener)

用于取消设置过的闹铃,分别对应于PendingIntent和AlarmManager.OnAlarmListener方式注册的闹铃。

获得下一次闹铃事件

返回值公开方法
AlarmManager.AlarmClockInfogetNextAlarmClock()

用于获得下一次闹铃事件。

常用时间定义

AlarmManager类已经帮我们定义好了常用的时间常量。

    public static final long INTERVAL_FIFTEEN_MINUTES = 15 * 60 * 1000;
    public static final long INTERVAL_HALF_HOUR = 2*INTERVAL_FIFTEEN_MINUTES;
    public static final long INTERVAL_HOUR = 2*INTERVAL_HALF_HOUR;
    public static final long INTERVAL_HALF_DAY = 12*INTERVAL_HOUR;
    public static final long INTERVAL_DAY = 2*INTERVAL_HALF_DAY;

源码分析

设置闹铃

通过深入分析AlarmManager的源码,发现上面提到的所有与闹铃设置有关的方法(setXXX)最终都会调用setImpl方法,区别在于不同的应用场景设置的参数不同。setImpl方法的源码如下:

    private void setImpl(@AlarmType int type, long triggerAtMillis, long windowMillis,
            long intervalMillis, int flags, PendingIntent operation, final OnAlarmListener listener,
            String listenerTag, Handler targetHandler, WorkSource workSource,
            AlarmClockInfo alarmClock) {
        // 处理非法时间的设置
        if (triggerAtMillis < 0) {
            triggerAtMillis = 0;
        }

        // 把 OnAlarmListener 封装起来
        ListenerWrapper recipientWrapper = null;
        if (listener != null) {
            synchronized (AlarmManager.class) {
                if (sWrappers == null) {
                    sWrappers = new ArrayMap<OnAlarmListener, ListenerWrapper>();
                }

                recipientWrapper = sWrappers.get(listener);
                // no existing wrapper => build a new one
                if (recipientWrapper == null) {
                    recipientWrapper = new ListenerWrapper(listener);
                    sWrappers.put(listener, recipientWrapper);
                }
            }

            final Handler handler = (targetHandler != null) ? targetHandler : mMainThreadHandler;
            recipientWrapper.setHandler(handler);
        }
        // 调用Service的set方法
        try {
            mService.set(mPackageName, type, triggerAtMillis, windowMillis, intervalMillis, flags,
                    operation, recipientWrapper, listenerTag, workSource, alarmClock);
        } catch (RemoteException ex) {
            throw ex.rethrowFromSystemServer();
        }
    }

那么这个mService是哪来的呢?通过搜索在SystemServiceRegistry类中找到了一段静态方法,SystemServiceRegistry是用来管理所有能由Context.getSystemService方法获得系统服务的类,通过ServiceManager.getServiceOrThrow根据服务名字来查找到对应的IBinder,进而生成IAlarmManager实例并作为参数传递给AlarmManager。mService就是这个IAlarmManager实例。

    android-8.1.0_r2/frameworks/base/core/java/android/app/SystemServiceRegistry.java
    static {  
           ...
       registerService(Context.ALARM_SERVICE, AlarmManager.class,
                new CachedServiceFetcher<AlarmManager>() {
            @Override
            public AlarmManager createService(ContextImpl ctx) throws ServiceNotFoundException {
                IBinder b = ServiceManager.getServiceOrThrow(Context.ALARM_SERVICE);
                IAlarmManager service = IAlarmManager.Stub.asInterface(b);
                return new AlarmManager(service, ctx);
            }});
          ...
    }

接下来看看 IAlarmManager 是由谁实现的呢?熟悉Android源码的同学自然而然就会想到有可能有一个AlarmManagerService类来提供具体的实现机制。搜一搜还真有这个类,进一步搜索 IAlarmManager 查看哪里实现了这个接口类(当然,熟悉AIDL机制的同学也可以直接搜索 IAlarmManager ,也能找到)。

    private final IBinder mService = new IAlarmManager.Stub() {
        // 设置闹铃的方法
        @Override
        public void set(String callingPackage,
                int type, long triggerAtTime, long windowLength, long interval, int flags,
                PendingIntent operation, IAlarmListener directReceiver, String listenerTag,
                WorkSource workSource, AlarmManager.AlarmClockInfo alarmClock) {
            final int callingUid = Binder.getCallingUid();

            // make sure the caller is not lying about which package should be blamed for
            // wakelock time spent in alarm delivery
            mAppOps.checkPackage(callingUid, callingPackage);

            // Repeating alarms must use PendingIntent, not direct listener
            if (interval != 0) {
                if (directReceiver != null) {
                    throw new IllegalArgumentException("Repeating alarms cannot use AlarmReceivers");
                }
            }

            if (workSource != null) {
                getContext().enforcePermission(
                        android.Manifest.permission.UPDATE_DEVICE_STATS,
                        Binder.getCallingPid(), callingUid, "AlarmManager.set");
            }

            // No incoming callers can request either WAKE_FROM_IDLE or
            // ALLOW_WHILE_IDLE_UNRESTRICTED -- we will apply those later as appropriate.
            flags &= ~(AlarmManager.FLAG_WAKE_FROM_IDLE
                    | AlarmManager.FLAG_ALLOW_WHILE_IDLE_UNRESTRICTED);

            // Only the system can use FLAG_IDLE_UNTIL -- this is used to tell the alarm
            // manager when to come out of idle mode, which is only for DeviceIdleController.
            if (callingUid != Process.SYSTEM_UID) {
                flags &= ~AlarmManager.FLAG_IDLE_UNTIL;
            }

            // If this is an exact time alarm, then it can't be batched with other alarms.
            if (windowLength == AlarmManager.WINDOW_EXACT) {
                flags |= AlarmManager.FLAG_STANDALONE;
            }

            // If this alarm is for an alarm clock, then it must be standalone and we will
            // use it to wake early from idle if needed.
            if (alarmClock != null) {
                flags |= AlarmManager.FLAG_WAKE_FROM_IDLE | AlarmManager.FLAG_STANDALONE;

            // If the caller is a core system component or on the user's whitelist, and not calling
            // to do work on behalf of someone else, then always set ALLOW_WHILE_IDLE_UNRESTRICTED.
            // This means we will allow these alarms to go off as normal even while idle, with no
            // timing restrictions.
            } else if (workSource == null && (callingUid < Process.FIRST_APPLICATION_UID
                    || callingUid == mSystemUiUid
                    || Arrays.binarySearch(mDeviceIdleUserWhitelist,
                            UserHandle.getAppId(callingUid)) >= 0)) {
                flags |= AlarmManager.FLAG_ALLOW_WHILE_IDLE_UNRESTRICTED;
                flags &= ~AlarmManager.FLAG_ALLOW_WHILE_IDLE;
            }
            // 最终会调用AlarmManagerService的setImpl方法
            setImpl(type, triggerAtTime, windowLength, interval, operation, directReceiver,
                    listenerTag, flags, workSource, alarmClock, callingUid, callingPackage);
        }
        ...
    };

从上面这段源码可以看出,set方法最终会调用AlarmManagerService的setImpl方法。在setImpl中,根据传递的参数经过一系列的计算,传递给setImplLocked方法进行下一步处理。

    void setImpl(int type, long triggerAtTime, long windowLength, long interval,
            PendingIntent operation, IAlarmListener directReceiver, String listenerTag,
            int flags, WorkSource workSource, AlarmManager.AlarmClockInfo alarmClock,
            int callingUid, String callingPackage) {
        ...
        synchronized (mLock) {
            ...
            setImplLocked(type, triggerAtTime, triggerElapsed, windowLength, maxElapsed,
                    interval, operation, directReceiver, listenerTag, flags, true, workSource,
                    alarmClock, callingUid, callingPackage);
        }
    }

setImplLocked方法会把传递过来的参数封装成一个Alarm对象,调用setImplLocked的另一个重载方法。在setImplLocked中,会去计算Alarm所属的批次(Batch),然后根据批次进行重新打包,打包后对内核Alarm进行重新规划,更新下一个Alarm时间。

    private void setImplLocked(int type, long when, long whenElapsed, long windowLength,
            long maxWhen, long interval, PendingIntent operation, IAlarmListener directReceiver,
            String listenerTag, int flags, boolean doValidate, WorkSource workSource,
            AlarmManager.AlarmClockInfo alarmClock, int callingUid, String callingPackage) {
        // 参数封装成一个Alarm对象
        Alarm a = new Alarm(type, when, whenElapsed, windowLength, maxWhen, interval,
                operation, directReceiver, listenerTag, workSource, flags, alarmClock,
                callingUid, callingPackage);
        try {
            if (ActivityManager.getService().isAppStartModeDisabled(callingUid, callingPackage)) {
                Slog.w(TAG, "Not setting alarm from " + callingUid + ":" + a
                        + " -- package not allowed to start");
                return;
            }
        } catch (RemoteException e) {
        }
        removeLocked(operation, directReceiver);
        setImplLocked(a, false, doValidate);
    }

    private void setImplLocked(Alarm a, boolean rebatching, boolean doValidate) {
        // 计算alarm所属的批次
        int whichBatch = ((a.flags&AlarmManager.FLAG_STANDALONE) != 0)
                ? -1 : attemptCoalesceLocked(a.whenElapsed, a.maxWhenElapsed);
        if (whichBatch < 0) {
            Batch batch = new Batch(a);
            addBatchLocked(mAlarmBatches, batch);
        } else {
            Batch batch = mAlarmBatches.get(whichBatch);
            if (batch.add(a)) {
                // The start time of this batch advanced, so batch ordering may
                // have just been broken.  Move it to where it now belongs.
                mAlarmBatches.remove(whichBatch);
                addBatchLocked(mAlarmBatches, batch);
            }
        }
       ...
        if (!rebatching) {
            ...
            if (needRebatch) {
                // 重新打包所有的Alarm
                rebatchAllAlarmsLocked(false);
            }
            // 重新规划内核的Alarm
            rescheduleKernelAlarmsLocked();
            // 更新下一个Alarm的时间
            updateNextAlarmClockLocked();
        }
    }

在rescheduleKernelAlarmsLocked方法中会调用setLocked方法,setLocked方法内部会去调用native方法set,最终把Alarm设置到内核中去。

    private void setLocked(int type, long when) {
        if (mNativeData != 0) {
            // The kernel never triggers alarms with negative wakeup times
            // so we ensure they are positive.
            long alarmSeconds, alarmNanoseconds;
            if (when < 0) {
                alarmSeconds = 0;
                alarmNanoseconds = 0;
            } else {
                alarmSeconds = when / 1000;
                alarmNanoseconds = (when % 1000) * 1000 * 1000;
            }
            // native方法
            set(mNativeData, type, alarmSeconds, alarmNanoseconds);
        } else {
            Message msg = Message.obtain();
            msg.what = ALARM_EVENT;

            mHandler.removeMessages(ALARM_EVENT);
            mHandler.sendMessageAtTime(msg, when);
        }
    }

取消闹铃

在AlarmManager提供了两个cancel方法来取消闹铃,调用时候需要传递一个PendingIntent或是OnAlarmListener实例作为参数,从此也可以看出闹铃服务内部是以PendingIntent或是OnAlarmListener作为区分不同闹铃的唯一标识的。cancel(PendingIntent operation) 和 cancel(OnAlarmListener listener) 的实现原理是差不多的,最终都会调用mService.remove方法来移除闹铃,这里以 cancel(PendingIntent operation) 方法为例进行详细分析。

    public void cancel(PendingIntent operation) {
        // 如果 PendingIntent 为空,在N和之后的版本会抛出空指针异常
        if (operation == null) {
            final String msg = "cancel() called with a null PendingIntent";
            if (mTargetSdkVersion >= Build.VERSION_CODES.N) {
                throw new NullPointerException(msg);
            } else {
                Log.e(TAG, msg);
                return;
            }
        }

        try {
            // mService是一个IBinder,由来及对应方法的实现同上面设置闹铃中的解析
            mService.remove(operation, null);
        } catch (RemoteException ex) {
            throw ex.rethrowFromSystemServer();
        }
    }

mService.remove方法中首先会去判断PendingIntent 和 IAlarmListener 是否都为空,有一个不为空则调用removeLocked继续进行处理。

    private final IBinder mService = new IAlarmManager.Stub() {
        ...
         // 取消闹铃的方法
        @Override
        public void remove(PendingIntent operation, IAlarmListener listener) {
            // PendingIntent 和 IAlarmListener 必须有一个不为空
            if (operation == null && listener == null) {
                Slog.w(TAG, "remove() with no intent or listener");
                return;
            }
            synchronized (mLock) {
                // 调用AlarmManagerService中的removeLocked方法
                removeLocked(operation, listener);
            }
        }
        ...
    };

在removeLocked方法中,会根据传递过来的参数在mAlarmBatches和mPendingWhileIdleAlarms两个列表中查询当前要删除的Alarm,如果匹配到则删除。删除后会对所有闹铃重新打包,如果删除的是非低功耗模式下启动的闹铃则需要刷新非低功耗下启动的闹铃设置,最后更新下一次闹铃时间。

   private void removeLocked(PendingIntent operation, IAlarmListener directReceiver) {
        // 遍历查询并删除匹配的Alarms
        boolean didRemove = false;
        for (int i = mAlarmBatches.size() - 1; i >= 0; i--) {
            Batch b = mAlarmBatches.get(i);
            didRemove |= b.remove(operation, directReceiver);
            if (b.size() == 0) {
                mAlarmBatches.remove(i);
            }
        }
        for (int i = mPendingWhileIdleAlarms.size() - 1; i >= 0; i--) {
            if (mPendingWhileIdleAlarms.get(i).matches(operation, directReceiver)) {
                // Don't set didRemove, since this doesn't impact the scheduled alarms.
                mPendingWhileIdleAlarms.remove(i);
            }
        }

        if (didRemove) {
            if (DEBUG_BATCH) {
                Slog.v(TAG, "remove(operation) changed bounds; rebatching");
            }
            boolean restorePending = false;
            if (mPendingIdleUntil != null && mPendingIdleUntil.matches(operation, directReceiver)) {
                mPendingIdleUntil = null;
                restorePending = true;
            }
            if (mNextWakeFromIdle != null && mNextWakeFromIdle.matches(operation, directReceiver)) {
                mNextWakeFromIdle = null;
            }
            // 重新打包所有的闹铃
            rebatchAllAlarmsLocked(true);
            if (restorePending) {
                // 重新存储非低功耗下启动的闹铃
                restorePendingWhileIdleAlarmsLocked();
            }
            // 更新下一次闹铃时间
            updateNextAlarmClockLocked();
        }
    }

最终在restorePendingWhileIdleAlarmsLocked方法中会调用rescheduleKernelAlarmsLocked和updateNextAlarmClockLocked 重新规划内核的Alarm并更新下一个Alarm的时间。

    void restorePendingWhileIdleAlarmsLocked() {
        ...
        // 重新规划内核的Alarm
        rescheduleKernelAlarmsLocked();
        // 更新下一个Alarm的时间
        updateNextAlarmClockLocked();
        ...
    }

获得下一次闹铃事件

AlarmManager提供了getNextAlarmClock方法来获得下一次闹铃事件,该方法中会把当前的UserId作为查询依据传递到AlarmManagerService中的getNextAlarmClockImpl方法,从而查询出当前用户所对应的下一次闹铃事件。

    frameworks/base/core/java/android/app/AlarmManager.java
    public AlarmClockInfo getNextAlarmClock() {
        return getNextAlarmClock(UserHandle.myUserId());
    }

    public AlarmClockInfo getNextAlarmClock(int userId) {
        try {
            return mService.getNextAlarmClock(userId);
        } catch (RemoteException ex) {
            throw ex.rethrowFromSystemServer();
        }
    }

    frameworks/base/services/core/java/com/android/server/AlarmManagerService.java
    private final IBinder mService = new IAlarmManager.Stub() {
        ...
         // 获得下次闹铃事件
        @Override
        public AlarmManager.AlarmClockInfo getNextAlarmClock(int userId) {
            userId = ActivityManager.handleIncomingUser(Binder.getCallingPid(),
                    Binder.getCallingUid(), userId, false /* allowAll */, false /* requireFull */,
                    "getNextAlarmClock", null);

            return getNextAlarmClockImpl(userId);
        }
        ...
    };

    AlarmManager.AlarmClockInfo getNextAlarmClockImpl(int userId) {
        synchronized (mLock) {
            return mNextAlarmClockForUser.get(userId);
        }
    }

设置系统时间

设置系统时间的功能实现流程比较简单,在AlarmManager提供的setTime方法中直接调用mService.setTime方法,进而通过AlarmManagerService中声明的native方法setKernelTime把时间设置到底层内核中去。

    frameworks/base/core/java/android/app/AlarmManager.java
    public void setTime(long millis) {
        try {
            mService.setTime(millis);
        } catch (RemoteException ex) {
            throw ex.rethrowFromSystemServer();
        }
    }

    frameworks/base/services/core/java/com/android/server/AlarmManagerService.java
    private final IBinder mService = new IAlarmManager.Stub() {
        ...
         // 设置系统时钟的方法
        @Override
        public boolean setTime(long millis) {
            // 注意,设置系统时间需要"android.permission.SET_TIME"权限
            getContext().enforceCallingOrSelfPermission(
                    "android.permission.SET_TIME",
                    "setTime");

            if (mNativeData == 0) {
                Slog.w(TAG, "Not setting time since no alarm driver is available.");
                return false;
            }

            synchronized (mLock) {
                // native 方法,直接设置到底层kernel中
                return setKernelTime(mNativeData, millis) == 0;
            }
        }
        ...
    };

设置系统时区

在AlarmManager提供的setTimeZone方法中直接调用mService的setTimeZone方法,进而调用AlarmManagerService的setTimeZoneImpl方法,并由此方法完成整个系统时区设置的相关逻辑(包括系统属性值修改、设置内核时区和广播系统时区变化)。

    frameworks/base/core/java/android/app/AlarmManager.java
    public void setTimeZone(String timeZone) {
        ...
        try {
            mService.setTimeZone(timeZone);
        } catch (RemoteException ex) {
            throw ex.rethrowFromSystemServer();
        }
    }

    frameworks/base/services/core/java/com/android/server/AlarmManagerService.java
    private final IBinder mService = new IAlarmManager.Stub() {
        ...
         // 设置系统默认时区的方法
        @Override
        public void setTimeZone(String tz) {
            getContext().enforceCallingOrSelfPermission(
                    "android.permission.SET_TIME_ZONE",
                    "setTimeZone");

            final long oldId = Binder.clearCallingIdentity();
            try {
                setTimeZoneImpl(tz);
            } finally {
                Binder.restoreCallingIdentity(oldId);
            }
        }
        ...
    };

    void setTimeZoneImpl(String tz) {
        ...
        boolean timeZoneWasChanged = false;
        synchronized (this) {
            String current = SystemProperties.get(TIMEZONE_PROPERTY);
            if (current == null || !current.equals(zone.getID())) {
                timeZoneWasChanged = true;
                // 设置SystemProperties中时区对应的字段值
                SystemProperties.set(TIMEZONE_PROPERTY, zone.getID());
            }

            int gmtOffset = zone.getOffset(System.currentTimeMillis());
            // native 方法,直接设置到底层kernel中
            setKernelTimezone(mNativeData, -(gmtOffset / 60000));
        }

        TimeZone.setDefault(null);
        // 广播系统时区变化
        if (timeZoneWasChanged) {
            Intent intent = new Intent(Intent.ACTION_TIMEZONE_CHANGED);
            intent.addFlags(Intent.FLAG_RECEIVER_REPLACE_PENDING
                    | Intent.FLAG_RECEIVER_INCLUDE_BACKGROUND
                    | Intent.FLAG_RECEIVER_VISIBLE_TO_INSTANT_APPS);
            intent.putExtra("time-zone", zone.getID());
            getContext().sendBroadcastAsUser(intent, UserHandle.ALL);
        }
    }

总结

本文基于Android 8.0源码,首先列举了闹铃种类和设置闹铃、取消闹铃、获得下一次闹铃事件、设置系统时间、设置系统时区等相关方法,然后结合系统源码详细分析了各种方法的实现机制。使用过程中有以下几点需要注意:
1、设置系统时间需要"android.permission.SET_TIME"权限。
2、每当有新的Alarm设置或删除定时服务都会重新计算所属批次,把时间相近的Alarm打包到一个批次里(Batch)一起执行,起到优化电池节省耗电的目的。这就是导致非精确Alarm执行时间存在不确定误差的根本原因。
3、如果想要在低耗电模式下触发闹铃需要通过setAndAllowWhileIdle和setExactAndAllowWhileIdle方法来设置闹铃。
4、如果设置的闹铃时间已经过了,闹铃会被立即触发。这个问题可以通过比较闹铃设置时间和当前时间来解决。
5、根据实际需求选择是否设置精确闹铃以达到优化电池节省耗电的目的。
6、通过设置时区的源码可知,如果想要获取系统时区的相关信息可以通过监听Intent.ACTION_TIMEZONE_CHANGED广播或是直接读取系统属性TIMEZONE_PROPERTY。

具体的使用方法可以参考下面两个链接:
使用示例:Android定时器AlarmManager
不同版本的差异:关于使用AlarmManager的注意事项

 -----------

关于android的alarmmanager使用过程中的坑(包括魅族手机休眠后无法启动闹钟的问题)

  在最近的开发过程中,需要完成一个本地闹钟的功能,需求是固定的3个闹钟,每日重复,可以手动开关,需要时间精准,闹钟响起时需弹出dialog和播放音乐。
在alarmmanager的使用过程中主要参考了github上的一个demo , Android-AlarmManagerClock ,遇到了一些比较难解决的问题,现在整理一下以防止以后再采坑。

1.关于不同手机版本精确闹钟的兼容

SDK API < 19

一般情况下,使用 AlarmManager 来执行重复定时任务的代码如下所示:

alarmManager.setRepeating(AlarmManager.ELAPSED_REALTIME_WAKEUP, SystemClock.elapsedRealtime(), TIME_INTERVAL, pendingIntent);

或者

alarmManager.setRepeating(AlarmManager.RTC_WAKEUP, System.currentTimeMillis(), TIME_INTERVAL, pendingIntent);

setRepeating 该方法用于设置重复定时任务。

  • 第一个参数表示闹钟类型:一般为 AlarmManager.ELAPSED_REALTIME_WAKEUP 或者 AlarmManager.RTC_WAKEUP 。它们之间的区别就是前者是从手机开机后的时间,包含了手机睡眠时间;而后者使用的就是手机系统设置中的时间。所以如果设置为 AlarmManager.RTC_WAKEUP ,那么可以通过修改手机系统的时间来提前触发定时事件。另外,对于相似的 AlarmManager.ELAPSED_REALTIME 和 AlarmManager.RTC 来说,它们不会唤醒 CPU 。所以使用的频率较少;
  • 第二个参数表示任务首次执行时间:与第一个参数密切相关。第一个参数若为 AlarmManager.ELAPSED_REALTIME_WAKEUP ,那么当前时间就为 SystemClock.elapsedRealtime() ;若为 AlarmManager.RTC_WAKEUP ,那么当前时间就为 System.currentTimeMillis() ;
  • 第三个参数表示两次执行的间隔时间:这个参数没什么好讲的,一般为常量;
  • 第四个参数表示对应的响应动作:一般都是去发送广播,然后在广播接收 onReceive(Context context, Intent intent) 中做相关操作。

SDK API >= 19 && SDK API < 23

当你写好代码、满心欢喜地将程序跑在手机上的时候,傻眼了!你会发现在 Android 4.4 及以上版本的定时任务不是按照规定时间间隔来执行的。比如你设置了每隔 3 分钟发出一个 HTTP 请求,结果你一看莫名其妙地变成了隔 5 分钟发一次。

然后你查阅 Android 官网中关于 Android 4.4 API 会看到如下几句话:

1017209-9aeac689a801b0a7.png

恍然大悟!原来是 Google 为了追求系统省电,所以“偷偷加工”了一下唤醒的时间间隔。但也正如上面官网中所说的那样,如果在 Android 4.4 及以上的设备还要追求精准的闹钟定时任务,要使用 setExact() 方法。

所以,相应的代码就变成了这样:

// pendingIntent 为发送广播
if (Build.VERSION.SDK_INT >= Build.VERSION_CODES.KITKAT) {
    alarmManager.setExact(AlarmManager.ELAPSED_REALTIME_WAKEUP, SystemClock.elapsedRealtime(), pendingIntent);
} else {
    alarmManager.setRepeating(AlarmManager.ELAPSED_REALTIME_WAKEUP, SystemClock.elapsedRealtime(), TIME_INTERVAL, pendingIntent);
}

private BroadcastReceiver alarmReceiver = new BroadcastReceiver() {
    @Override
    public void onReceive(Context context, Intent intent) {
        // 重复定时任务
        if (Build.VERSION.SDK_INT >= Build.VERSION_CODES.KITKAT) {
            alarmManager.setExact(AlarmManager.ELAPSED_REALTIME_WAKEUP, SystemClock.elapsedRealtime() + TIME_INTERVAL, pendingIntent);
        }
        // to do something
        doSomething();
    }
};

当你写好了“加强版”的 AlarmManager 之后,内心肯定无比小激动。这下总应该行了吧?运行一下,果然没错!在 Android 4.4 上的确按照规定的时间间隔在执行任务。哈哈,这下大功告成了!!!

SDK API >= 23

在 Android 4.4 上品尝到胜利的甜头后,你顺便在 Android 6.0 的设备上测试了一下。结果。。。。。。你又 TMD 傻眼了!

发现在设备关屏静止一段时间后, AlarmManager 又又又不能正常工作了。相必此时你连日狗的心都有了吧!强忍着泪水,再次打开 Android 官网中关于 Android 6.0 变更 ,发现在 Android 6.0 中引入了低电耗模式和应用待机模式。然后接着往下看 对低电耗模式和应用待机模式进行针对性优化 ,发现会有下面一段话:

1017209-958b1bca16fe2651.png

啊啊啊啊啊啊!之前在 Android 4.4 上能用的 setExact() 方法在 Android 6.0 上因为低电耗模式又不能正常使用了。但是,Google 又又又提供了新的方法 setExactAndAllowWhileIdle() 来解决在低电耗模式下的闹钟触发。

所以,Attention!相关的代码又被改写为这样:

// pendingIntent 为发送广播
if (Build.VERSION.SDK_INT >= Build.VERSION_CODES.M) {
    alarmManager.setExactAndAllowWhileIdle(AlarmManager.ELAPSED_REALTIME_WAKEUP, SystemClock.elapsedRealtime(), pendingIntent);
} else if (Build.VERSION.SDK_INT >= Build.VERSION_CODES.KITKAT) {
    alarmManager.setExact(AlarmManager.ELAPSED_REALTIME_WAKEUP, SystemClock.elapsedRealtime(), pendingIntent);
} else {
    alarmManager.setRepeating(AlarmManager.ELAPSED_REALTIME_WAKEUP, SystemClock.elapsedRealtime(), TIME_INTERVAL, pendingIntent);
}

private BroadcastReceiver alarmReceiver = new BroadcastReceiver() {
    @Override
    public void onReceive(Context context, Intent intent) {
        // 重复定时任务
        if (Build.VERSION.SDK_INT >= Build.VERSION_CODES.M) {
            alarmManager.setExactAndAllowWhileIdle(AlarmManager.ELAPSED_REALTIME_WAKEUP, SystemClock.elapsedRealtime() + TIME_INTERVAL, pendingIntent);
        } else if (Build.VERSION.SDK_INT >= Build.VERSION_CODES.KITKAT) {
            alarmManager.setExact(AlarmManager.ELAPSED_REALTIME_WAKEUP, SystemClock.elapsedRealtime() + TIME_INTERVAL, pendingIntent);
        }
        // to do something
        doSomething();
    }
};

2.Android 7.0 pendingIntent用intent传递的bug

问题比较少见,只有你在跨进程传递数据的时候会碰到,如pendingIntent中

在7.0中通过pendingIntent的bundle传递的数据时,你会发现serializable和parcelable的数据拿不到

如果你只传了string,那是没问题的,但是如果你传了string和一个serializable你会发现,不光serializable拿不到,连string也拿不到了,黑人问好脸吧

原因参考:

https://commonsware.com/blog/2016/07/22/be-careful-where-you-use-custom-parcelables.html

解决方案1:

https://stackoverflow.com/questions/18000093/how-to-marshall-and-unmarshall-a-parcelable-to-a-byte-array-with-help-of-parcel/18000094#18000094

他的解决方法很独特,将所有数据转为基本类型bytes再去传递,当然,这可以解决我们的问题

然后我就想既然byte能解决,只传string也没问题,那为什么不干脆直接传string嗯,所以另一个简单的修改方法就是把所有的对象全部转成jsonstring去传递,也可以解决问题

解决方案2:

继续寻找有没有更加合适的方案时发现google的issuetracker中有个大神发现了一个更简单的方法,直接把所有数据放到bundle里,然后将bundler作为参数传递即intent.putExtra("data",bundle)也可以解决问题,

详情参考:

https://issuetracker.google.com/issues/37097877

参考代码:

        Intent intent = new Intent(ALARM_ACTION);
        Bundle bundle = new Bundle();
        bundle.putInt(AlarmConfig.DATA_BUNDLE_ALARM_ID,id);
        bundle.putLong(AlarmConfig.DATA_BUNDLE_INTERVALMILLIS, intervalMillis);
        intent.putExtra(AlarmConfig.DATA_BUNDLE, bundle);
        // 这个pendingIntent是Intent的包装类, 在闹钟到点的时候能够发送广播给AlarmOnTimeReceiver
        PendingIntent sender = PendingIntent.getBroadcast(context, id, intent, PendingIntent
                .FLAG_CANCEL_CURRENT);

另外两个问题是关于魅族手机适配的问题:
发现在魅族手机上出现2个问题,魅族M6版本 Flyme 6.1.4.6A ,Android 版本 7.1.2 :

  1. 实现一个通知栏通知的功能,闹钟响起来就出现通知通知栏,setContentText()中的内容要是有 感叹号(!) 就通知就出现不了,代码如下 :
    //发送通知
    private void showNotification(AlarmClock clock) {
    int NOTIFICATION_ID = clock.getId();
    NotificationCompat.Builder builder = new NotificationCompat.Builder(this);
    builder.setContentTitle
    ("闹钟响起了").setContentText("时间到了哦!").setAutoCancel(true).setColor(Color
    .rgb(134, 177, 194)).setSmallIcon(R.mipmap.ic_launcher).setLargeIcon
    (BitmapFactory.decodeResource(getResources(), R.mipmap.ic_launcher)).setDefaults
    (NotificationCompat.DEFAULT_ALL);
    //要跳转到主页面
    Intent intent = new Intent(this, HomeActivity.class);
    PendingIntent operation = PendingIntent.getActivity(this, NOTIFICATION_ID, intent, 0);
    builder.setFullScreenIntent(operation, false); // 悬挂式Notification(5.0 新增)
    builder.setContentIntent(operation);
    Notification notification = builder.build();
    mNotificationManager.notify(NOTIFICATION_ID, notification);
    }

2.使用AlarmManager ,在App中按Home键锁屏后闹钟失效(只有按Home键锁屏这一种情况,按返回键没有这个问题) , AlarmManager接收不到广播 ,导致闹钟失效

解决问题1最终还是没有解决
解决问题2:通过魅族手机-设置-关闭智能休眠模式

魅族手机的问题说明 手机厂商改动系统太多了, 给开发者带来了无数适配的坑.... = =

参考文章:
关于使用AlarmManager的注意事项
Android 7.0 pendingIntent bug(AlarmManager通过PendingIntent传递数据(跨进程数据传递)

来源: https://www.jianshu.com/p/6be84993d2f7

c语言线程编程

Abstract

In shared memory multiprocessor architectures, threads can be used to implement parallelism. Historically, hardware vendors have implemented their own proprietary versions of threads, making portability a concern for software developers. For UNIX systems, a standardized C language threads programming interface has been specified by the IEEE POSIX 1003.1c standard. Implementations that adhere to this standard are referred to as POSIX threads, or Pthreads.

在共享内存多处理器体系结构中,线程可以用来实现并行性。从历史上看,硬件供应商已经实现了他们自己的线程专有版本,这使得可移植性成为软件开发人员关注的问题。对于unix系统,ieee posix 1003.1c标准规定了标准的c语言线程编程接口。遵循此标准的实现称为posix线程或pthreads。(fanyi.baidu.com翻译结果)

The tutorial begins with an introduction to concepts, motivations, and design considerations for using Pthreads. Each of the three major classes of routines in the Pthreads API are then covered: Thread Management, Mutex Variables, and Condition Variables. Example codes are used throughout to demonstrate how to use most of the Pthreads routines needed by a new Pthreads programmer. The tutorial concludes with a discussion of LLNL specifics and how to mix MPI with pthreads. A lab exercise, with numerous example codes (C Language) is also included.

本教程首先介绍使用pthread的概念、动机和设计注意事项。接下来将介绍pthreads api中的三个主要例程类:线程管理、互斥变量和条件变量。示例代码始终用于演示如何使用新pthreads程序员所需的大多数pthreads例程。本教程最后讨论了llnl的细节以及如何将mpi与pthreads混合。还包括一个带有大量示例代码(C语言)的实验室练习。

Level/Prerequisites: This tutorial is ideal for those who are new to parallel programming with pthreads. A basic understanding of parallel programming in C is required. For those who are unfamiliar with Parallel Programming in general, the material covered in EC3500: Introduction to Parallel Computing would be helpful.
级别/先决条件:本教程非常适合那些刚开始使用pthreads进行并行编程的人。需要对C语言中的并行编程有基本的了解。对于一般不熟悉并行编程的人来说,EC3500:并行计算简介中的内容会很有帮助。

Pthreads Overview

What is a Thread?

  • Technically, a thread is defined as an independent stream of instructions that can be scheduled to run as such by the operating system. But what does this mean?

从技术上讲,线程被定义为一个独立的指令流,操作系统可以将其调度为这样运行。但这是什么意思?

  • To the software developer, the concept of a "procedure" that runs independently from its main program may best describe a thread.

对于软件开发人员来说,独立于主程序运行的“过程”的概念最能描述线程。

  • To go one step further, imagine a main program (a.out) that contains a number of procedures. Then imagine all of these procedures being able to be scheduled to run simultaneously and/or independently by the operating system. That would describe a "multi-threaded" program.

为了更进一步,设想一个包含许多过程的主程序(a.out)。然后想象所有这些过程都能够被操作系统同时和/或独立地调度运行。这将描述一个“多线程”程序。

  • How is this accomplished?

这是怎么做到的?

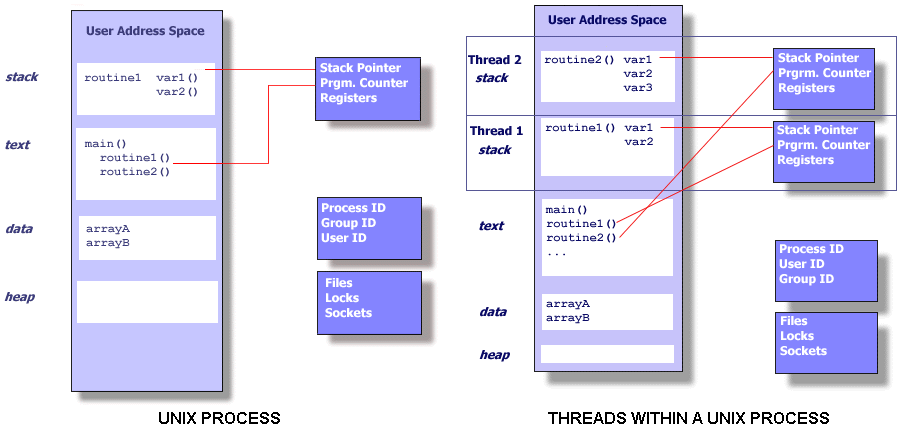
  • Before understanding a thread, one first needs to understand a UNIX process. A process is created by the operating system, and requires a fair amount of "overhead". Processes contain information about program resources and program execution state, including:

在理解线程之前,首先需要了解unix进程。一个进程是由操作系统创建的,需要相当多的“开销”。进程包含有关程序资源和程序执行状态的信息,包括:

    • Process ID, process group ID, user ID, and group ID  进程ID、进程组ID、用户ID和组ID
    • Environment    环境
    • Working directory.   工作目录
    • Program instructions   程序指令
    • Registers   寄存器
    • Stack    栈  (线程)
    • Heap    堆
    • File descriptors   文件描述符
    • Signal actions     信号作用
    • Shared libraries   共享库
    • Inter-process communication tools (such as message queues, pipes, semaphores, or shared memory).
  •           进程间通信工具(如消息队列、管道、信号量或共享内存)。


  • Threads use and exist within these process resources, yet are able to be scheduled by the operating system and run as independent entities largely because they duplicate only the bare essential resources that enable them to exist as executable code.

线程使用并存在于这些进程资源中,但它们可以由操作系统调度,并且作为独立的实体运行,主要是因为它们只复制允许它们作为可执行代码存在的裸露的基本资源。

  • This independent flow of control is accomplished because a thread maintains its own: 这一独立的控制流之所以完成,是因为线程维护自己的:
    • Stack pointer    栈指针
    • Registers           寄存器
    • Scheduling properties (such as policy or priority)计划属性(如策略或优先级)
    • Set of pending and blocked signals 待处理和阻塞信号集
    • Thread specific data. 线程特定数据
  • So, in summary, in the UNIX environment a thread:总之,在unix环境中,一个线程:
    • Exists within a process and uses the process resources 存在于进程内并使用进程资源
    • Has its own independent flow of control as long as its parent process exists and the OS supports it只要它的父进程存在并且OS支持它,它就有自己独立的控制流。
    • Duplicates only the essential resources it needs to be independently schedulable只复制它需要独立可调度的基本资源
    • May share the process resources with other threads that act equally independently (and dependently)可以与其他独立(独立)工作的线程共享进程资源。
    • Dies if the parent process dies - or something similar如果父进程死亡或类似的事情
    • Is "lightweight" because most of the overhead has already been accomplished through the creation of its process.是“轻量级”的,因为大部分开销已经通过创建其进程来完成。
  • Because threads within the same process share resources:因为同一进程中的线程共享资源:
    • Changes made by one thread to shared system resources (such as closing a file) will be seen by all other threads.一个线程对共享系统资源所做的更改(例如关闭文件)将被所有其他线程看到。
    • Two pointers having the same value point to the same data.具有相同值的两个指针指向相同的数据。
    • Reading and writing to the same memory locations is possible, and therefore requires explicit synchronization by the programmer. 读取和写入相同的内存位置是可能的,因此需要程序员显式同步。
Pthreads Overview

What are Pthreads?

  • Historically, hardware vendors have implemented their own proprietary versions of threads. These implementations differed substantially from each other making it difficult for programmers to develop portable threaded applications.历史上,硬件供应商已经实现了他们自己的线程专有版本。这些实现之间有很大的不同,使得程序员很难开发可移植的线程应用程序。
  • In order to take full advantage of the capabilities provided by threads, a standardized programming interface was required.为了充分利用线程提供的功能,需要一个标准化的编程接口。
    • For UNIX systems, this interface has been specified by the IEEE POSIX 1003.1c standard (1995).对于unix系统,此接口已由ieee posix 1003.1c标准(1995)指定。
    • Implementations adhering to this standard are referred to as POSIX threads, or Pthreads.遵循此标准的实现称为posix线程或pthreads。
    • Most hardware vendors now offer Pthreads in addition to their proprietary API's.大多数硬件供应商现在除了他们专有的api之外还提供pthread。
  • The POSIX standard has continued to evolve and undergo revisions, including the Pthreads specification.POSIX标准一直在不断发展和修订,包括pthreads规范。
  • Some useful links:
    • standards.ieee.org/findstds/standard/1003.1-2008.html
    • www.opengroup.org/austin/papers/posix_faq.html
    • www.unix.org/version3/ieee_std.html
  • Pthreads are defined as a set of C language programming types and procedure calls, implemented with a pthread.h header/include file and a thread library - though this library may be part of another library, such as libc, in some implementations. pthreads被定义为一组c语言编程类型和过程调用,用pthread.h头/包含文件和线程库实现——尽管在某些实现中,这个库可能是另一个库(如libc)的一部分。
Pthreads Overview

Why Pthreads?

Light Weight:  重量轻:

  • When compared to the cost of creating and managing a process, a thread can be created with much less operating system overhead. Managing threads requires fewer system resources than managing processes.与创建和管理进程的成本相比,创建线程的操作系统开销要少得多。管理线程比管理进程需要更少的系统资源。
  • For example, the following table compares timing results for the fork() subroutine and the pthread_create() subroutine. Timings reflect 50,000 process/thread creations, were performed with the time utility, and units are in seconds, no optimization flags.Note: don't expect the sytem and user times to add up to real time, because these are SMP systems with multiple CPUs/cores working on the problem at the same time. At best, these are approximations run on local machines, past and present.例如,下表比较fork()子例程和pthread_create()子例程的计时结果。计时反映50000个进程/线程创建,使用时间实用程序执行,单位为秒,没有优化标志。注意:不要期望系统和用户时间加起来是实时的,因为这些是多个CPU/内核同时处理问题的SMP系统。充其量,这些是在本地机器上运行的近似,过去和现在。
  • Platformfork()pthread_create()
    realusersysrealusersys
    Intel 2.6 GHz Xeon E5-2670 (16 cores/node)8.10.12.90.90.20.3
    Intel 2.8 GHz Xeon 5660 (12 cores/node)4.40.44.30.70.20.5
    AMD 2.3 GHz Opteron (16 cores/node)12.51.012.51.20.21.3
    AMD 2.4 GHz Opteron (8 cores/node)17.62.215.71.40.31.3
    IBM 4.0 GHz POWER6 (8 cpus/node)9.50.68.81.60.10.4
    IBM 1.9 GHz POWER5 p5-575 (8 cpus/node)64.230.727.61.70.61.1
    IBM 1.5 GHz POWER4 (8 cpus/node)104.548.647.22.11.01.5
    INTEL 2.4 GHz Xeon (2 cpus/node)54.91.520.81.60.70.9
    INTEL 1.4 GHz Itanium2 (4 cpus/node)54.51.122.22.01.20.6

    View source code  fork_vs_thread.txt

Efficient Communications/Data Exchange:高效的通信/数据交换

  • The primary motivation for considering the use of Pthreads in a high performance computing environment is to achieve optimum performance. In particular, if an application is using MPI for on-node communications, there is a potential that performance could be improved by using Pthreads instead.考虑在高性能计算环境中使用pthreads的主要动机是获得最佳性能。特别是,如果应用程序使用mpi进行节点上的通信,那么使用pthreads可以提高性能。
  • MPI libraries usually implement on-node task communication via shared memory, which involves at least one memory copy operation (process to process).mpi库通常通过共享内存实现节点上的任务通信,其中至少涉及一个内存复制操作(进程到进程)。
  • For Pthreads there is no intermediate memory copy required because threads share the same address space within a single process. There is no data transfer, per se. It can be as efficient as simply passing a pointer.对于pthreads,不需要中间内存拷贝,因为线程在单个进程中共享相同的地址空间。本质上没有数据传输。它可以像简单地传递指针一样高效。
  • In the worst case scenario, Pthread communications become more of a cache-to-CPU or memory-to-CPU bandwidth issue. These speeds are much higher than MPI shared memory communications.在最坏的情况下,pthread通信变得更像是一个缓存到cpu或内存到cpu的带宽问题。这些速度远高于mpi共享内存通信。
  • For example: some local comparisons, past and present, are shown below:例如:一些过去和现在的本地比较如下所示
    PlatformMPI Shared Memory Bandwidth
    (GB/sec)
    Pthreads Worst Case
    Memory-to-CPU Bandwidth
    (GB/sec)
    Intel 2.6 GHz Xeon E5-2670 4.551.2
    Intel 2.8 GHz Xeon 5660 5.632
    AMD 2.3 GHz Opteron 1.85.3
    AMD 2.4 GHz Opteron 1.25.3
    IBM 1.9 GHz POWER5 p5-575 4.116
    IBM 1.5 GHz POWER42.14
    Intel 2.4 GHz Xeon0.34.3
    Intel 1.4 GHz Itanium 21.86.4

Other Common Reasons:

  • Threaded applications offer potential performance gains and practical advantages over non-threaded applications in several other ways:与非线程应用程序相比,线程应用程序在以下几个方面提供了潜在的性能增益和实际优势:
    • Overlapping CPU work with I/O: For example, a program may have sections where it is performing a long I/O operation. While one thread is waiting for an I/O system call to complete, CPU intensive work can be performed by other threads.重叠的CPU与I/O工作:例如,程序可能有执行长I/O操作的部分。当一个线程等待I/O系统调用完成时,CPU密集型工作可以由其他线程执行。
    • Priority/real-time scheduling: tasks which are more important can be scheduled to supersede or interrupt lower priority tasks.优先级/实时调度:更重要的任务可以被调度以取代或中断较低优先级的任务。
    • Asynchronous event handling: tasks which service events of indeterminate frequency and duration can be interleaved. For example, a web server can both transfer data from previous requests and manage the arrival of new requests.异步事件处理:服务频率和持续时间不确定的事件的任务。例如,web服务器既可以传输以前请求的数据,也可以管理新请求的到达。
  • A perfect example is the typical web browser, where many interleaved tasks can be happening at the same time, and where tasks can vary in priority.一个完美的例子是典型的web浏览器,其中许多交错的任务可以同时发生,并且任务的优先级可以不同。
  • Another good example is a modern operating system, which makes extensive use of threads. A screenshot of the MS Windows OS and applications using threads is shown below.另一个很好的例子是现代操作系统,它广泛使用线程。使用线程的MS Windows操作系统和应用程序的屏幕截图如下所示。

    Click for larger image


Pthreads Overview

Designing Threaded Programs

Parallel Programming:并行编程:

  • On modern, multi-core machines, pthreads are ideally suited for parallel programming, and whatever applies to parallel programming in general, applies to parallel pthreads programs.在现代的多核机器上,pthreads非常适合并行编程,无论什么样的应用于并行编程,一般都适用于并行pthreads程序。
  • There are many considerations for designing parallel programs, such as:设计并行程序需要考虑很多因素,例如:
    • What type of parallel programming model to use?使用哪种类型的并行编程模型?
    • Problem partitioning问题分区
    • Load balancing负载均衡
    • Communications通信
    • Data dependencies资料相依
    • Synchronization and race conditions同步和竞争条件
    • Memory issues内存问题
    • I/O issues    I/O问题
    • Program complexity程序复杂性
    • Programmer effort/costs/time  程序员工作/成本/时间
    • ...
  • Covering these topics is beyond the scope of this tutorial, however interested readers can obtain a quick overview in the Introduction to Parallel Computing tutorial.涵盖这些主题超出了本教程的范围,但是感兴趣的读者可以在并行计算入门教程中获得一个快速的概述。
  • In general though, in order for a program to take advantage of Pthreads, it must be able to be organized into discrete, independent tasks which can execute concurrently. For example, if routine1 and routine2 can be interchanged, interleaved and/or overlapped in real time, they are candidates for threading.但是,一般来说,为了让程序利用pthreads,它必须能够被组织成可以并发执行的离散的、独立的任务。例如,如果routine1和routine2可以实时交换、交织和/或重叠,则它们是线程的候选对象。
  • Programs having the following characteristics may be well suited for pthreads:具有以下特性的程序可能非常适合pthread:
    • Work that can be executed, or data that can be operated on, by multiple tasks simultaneously:可由多个任务同时执行的工作或可操作的数据:
    • Block for potentially long I/O waits阻止潜在的长I/O等待
    • Use many CPU cycles in some places but not others在某些地方使用许多CPU周期,但在其他地方不使用
    • Must respond to asynchronous events必须响应异步事件
    • Some work is more important than other work (priority interrupts)有些工作比其他工作更重要(优先级中断)
  • Several common models for threaded programs exist:有几种常见的线程程序模型存在:
    • Manager/worker: a single thread, the manager assigns work to other threads, the workers. Typically, the manager handles all input and parcels out work to the other tasks. At least two forms of the manager/worker model are common: static worker pool and dynamic worker pool.管理器/工作线程:一个线程,管理器将工作分配给其他线程,即工作线程。通常,管理器处理所有输入,并将工作分配给其他任务。管理器/工作器模型至少有两种常见形式:静态工作器池和动态工作器池。
    • Pipeline: a task is broken into a series of suboperations, each of which is handled in series, but concurrently, by a different thread. An automobile assembly line best describes this model.管道:一个任务被分解成一系列子操作,每个子操作由一个不同的线程按顺序(但同时)处理。汽车装配线最能描述这种模式。
    • Peer: similar to the manager/worker model, but after the main thread creates other threads, it participates in the work.peer:类似于manager/worker模型,但是在主线程创建其他线程之后,它参与工作。

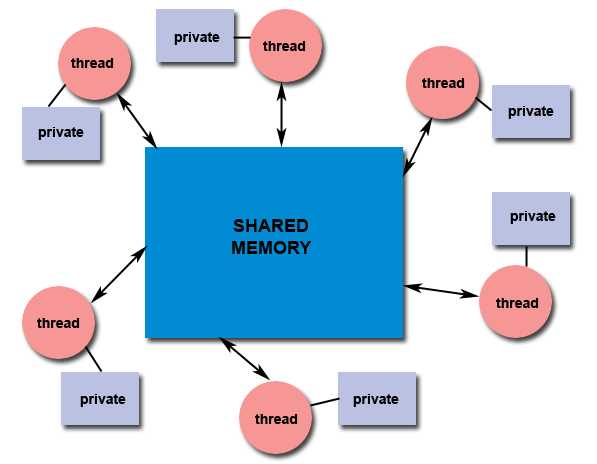
Shared Memory Model: 共享内存模型:

  • All threads have access to the same global, shared memory所有线程都可以访问相同的全局共享内存
  • Threads also have their own private data线程也有自己的私有数据
  • Programmers are responsible for synchronizing access (protecting) globally shared data.程序员负责同步访问(保护)全局共享数据。

Thread-safeness: 线程安全性

  • Thread-safeness: in a nutshell, refers an application's ability to execute multiple threads simultaneously without "clobbering" shared data or creating "race" conditions.线程安全性:简而言之,是指应用程序能够同时执行多个线程,而不会“破坏”共享数据或创建“竞争”条件。
  • For example, suppose that your application creates several threads, each of which makes a call to the same library routine:例如,假设应用程序创建了几个线程,每个线程都调用同一个库例程:
    • This library routine accesses/modifies a global structure or location in memory.此库例程访问/修改内存中的全局结构或位置。
    • As each thread calls this routine it is possible that they may try to modify this global structure/memory location at the same time.当每个线程调用此例程时,它们可能会尝试同时修改此全局结构/内存位置。
    • If the routine does not employ some sort of synchronization constructs to prevent data corruption, then it is not thread-safe.如果例程没有使用某种同步结构来防止数据损坏,则它不是线程安全的。

    threadunsafe

  • The implication to users of external library routines is that if you aren't 100% certain the routine is thread-safe, then you take your chances with problems that could arise.对于外部库例程的用户来说,这意味着如果您不能百分之百地确定该例程是线程安全的,那么您可以冒险处理可能出现的问题。
  • Recommendation: Be careful if your application uses libraries or other objects that don't explicitly guarantee thread-safeness. When in doubt, assume that they are not thread-safe until proven otherwise. This can be done by "serializing" the calls to the uncertain routine, etc.建议:如果应用程序使用的库或其他对象不能明确保证线程的安全性,请小心。当有疑问时,假设它们不是线程安全的,除非另有证明。这可以通过“序列化”对不确定例程的调用等来实现。

Thread Limits: 线程限制

  • Although the Pthreads API is an ANSI/IEEE standard, implementations can, and usually do, vary in ways not specified by the standard.尽管pthreads api是一个ansi/ieee标准,但是实现可以而且通常会以标准未指定的方式变化。
  • Because of this, a program that runs fine on one platform, may fail or produce wrong results on another platform.因此,在一个平台上运行良好的程序可能会在另一个平台上失败或产生错误的结果。
  • For example, the maximum number of threads permitted, and the default thread stack size are two important limits to consider when designing your program.例如,允许的最大线程数和默认线程堆栈大小是设计程序时要考虑的两个重要限制。
  • Several thread limits are discussed in more detail later in this tutorial.本教程后面将更详细地讨论几个线程限制。
The Pthreads API


  • The original Pthreads API was defined in the ANSI/IEEE POSIX 1003.1 - 1995 standard. The POSIX standard has continued to evolve and undergo revisions, including the Pthreads specification.最初的pthreads api是在ansi/ieee posix 1003.1-1995标准中定义的。POSIX标准一直在不断发展和修订,包括pthreads规范。
  • Copies of the standard can be purchased from IEEE or downloaded for free from other sites online.该标准的副本可以从ieee购买,也可以从其他在线站点免费下载。
  • The subroutines which comprise the Pthreads API can be informally grouped into four major groups:组成pthreads api的子例程可以非正式地分为四大类:
    1. Thread management: Routines that work directly on threads - creating, detaching, joining, etc. They also include functions to set/query thread attributes (joinable, scheduling etc.)线程管理:直接在线程上工作的例程-创建、分离、连接等。它们还包括设置/查询线程属性(可连接、调度等)的函数。
    2. Mutexes: Routines that deal with synchronization, called a "mutex", which is an abbreviation for "mutual exclusion". Mutex functions provide for creating, destroying, locking and unlocking mutexes. These are supplemented by mutex attribute functions that set or modify attributes associated with mutexes.互斥体:处理同步的例程,称为互斥体,是互斥体的缩写。互斥函数提供创建、销毁、锁定和解除互斥的功能。此外,互斥属性函数还可以设置或修改与互斥关联的属性。
    3. Condition variables: Routines that address communications between threads that share a mutex. Based upon programmer specified conditions. This group includes functions to create, destroy, wait and signal based upon specified variable values. Functions to set/query condition variable attributes are also included.条件变量:处理共享互斥锁的线程之间通信的例程。基于程序员指定的条件。该组包括基于指定变量值创建、销毁、等待和发送信号的函数。还包括设置/查询条件变量属性的函数。
    4. Synchronization: Routines that manage read/write locks and barriers.同步:管理读/写锁和屏障的例程。
  • Naming conventions: All identifiers in the threads library begin with pthread_. Some examples are shown below.命名约定:线程库中的所有标识符都以pthread开头。下面是一些例子。
    Routine PrefixFunctional Group
    pthread_Threads themselves and miscellaneous subroutines
    pthread_attr_Thread attributes objects
    pthread_mutex_Mutexes
    pthread_mutexattr_Mutex attributes objects.
    pthread_cond_Condition variables
    pthread_condattr_Condition attributes objects
    pthread_key_Thread-specific data keys
    pthread_rwlock_Read/write locks
    pthread_barrier_Synchronization barriers
  • The concept of opaque objects pervades the design of the API. The basic calls work to create or modify opaque objects - the opaque objects can be modified by calls to attribute functions, which deal with opaque attributes.不透明对象的概念渗透在api的设计中。基本调用用于创建或修改不透明对象-可以通过调用处理不透明属性的属性函数来修改不透明对象。
  • The Pthreads API contains around 100 subroutines. This tutorial will focus on a subset of these - specifically, those which are most likely to be immediately useful to the beginning Pthreads programmer.pthreads api包含大约100个子例程。本教程将重点介绍其中的一个子集—特别是那些对刚开始的pthreads程序员最有可能立即有用的子集。
  • For portability, the pthread.h header file should be included in each source file using the Pthreads library.为了便于移植,pthread.h头文件应该包含在每个使用pthreads库的源文件中。
  • The current POSIX standard is defined only for the C language. Fortran programmers can use wrappers around C function calls. Some Fortran compilers may provide a Fortran pthreads API.当前的posix标准仅为c语言定义。Fortran程序员可以在C函数调用周围使用包装器。一些Fortran编译器可能提供Fortran pthreads API。
  • A number of excellent books about Pthreads are available. Several of these are listed in the References section of this tutorial.有很多关于pthreads的优秀书籍。其中一些在本教程的“参考”部分中列出。


Compiling Threaded Programs 编译线程程序


  • Several examples of compile commands used for pthreads codes are listed in the table below.下表列出了几个用于pthreads代码的编译命令示例。
    Compiler / PlatformCompiler CommandDescription
    INTEL
    Linux
    icc -pthreadC
    icpc -pthreadC++
    PGI
    Linux
    pgcc -lpthreadC
    pgCC -lpthreadC++
    GNU
    Linux, Blue Gene
    gcc -pthreadGNU C
    g++ -pthreadGNU C++
    IBM
    Blue Gene
    bgxlc_r  /  bgcc_rC (ANSI  /  non-ANSI)
    bgxlC_r, bgxlc++_rC++


Thread Management

Creating and Terminating Threads

Routines:

pthread_create (thread,attr,start_routine,arg) pthread_exit (status) pthread_cancel (thread)pthread_attr_init (attr) pthread_attr_destroy (attr)

Creating Threads:

  • Initially, your main() program comprises a single, default thread. All other threads must be explicitly created by the programmer.最初,main()程序由一个默认线程组成。所有其他线程必须由程序员显式创建。
  • pthread_create creates a new thread and makes it executable. This routine can be called any number of times from anywhere within your code.pthread_create创建一个新线程并使其可执行。这个例程可以从代码中的任何地方调用任意次数。
  • pthread_create arguments:
    • thread: An opaque, unique identifier for the new thread returned by the subroutine.子例程返回的新线程的不透明唯一标识符。
    • attr: An opaque attribute object that may be used to set thread attributes. You can specify a thread attributes object, or NULL for the default values.可用于设置线程属性的不透明属性对象。您可以指定线程属性对象,或者为默认值指定空值。
    • start_routine: the C routine that the thread will execute once it is created.线程创建后将执行的C例程。
    • arg: A single argument that may be passed to start_routine. It must be passed by reference as a pointer cast of type void. NULL may be used if no argument is to be passed.可以传递给启动例程的单个参数。它必须作为void类型的指针转换通过引用传递。如果不传递参数,则可以使用null。
  • The maximum number of threads that may be created by a process is implementation dependent. Programs that attempt to exceed the limit can fail or produce wrong results.
  • Querying and setting your implementation's thread limit - Linux example shown. Demonstrates querying the default (soft) limits and then setting the maximum number of processes (including threads) to the hard limit. Then verifying that the limit has been overridden.
    bash / ksh / shtcsh / csh
    $ ulimit -a
    core file size          (blocks, -c) 16
    data seg size           (kbytes, -d) unlimited
    scheduling priority             (-e) 0
    file size               (blocks, -f) unlimited
    pending signals                 (-i) 255956
    max locked memory       (kbytes, -l) 64
    max memory size         (kbytes, -m) unlimited
    open files                      (-n) 1024
    pipe size            (512 bytes, -p) 8
    POSIX message queues     (bytes, -q) 819200
    real-time priority              (-r) 0
    stack size              (kbytes, -s) unlimited
    cpu time               (seconds, -t) unlimited
    max user processes              (-u) 1024
    virtual memory          (kbytes, -v) unlimited
    file locks                      (-x) unlimited
    
    $ ulimit -Hu
    7168
    
    $ ulimit -u 7168
    
    $ ulimit -a
    core file size          (blocks, -c) 16
    data seg size           (kbytes, -d) unlimited
    scheduling priority             (-e) 0
    file size               (blocks, -f) unlimited
    pending signals                 (-i) 255956
    max locked memory       (kbytes, -l) 64
    max memory size         (kbytes, -m) unlimited
    open files                      (-n) 1024
    pipe size            (512 bytes, -p) 8
    POSIX message queues     (bytes, -q) 819200
    real-time priority              (-r) 0
    stack size              (kbytes, -s) unlimited
    cpu time               (seconds, -t) unlimited
    max user processes              (-u) 7168
    virtual memory          (kbytes, -v) unlimited
    file locks                      (-x) unlimited
    % limit 
    cputime      unlimited
    filesize     unlimited
    datasize     unlimited
    stacksize    unlimited
    coredumpsize 16 kbytes
    memoryuse    unlimited
    vmemoryuse   unlimited
    descriptors  1024 
    memorylocked 64 kbytes
    maxproc      1024
    
    % limit maxproc unlimited
    
    % limit
    cputime      unlimited
    filesize     unlimited
    datasize     unlimited
    stacksize    unlimited
    coredumpsize 16 kbytes
    memoryuse    unlimited
    vmemoryuse   unlimited
    descriptors  1024 
    memorylocked 64 kbytes
    maxproc      7168
    
  • Once created, threads are peers, and may create other threads. There is no implied hierarchy or dependency between threads.Peer Threads

Thread Attributes:

  • By default, a thread is created with certain attributes. Some of these attributes can be changed by the programmer via the thread attribute object.
  • pthread_attr_init and pthread_attr_destroy are used to initialize/destroy the thread attribute object.
  • Other routines are then used to query/set specific attributes in the thread attribute object. Attributes include:
    • Detached or joinable state
    • Scheduling inheritance
    • Scheduling policy
    • Scheduling parameters
    • Scheduling contention scope
    • Stack size
    • Stack address
    • Stack guard (overflow) size
  • Some of these attributes will be discussed later.

Thread Binding and Scheduling:

Question: After a thread has been created, how do you know a)when it will be scheduled to run by the operating system, and b)which processor/core it will run on?
  • The Pthreads API provides several routines that may be used to specify how threads are scheduled for execution. For example, threads can be scheduled to run FIFO (first-in first-out), RR (round-robin) or OTHER (operating system determines). It also provides the ability to set a thread's scheduling priority value.
  • These topics are not covered here, however a good overview of "how things work" under Linux can be found in the sched_setscheduler man page.
  • The Pthreads API does not provide routines for binding threads to specific cpus/cores. However, local implementations may include this functionality - such as providing the non-standard pthread_setaffinity_np routine. Note that "_np" in the name stands for "non-portable".
  • Also, the local operating system may provide a way to do this. For example, Linux provides the sched_setaffinity routine.

Terminating Threads & pthread_exit():

  • There are several ways in which a thread may be terminated:
    • The thread returns normally from its starting routine. Its work is done.
    • The thread makes a call to the pthread_exit subroutine - whether its work is done or not.
    • The thread is canceled by another thread via the pthread_cancel routine.
    • The entire process is terminated due to making a call to either the exec() or exit()
    • If main() finishes first, without calling pthread_exit explicitly itself
  • The pthread_exit() routine allows the programmer to specify an optional termination status parameter. This optional parameter is typically returned to threads "joining" the terminated thread (covered later).
  • In subroutines that execute to completion normally, you can often dispense with calling pthread_exit() - unless, of course, you want to pass the optional status code back.
  • Cleanup: the pthread_exit() routine does not close files; any files opened inside the thread will remain open after the thread is terminated.
  • Discussion on calling pthread_exit() from main():
    • There is a definite problem if main() finishes before the threads it spawned if you don't call pthread_exit() explicitly. All of the threads it created will terminate because main() is done and no longer exists to support the threads.
    • By having main() explicitly call pthread_exit() as the last thing it does, main() will block and be kept alive to support the threads it created until they are done.

Example: Pthread Creation and Termination

  • This simple example code creates 5 threads with the pthread_create() routine. Each thread prints a "Hello World!" message, and then terminates with a call to pthread_exit().

    Pthread Creation and Termination Example
     1
     2
     3
     4
     5
     6
     7
     8
     9
    10
    11
    12
    13
    14
    15
    16
    17
    18
    19
    20
    21
    22
    23
    24
    25
    26
    27
    28
    29
     #include <pthread.h>
     #include <stdio.h>
     #define NUM_THREADS     5
    
     void *PrintHello(void *threadid)
     {
        long tid;
        tid = (long)threadid;
        printf("Hello World! It's me, thread #%ld!\n", tid);
        pthread_exit(NULL);
     }
    
     int main (int argc, char *argv[])
     {
        pthread_t threads[NUM_THREADS];
        int rc;
        long t;
        for(t=0; t<NUM_THREADS; t++){
           printf("In main: creating thread %ld\n", t);
           rc = pthread_create(&threads[t], NULL, PrintHello, (void *)t);
           if (rc){
              printf("ERROR; return code from pthread_create() is %d\n", rc);
              exit(-1);
           }
        }
    
        /* Last thing that main() should do */
        pthread_exit(NULL);
     }


Thread Management

Passing Arguments to Threads

  • The pthread_create() routine permits the programmer to pass one argument to the thread start routine. For cases where multiple arguments must be passed, this limitation is easily overcome by creating a structure which contains all of the arguments, and then passing a pointer to that structure in the pthread_create() routine.
  • All arguments must be passed by reference and cast to (void *).
Question: How can you safely pass data to newly created threads, given their non-deterministic start-up and scheduling?


Example 1 - Thread Argument Passing

    This code fragment demonstrates how to pass a simple integer to each thread. The calling thread uses a unique data structure for each thread, insuring that each thread's argument remains intact throughout the program.

long taskids[NUM_THREADS];

for(t=0; t<NUM_THREADS; t++)
{
   taskids[t] = t;
   printf("Creating thread %ld\n", t);
   rc = pthread_create(&threads[t], NULL, PrintHello, (void *) taskids[t]);
   ...
}

View source code View sample output

Example 2 - Thread Argument Passing

    This example shows how to setup/pass multiple arguments via a structure. Each thread receives a unique instance of the structure.

struct thread_data{
   int  thread_id;
   int  sum;
   char *message;
};

struct thread_data thread_data_array[NUM_THREADS];

void *PrintHello(void *threadarg)
{
   struct thread_data *my_data;
   ...
   my_data = (struct thread_data *) threadarg;
   taskid = my_data->thread_id;
   sum = my_data->sum;
   hello_msg = my_data->message;
   ...
}

int main (int argc, char *argv[])
{
   ...
   thread_data_array[t].thread_id = t;
   thread_data_array[t].sum = sum;
   thread_data_array[t].message = messages[t];
   rc = pthread_create(&threads[t], NULL, PrintHello, 
        (void *) &thread_data_array[t]);
   ...
}

View source code View sample output

Example 3 - Thread Argument Passing (Incorrect)

    This example performs argument passing incorrectly. It passes the

address

    of variable

t

    , which is shared memory space and visible to all threads. As the loop iterates, the value of this memory location changes, possibly before the created threads can access it.

int rc;
long t;

for(t=0; t<NUM_THREADS; t++) 
{
   printf("Creating thread %ld\n", t);
   rc = pthread_create(&threads[t], NULL, PrintHello, (void *) &t);
   ...
}

View source code View sample output


Thread Management

Joining and Detaching Threads

Routines:

pthread_join (threadid,status) pthread_detach (threadid) pthread_attr_setdetachstate (attr,detachstate) pthread_attr_getdetachstate (attr,detachstate)

Joining:

  • "Joining" is one way to accomplish synchronization between threads. For example:Joining
  • The pthread_join() subroutine blocks the calling thread until the specified threadid thread terminates.
  • The programmer is able to obtain the target thread's termination return status if it was specified in the target thread's call to pthread_exit().
  • A joining thread can match one pthread_join() call. It is a logical error to attempt multiple joins on the same thread.
  • Two other synchronization methods, mutexes and condition variables, will be discussed later.

Joinable or Not?

  • When a thread is created, one of its attributes defines whether it is joinable or detached. Only threads that are created as joinable can be joined. If a thread is created as detached, it can never be joined.
  • The final draft of the POSIX standard specifies that threads should be created as joinable.
  • To explicitly create a thread as joinable or detached, the attr argument in the pthread_create() routine is used. The typical 4 step process is:
    1. Declare a pthread attribute variable of the pthread_attr_t data type
    2. Initialize the attribute variable with pthread_attr_init()
    3. Set the attribute detached status with pthread_attr_setdetachstate()
    4. When done, free library resources used by the attribute with pthread_attr_destroy()

Detaching:

  • The pthread_detach() routine can be used to explicitly detach a thread even though it was created as joinable.
  • There is no converse routine.

Recommendations:

  • If a thread requires joining, consider explicitly creating it as joinable. This provides portability as not all implementations may create threads as joinable by default.
  • If you know in advance that a thread will never need to join with another thread, consider creating it in a detached state. Some system resources may be able to be freed.

Example: Pthread Joining

  • This example demonstrates how to "wait" for thread completions by using the Pthread join routine.
  • Since some implementations of Pthreads may not create threads in a joinable state, the threads in this example are explicitly created in a joinable state so that they can be joined later.

    Pthread Joining Example
     1
     2
     3
     4
     5
     6
     7
     8
     9
    10
    11
    12
    13
    14
    15
    16
    17
    18
    19
    20
    21
    22
    23
    24
    25
    26
    27
    28
    29
    30
    31
    32
    33
    34
    35
    36
    37
    38
    39
    40
    41
    42
    43
    44
    45
    46
    47
    48
    49
    50
    51
    52
    53
    54
    55
    56
    57
     #include <pthread.h>
     #include <stdio.h>
     #include <stdlib.h>
     #include <math.h>
     #define NUM_THREADS	4
    
     void *BusyWork(void *t)
     {
        int i;
        long tid;
        double result=0.0;
        tid = (long)t;
        printf("Thread %ld starting...\n",tid);
        for (i=0; i<1000000; i++)
        {
           result = result + sin(i) * tan(i);
        }
        printf("Thread %ld done. Result = %e\n",tid, result);
        pthread_exit((void*) t);
     }
    
     int main (int argc, char *argv[])
     {
        pthread_t thread[NUM_THREADS];
        pthread_attr_t attr;
        int rc;
        long t;
        void *status;
    
        /* Initialize and set thread detached attribute */
        pthread_attr_init(&attr);
        pthread_attr_setdetachstate(&attr, PTHREAD_CREATE_JOINABLE);
    
        for(t=0; t<NUM_THREADS; t++) {
           printf("Main: creating thread %ld\n", t);
           rc = pthread_create(&thread[t], &attr, BusyWork, (void *)t);  
           if (rc) {
              printf("ERROR; return code from pthread_create() is %d\n", rc);
              exit(-1);
              }
           }
    
        /* Free attribute and wait for the other threads */
        pthread_attr_destroy(&attr);
        for(t=0; t<NUM_THREADS; t++) {
           rc = pthread_join(thread[t], &status);
           if (rc) {
              printf("ERROR; return code from pthread_join() is %d\n", rc);
              exit(-1);
              }
           printf("Main: completed join with thread %ld having a status   
                 of %ld\n",t,(long)status);
           }
     
     printf("Main: program completed. Exiting.\n");
     pthread_exit(NULL);
     }


Thread Management

Stack Management

Routines:

pthread_attr_getstacksize (attr, stacksize) pthread_attr_setstacksize (attr, stacksize) pthread_attr_getstackaddr (attr, stackaddr) pthread_attr_setstackaddr (attr, stackaddr)

Preventing Stack Problems:

  • The POSIX standard does not dictate the size of a thread's stack. This is implementation dependent and varies.
  • Exceeding the default stack limit is often very easy to do, with the usual results: program termination and/or corrupted data.
  • Safe and portable programs do not depend upon the default stack limit, but instead, explicitly allocate enough stack for each thread by using the pthread_attr_setstacksize routine.
  • The pthread_attr_getstackaddr and pthread_attr_setstackaddr routines can be used by applications in an environment where the stack for a thread must be placed in some particular region of memory.

Some Practical Examples at LC:

  • Default thread stack size varies greatly. The maximum size that can be obtained also varies greatly, and may depend upon the number of threads per node.
  • Both past and present architectures are shown to demonstrate the wide variation in default thread stack size.
    Node
    Architecture
    #CPUsMemory (GB)Default Size
    (bytes)
    Intel Xeon E5-267016322,097,152
    Intel Xeon 566012242,097,152
    AMD Opteron8162,097,152
    Intel IA644833,554,432
    Intel IA32242,097,152
    IBM Power5832196,608
    IBM Power4816196,608
    IBM Power3161698,304

Example: Stack Management

  • This example demonstrates how to query and set a thread's stack size.

    Stack Management Example
     1
     2
     3
     4
     5
     6
     7
     8
     9
    10
    11
    12
    13
    14
    15
    16
    17
    18
    19
    20
    21
    22
    23
    24
    25
    26
    27
    28
    29
    30
    31
    32
    33
    34
    35
    36
    37
    38
    39
    40
    41
    42
    43
    44
    45
    46
    47
    48
     #include <pthread.h>
     #include <stdio.h>
     #define NTHREADS 4
     #define N 1000
     #define MEGEXTRA 1000000
     
     pthread_attr_t attr;
     
     void *dowork(void *threadid)
     {
        double A[N][N];
        int i,j;
        long tid;
        size_t mystacksize;
    
        tid = (long)threadid;
        pthread_attr_getstacksize (&attr, &mystacksize);
        printf("Thread %ld: stack size = %li bytes \n", tid, mystacksize);
        for (i=0; i<N; i++)
          for (j=0; j<N; j++)
           A[i][j] = ((i*j)/3.452) + (N-i);
        pthread_exit(NULL);
     }
     
     int main(int argc, char *argv[])
     {
        pthread_t threads[NTHREADS];
        size_t stacksize;
        int rc;
        long t;
     
        pthread_attr_init(&attr);
        pthread_attr_getstacksize (&attr, &stacksize);
        printf("Default stack size = %li\n", stacksize);
        stacksize = sizeof(double)*N*N+MEGEXTRA;
        printf("Amount of stack needed per thread = %li\n",stacksize);
        pthread_attr_setstacksize (&attr, stacksize);
        printf("Creating threads with stack size = %li bytes\n",stacksize);
        for(t=0; t<NTHREADS; t++){
           rc = pthread_create(&threads[t], &attr, dowork, (void *)t);
           if (rc){
              printf("ERROR; return code from pthread_create() is %d\n", rc);
              exit(-1);
           }
        }
        printf("Created %ld threads.\n", t);
        pthread_exit(NULL);
     }


Thread Management

Miscellaneous Routines

pthread_self () pthread_equal (thread1,thread2)
  • pthread_self returns the unique, system assigned thread ID of the calling thread.
  • pthread_equal compares two thread IDs. If the two IDs are different 0 is returned, otherwise a non-zero value is returned.
  • Note that for both of these routines, the thread identifier objects are opaque and can not be easily inspected. Because thread IDs are opaque objects, the C language equivalence operator == should not be used to compare two thread IDs against each other, or to compare a single thread ID against another value.
    pthread_once (once_control, init_routine)
  • pthread_once executes the init_routine exactly once in a process. The first call to this routine by any thread in the process executes the given init_routine, without parameters. Any subsequent call will have no effect.
  • The init_routine routine is typically an initialization routine.
  • The once_control parameter is a synchronization control structure that requires initialization prior to calling pthread_once. For example:pthread_once_t once_control = PTHREAD_ONCE_INIT;


Pthread Exercise 1

Getting Started and Thread Management Routines


Overview:

  • Login to an LC cluster using your workshop username and OTP token
  • Copy the exercise files to your home directory
  • Familiarize yourself with LC's Pthreads environment
  • Write a simple "Hello World" Pthreads program
  • Successfully compile your program
  • Successfully run your program - several different ways
  • Review, compile, run and/or debug some related Pthreads programs (provided)

GO TO THE EXERCISE HERE


Mutex Variables

Overview

  • Mutex is an abbreviation for "mutual exclusion". Mutex variables are one of the primary means of implementing thread synchronization and for protecting shared data when multiple writes occur.
  • A mutex variable acts like a "lock" protecting access to a shared data resource. The basic concept of a mutex as used in Pthreads is that only one thread can lock (or own) a mutex variable at any given time. Thus, even if several threads try to lock a mutex only one thread will be successful. No other thread can own that mutex until the owning thread unlocks that mutex. Threads must "take turns" accessing protected data.
  • Mutexes can be used to prevent "race" conditions. An example of a race condition involving a bank transaction is shown below:
    Thread 1Thread 2Balance
    Read balance: $1000$1000
    Read balance: $1000$1000
    Deposit $200$1000
    Deposit $200$1000
    Update balance $1000+$200$1200
    Update balance $1000+$200$1200
  • In the above example, a mutex should be used to lock the "Balance" while a thread is using this shared data resource.
  • Very often the action performed by a thread owning a mutex is the updating of global variables. This is a safe way to ensure that when several threads update the same variable, the final value is the same as what it would be if only one thread performed the update. The variables being updated belong to a "critical section".
  • A typical sequence in the use of a mutex is as follows:
    • Create and initialize a mutex variable
    • Several threads attempt to lock the mutex
    • Only one succeeds and that thread owns the mutex
    • The owner thread performs some set of actions
    • The owner unlocks the mutex
    • Another thread acquires the mutex and repeats the process
    • Finally the mutex is destroyed
  • When several threads compete for a mutex, the losers block at that call - an unblocking call is available with "trylock" instead of the "lock" call.
  • When protecting shared data, it is the programmer's responsibility to make sure every thread that needs to use a mutex does so. For example, if 4 threads are updating the same data, but only one uses a mutex, the data can still be corrupted.


Mutex Variables

Creating and Destroying Mutexes

Routines:

pthread_mutex_init (mutex,attr) pthread_mutex_destroy (mutex) pthread_mutexattr_init (attr) pthread_mutexattr_destroy (attr)

Usage:

  • Mutex variables must be declared with type pthread_mutex_t, and must be initialized before they can be used. There are two ways to initialize a mutex variable:
    1. Statically, when it is declared. For example:
      pthread_mutex_t mymutex = PTHREAD_MUTEX_INITIALIZER;
    2. Dynamically, with the pthread_mutex_init() routine. This method permits setting mutex object attributes, attr.

    The mutex is initially unlocked.

  • The attr object is used to establish properties for the mutex object, and must be of type pthread_mutexattr_t if used (may be specified as NULL to accept defaults). The Pthreads standard defines three optional mutex attributes:
    • Protocol: Specifies the protocol used to prevent priority inversions for a mutex.
    • Prioceiling: Specifies the priority ceiling of a mutex.
    • Process-shared: Specifies the process sharing of a mutex.

    Note that not all implementations may provide the three optional mutex attributes.

  • The pthread_mutexattr_init() and pthread_mutexattr_destroy() routines are used to create and destroy mutex attribute objects respectively.
  • pthread_mutex_destroy() should be used to free a mutex object which is no longer needed.


Mutex Variables

Locking and Unlocking Mutexes

Routines:

pthread_mutex_lock (mutex) pthread_mutex_trylock (mutex) pthread_mutex_unlock (mutex)

Usage:

  • The pthread_mutex_lock() routine is used by a thread to acquire a lock on the specified mutex variable. If the mutex is already locked by another thread, this call will block the calling thread until the mutex is unlocked.
  • pthread_mutex_trylock() will attempt to lock a mutex. However, if the mutex is already locked, the routine will return immediately with a "busy" error code. This routine may be useful in preventing deadlock conditions, as in a priority-inversion situation.
  • pthread_mutex_unlock() will unlock a mutex if called by the owning thread. Calling this routine is required after a thread has completed its use of protected data if other threads are to acquire the mutex for their work with the protected data. An error will be returned if:
    • If the mutex was already unlocked
    • If the mutex is owned by another thread
  • There is nothing "magical" about mutexes...in fact they are akin to a "gentlemen's agreement" between participating threads. It is up to the code writer to insure that the necessary threads all make the the mutex lock and unlock calls correctly. The following scenario demonstrates a logical error:
    Thread 1     Thread 2     Thread 3
    Lock         Lock         
    A = 2        A = A+1      A = A*B
    Unlock       Unlock    
    
Question: When more than one thread is waiting for a locked mutex, which thread will be granted the lock first after it is released?

Example: Using Mutexes

  • This example program illustrates the use of mutex variables in a threads program that performs a dot product.
  • The main data is made available to all threads through a globally accessible structure.
  • Each thread works on a different part of the data.
  • The main thread waits for all the threads to complete their computations, and then it prints the resulting sum.

    Using Mutexes Example
      1 
      2 
      3 
      4 
      5 
      6 
      7 
      8 
      9 
     10 
     11 
     12 
     13 
     14 
     15 
     16 
     17 
     18 
     19 
     20 
     21 
     22 
     23 
     24 
     25 
     26 
     27 
     28 
     29 
     30 
     31 
     32 
     33 
     34 
     35 
     36 
     37 
     38 
     39 
     40 
     41 
     42 
     43 
     44 
     45 
     46 
     47 
     48 
     49 
     50 
     51 
     52 
     53 
     54 
     55 
     56 
     57 
     58 
     59 
     60 
     61 
     62 
     63 
     64 
     65 
     66 
     67 
     68 
     69 
     70 
     71 
     72 
     73 
     74 
     75 
     76 
     77 
     78 
     79 
     80 
     81 
     82 
     83 
     84 
     85 
     86 
     87 
     88 
     89 
     90 
     91 
     92 
     93 
     94 
     95 
     96 
     97 
     98 
     99 
    100
    101
    102
    103
    104
    105
    106
    107
    108
    109
    110
    111
    112
    113
    114
    115
    116
    117
    118
    119
    120
    121
    122
    123
    124
    125
    126
    127
    128
    129
    130
    131
    132
    133
    134
    135
    136
    137
    138
    
     #include <pthread.h>
     #include <stdio.h>
     #include <stdlib.h>
    
     /*   
     The following structure contains the necessary information  
     to allow the function "dotprod" to access its input data and 
     place its output into the structure.  
     */
    
     typedef struct 
      {
        double      *a;
        double      *b;
        double     sum; 
        int     veclen; 
      } DOTDATA;
    
     /* Define globally accessible variables and a mutex */
    
     #define NUMTHRDS 4
     #define VECLEN 100
        DOTDATA dotstr; 
        pthread_t callThd[NUMTHRDS];
        pthread_mutex_t mutexsum;
    
     /*
     The function dotprod is activated when the thread is created.
     All input to this routine is obtained from a structure 
     of type DOTDATA and all output from this function is written into
     this structure. The benefit of this approach is apparent for the 
     multi-threaded program: when a thread is created we pass a single
     argument to the activated function - typically this argument
     is a thread number. All  the other information required by the 
     function is accessed from the globally accessible structure. 
     */  
    
     void *dotprod(void *arg)
     {
    
        /* Define and use local variables for convenience */
    
        int i, start, end, len ;
        long offset;
        double mysum, *x, *y;
        offset = (long)arg;
         
        len = dotstr.veclen;
        start = offset*len;
        end   = start + len;
        x = dotstr.a;
        y = dotstr.b;
    
        /*
        Perform the dot product and assign result
        to the appropriate variable in the structure. 
        */
    
        mysum = 0;
        for (i=start; i<end ; i++) 
         {
           mysum += (x[i] * y[i]);
         }
    
        /*
        Lock a mutex prior to updating the value in the shared
        structure, and unlock it upon updating.
        */
        pthread_mutex_lock (&mutexsum);
        dotstr.sum += mysum;
        pthread_mutex_unlock (&mutexsum);
    
        pthread_exit((void*) 0);
     }
    
     /* 
     The main program creates threads which do all the work and then 
     print out result upon completion. Before creating the threads,
     the input data is created. Since all threads update a shared structure, 
     we need a mutex for mutual exclusion. The main thread needs to wait for
     all threads to complete, it waits for each one of the threads. We specify
     a thread attribute value that allow the main thread to join with the
     threads it creates. Note also that we free up handles when they are
     no longer needed.
     */
    
     int main (int argc, char *argv[])
     {
        long i;
        double *a, *b;
        void *status;
        pthread_attr_t attr;  
    
        /* Assign storage and initialize values */
        a = (double*) malloc (NUMTHRDS*VECLEN*sizeof(double));
        b = (double*) malloc (NUMTHRDS*VECLEN*sizeof(double));
       
        for (i=0; i<VECLEN*NUMTHRDS; i++)
          {
          a[i]=1.0;
          b[i]=a[i];
          }
    
        dotstr.veclen = VECLEN; 
        dotstr.a = a; 
        dotstr.b = b; 
        dotstr.sum=0;
    
        pthread_mutex_init(&mutexsum, NULL);
             
        /* Create threads to perform the dotproduct  */
        pthread_attr_init(&attr);
        pthread_attr_setdetachstate(&attr, PTHREAD_CREATE_JOINABLE);
    
        for(i=0; i<NUMTHRDS; i++)
        {
        /* 
        Each thread works on a different set of data. The offset is specified 
        by 'i'. The size of the data for each thread is indicated by VECLEN.
        */
        pthread_create(&callThd[i], &attr, dotprod, (void *)i);
        }
    
        pthread_attr_destroy(&attr);
    
        /* Wait on the other threads */
        for(i=0; i<NUMTHRDS; i++)
           {
           pthread_join(callThd[i], &status);
           }
    
        /* After joining, print out the results and cleanup */
        printf ("Sum =  %f \n", dotstr.sum);
        free (a);
        free (b);
        pthread_mutex_destroy(&mutexsum);
        pthread_exit(NULL);
     }   


    Serial version
    Pthreads version


Condition Variables

Overview

  • Condition variables provide yet another way for threads to synchronize. While mutexes implement synchronization by controlling thread access to data, condition variables allow threads to synchronize based upon the actual value of data.
  • Without condition variables, the programmer would need to have threads continually polling (possibly in a critical section), to check if the condition is met. This can be very resource consuming since the thread would be continuously busy in this activity. A condition variable is a way to achieve the same goal without polling.
  • A condition variable is always used in conjunction with a mutex lock.
  • A representative sequence for using condition variables is shown below.
    Main Thread

    • Declare and initialize global data/variables which require synchronization (such as "count")
    • Declare and initialize a condition variable object
    • Declare and initialize an associated mutex
    • Create threads A and B to do work
    Thread A

    • Do work up to the point where a certain condition must occur (such as "count" must reach a specified value)
    • Lock associated mutex and check value of a global variable
    • Call pthread_cond_wait() to perform a blocking wait for signal from Thread-B. Note that a call to pthread_cond_wait() automatically and atomically unlocks the associated mutex variable so that it can be used by Thread-B.
    • When signalled, wake up. Mutex is automatically and atomically locked.
    • Explicitly unlock mutex
    • Continue
    Thread B

    • Do work
    • Lock associated mutex
    • Change the value of the global variable that Thread-A is waiting upon.
    • Check value of the global Thread-A wait variable. If it fulfills the desired condition, signal Thread-A.
    • Unlock mutex.
    • Continue
    Main Thread

      Join / Continue


Condition Variables

Creating and Destroying Condition Variables

Routines:

pthread_cond_init (condition,attr) pthread_cond_destroy (condition) pthread_condattr_init (attr) pthread_condattr_destroy (attr)

Usage:

  • Condition variables must be declared with type pthread_cond_t, and must be initialized before they can be used. There are two ways to initialize a condition variable:
    1. Statically, when it is declared. For example:
      pthread_cond_t myconvar = PTHREAD_COND_INITIALIZER;
    2. Dynamically, with the pthread_cond_init() routine. The ID of the created condition variable is returned to the calling thread through the condition parameter. This method permits setting condition variable object attributes, attr.
  • The optional attr object is used to set condition variable attributes. There is only one attribute defined for condition variables: process-shared, which allows the condition variable to be seen by threads in other processes. The attribute object, if used, must be of type pthread_condattr_t (may be specified as NULL to accept defaults).Note that not all implementations may provide the process-shared attribute.
  • The pthread_condattr_init() and pthread_condattr_destroy() routines are used to create and destroy condition variable attribute objects.
  • pthread_cond_destroy() should be used to free a condition variable that is no longer needed.


Condition Variables

Waiting and Signaling on Condition Variables

Routines:

pthread_cond_wait (condition,mutex) pthread_cond_signal (condition) pthread_cond_broadcast (condition)

Usage:

  • pthread_cond_wait() blocks the calling thread until the specified condition is signalled. This routine should be called while mutex is locked, and it will automatically release the mutex while it waits. After signal is received and thread is awakened, mutex will be automatically locked for use by the thread. The programmer is then responsible for unlocking mutex when the thread is finished with it.Recommendation: Using a WHILE loop instead of an IF statement (see watch_count routine in example below) to check the waited for condition can help deal with several potential problems, such as:
    • If several threads are waiting for the same wake up signal, they will take turns acquiring the mutex, and any one of them can then modify the condition they all waited for.
    • If the thread received the signal in error due to a program bug
    • The Pthreads library is permitted to issue spurious wake ups to a waiting thread without violating the standard.
  • The pthread_cond_signal() routine is used to signal (or wake up) another thread which is waiting on the condition variable. It should be called after mutex is locked, and must unlock mutex in order for pthread_cond_wait() routine to complete.
  • The pthread_cond_broadcast() routine should be used instead of pthread_cond_signal() if more than one thread is in a blocking wait state.
  • It is a logical error to call pthread_cond_signal() before calling pthread_cond_wait().
Proper locking and unlocking of the associated mutex variable is essential when using these routines. For example:

  • Failing to lock the mutex before calling pthread_cond_wait() may cause it NOT to block.
  • Failing to unlock the mutex after calling pthread_cond_signal() may not allow a matching pthread_cond_wait() routine to complete (it will remain blocked).

Example: Using Condition Variables

  • This simple example code demonstrates the use of several Pthread condition variable routines.
  • The main routine creates three threads.
  • Two of the threads perform work and update a "count" variable.
  • The third thread waits until the count variable reaches a specified value.

    Using Condition Variables Example
      1 
      2 
      3 
      4 
      5 
      6 
      7 
      8 
      9 
     10 
     11 
     12 
     13 
     14 
     15 
     16 
     17 
     18 
     19 
     20 
     21 
     22 
     23 
     24 
     25 
     26 
     27 
     28 
     29 
     30 
     31 
     32 
     33 
     34 
     35 
     36 
     37 
     38 
     39 
     40 
     41 
     42 
     43 
     44 
     45 
     46 
     47 
     48 
     49 
     50 
     51 
     52 
     53 
     54 
     55 
     56 
     57 
     58 
     59 
     60 
     61 
     62 
     63 
     64 
     65 
     66 
     67 
     68 
     69 
     70 
     71 
     72 
     73 
     74 
     75 
     76 
     77 
     78 
     79 
     80 
     81 
     82 
     83 
     84 
     85 
     86 
     87 
     88 
     89 
     90 
     91 
     92 
     93 
     94 
     95 
     96 
     #include <pthread.h>
     #include <stdio.h>
     #include <stdlib.h>
    
     #define NUM_THREADS  3
     #define TCOUNT 10
     #define COUNT_LIMIT 12
    
     int     count = 0;
     int     thread_ids[3] = {0,1,2};
     pthread_mutex_t count_mutex;
     pthread_cond_t count_threshold_cv;
    
     void *inc_count(void *t) 
     {
       int i;
       long my_id = (long)t;
    
       for (i=0; i<TCOUNT; i++) {
         pthread_mutex_lock(&count_mutex);
         count++;
    
         /* 
         Check the value of count and signal waiting thread when condition is
         reached.  Note that this occurs while mutex is locked. 
         */
         if (count == COUNT_LIMIT) {
           pthread_cond_signal(&count_threshold_cv);
           printf("inc_count(): thread %ld, count = %d  Threshold reached.\n", 
                  my_id, count);
           }
         printf("inc_count(): thread %ld, count = %d, unlocking mutex\n", 
    	    my_id, count);
         pthread_mutex_unlock(&count_mutex);
    
         /* Do some "work" so threads can alternate on mutex lock */
         sleep(1);
         }
       pthread_exit(NULL);
     }
    
     void *watch_count(void *t) 
     {
       long my_id = (long)t;
    
       printf("Starting watch_count(): thread %ld\n", my_id);
    
       /*
       Lock mutex and wait for signal.  Note that the pthread_cond_wait 
       routine will automatically and atomically unlock mutex while it waits. 
       Also, note that if COUNT_LIMIT is reached before this routine is run by
       the waiting thread, the loop will be skipped to prevent pthread_cond_wait
       from never returning. 
       */
       pthread_mutex_lock(&count_mutex);
       while (count<COUNT_LIMIT) {
         pthread_cond_wait(&count_threshold_cv, &count_mutex);
         printf("watch_count(): thread %ld Condition signal received.\n", my_id);
         }
         count += 125;
         printf("watch_count(): thread %ld count now = %d.\n", my_id, count);
       pthread_mutex_unlock(&count_mutex);
       pthread_exit(NULL);
     }
    
     int main (int argc, char *argv[])
     {
       int i, rc;
       long t1=1, t2=2, t3=3;
       pthread_t threads[3];
       pthread_attr_t attr;
    
       /* Initialize mutex and condition variable objects */
       pthread_mutex_init(&count_mutex, NULL);
       pthread_cond_init (&count_threshold_cv, NULL);
    
       /* For portability, explicitly create threads in a joinable state */
       pthread_attr_init(&attr);
       pthread_attr_setdetachstate(&attr, PTHREAD_CREATE_JOINABLE);
       pthread_create(&threads[0], &attr, watch_count, (void *)t1);
       pthread_create(&threads[1], &attr, inc_count, (void *)t2);
       pthread_create(&threads[2], &attr, inc_count, (void *)t3);
    
       /* Wait for all threads to complete */
       for (i=0; i<NUM_THREADS; i++) {
         pthread_join(threads[i], NULL);
       }
       printf ("Main(): Waited on %d  threads. Done.\n", NUM_THREADS);
    
       /* Clean up and exit */
       pthread_attr_destroy(&attr);
       pthread_mutex_destroy(&count_mutex);
       pthread_cond_destroy(&count_threshold_cv);
       pthread_exit(NULL);
    
     } 


Monitoring, Debugging and Performance Analysis Tools for Pthreads

Monitoring and Debugging Pthreads:

  • Debuggers vary in their ability to handle Pthreads. The TotalView debugger is LC's recommended debugger for parallel programs. It is well suited for both monitoring and debugging threaded programs.
  • An example screenshot from a TotalView session using a threaded code is shown below.
    1. Stack Trace Pane: Displays the call stack of routines that the selected thread is executing.
    2. Status Bars: Show status information for the selected thread and its associated process.
    3. Stack Frame Pane: Shows a selected thread's stack variables, registers, etc.
    4. Source Pane: Shows the source code for the selected thread.
    5. Root Window showing all threads
    6. Threads Pane: Shows threads associated with the selected process

    Example TotalView Pthread Debug Session

  • See the TotalView Debugger tutorial for details.
  • The Linux ps command provides several flags for viewing thread information. Some examples are shown below. See the man page for details.
    % ps -Lf 
    UID        PID  PPID   LWP  C NLWP STIME TTY          TIME CMD
    blaise   22529 28240 22529  0    5 11:31 pts/53   00:00:00 a.out
    blaise   22529 28240 22530 99    5 11:31 pts/53   00:01:24 a.out
    blaise   22529 28240 22531 99    5 11:31 pts/53   00:01:24 a.out
    blaise   22529 28240 22532 99    5 11:31 pts/53   00:01:24 a.out
    blaise   22529 28240 22533 99    5 11:31 pts/53   00:01:24 a.out
    
    % ps -T 
      PID  SPID TTY          TIME CMD
    22529 22529 pts/53   00:00:00 a.out
    22529 22530 pts/53   00:01:49 a.out
    22529 22531 pts/53   00:01:49 a.out
    22529 22532 pts/53   00:01:49 a.out
    22529 22533 pts/53   00:01:49 a.out
    
    % ps -Lm 
      PID   LWP TTY          TIME CMD
    22529     - pts/53   00:18:56 a.out
        - 22529 -        00:00:00 -
        - 22530 -        00:04:44 -
        - 22531 -        00:04:44 -
        - 22532 -        00:04:44 -
        - 22533 -        00:04:44 -
    
  • LC's Linux clusters also provide the top command to monitor processes on a node. If used with the -H flag, the threads contained within a process will be visible. An example of the top -H command is shown below. The parent process is PID 18010 which spawned three threads, shown as PIDs 18012, 18013 and 18014.top -H command

Performance Analysis Tools:

  • There are a variety of performance analysis tools that can be used with threaded programs. Searching the web will turn up a wealth of information.
  • At LC, the list of supported computing tools can be found at: computing.llnl.gov/code/content/software_tools.php.
  • These tools vary significantly in their complexity, functionality and learning curve. Covering them in detail is beyond the scope of this tutorial.
  • Some tools worth investigating, specifically for threaded codes, include:
    • Open|SpeedShop
    • TAU
    • HPCToolkit
    • PAPI
    • Intel VTune Amplifier
    • ThreadSpotter


LLNL Specific Information and Recommendations

This section describes details specific to Livermore Computing's systems.

Implementations:

  • All LC production systems include a Pthreads implementation that follows draft 10 (final) of the POSIX standard. This is the preferred implementation.
  • Implementations differ in the maximum number of threads that a process may create. They also differ in the default amount of thread stack space.

Compiling:

  • LC maintains a number of compilers, and usually several different versions of each - see the LC's Supported Compilers web page.
  • The compiler commands described in the Compiling Threaded Programs section apply to LC systems.

Mixing MPI with Pthreads:

  • This is the primary motivation for using Pthreads at LC.
  • Design:
    • Each MPI process typically creates and then manages N threads, where N makes the best use of the available cores/node.
    • Finding the best value for N will vary with the platform and your application's characteristics.
    • In general, there may be problems if multiple threads make MPI calls. The program may fail or behave unexpectedly. If MPI calls must be made from within a thread, they should be made only by one thread.
  • Compiling:
    • Use the appropriate MPI compile command for the platform and language of choice
    • Be sure to include the required Pthreads flag as shown in the Compiling Threaded Programs section.
  • An example code that uses both MPI and Pthreads is available below. The serial, threads-only, MPI-only and MPI-with-threads versions demonstrate one possible progression.
    • Serial
    • Pthreads only
    • MPI only
    • MPI with pthreads
    • makefile


Topics Not Covered

Several features of the Pthreads API are not covered in this tutorial. These are listed below. See the Pthread Library Routines Reference section for more information.

  • Thread Scheduling
    • Implementations will differ on how threads are scheduled to run. In most cases, the default mechanism is adequate.
    • The Pthreads API provides routines to explicitly set thread scheduling policies and priorities which may override the default mechanisms.
    • The API does not require implementations to support these features.
  • Keys: Thread-Specific Data
    • As threads call and return from different routines, the local data on a thread's stack comes and goes.
    • To preserve stack data you can usually pass it as an argument from one routine to the next, or else store the data in a global variable associated with a thread.
    • Pthreads provides another, possibly more convenient and versatile, way of accomplishing this through keys.
  • Mutex Protocol Attributes and Mutex Priority Management for the handling of "priority inversion" problems.
  • Condition Variable Sharing - across processes
  • Thread Cancellation
  • Threads and Signals
  • Synchronization constructs - barriers and locks


Pthread Exercise 2

Mutexes, Condition Variables and Hybrid MPI with Pthreads


Overview:

  • Login to the LC workshop cluster, if you are not already logged in
  • Mutexes: review and run the provided example codes
  • Condition variables: review and run the provided example codes
  • Hybrid MPI with Pthreads: review and run the provided example codes

GO TO THE EXERCISE HERE


This completes the tutorial.

Evaluation FormPlease complete the online evaluation form - unless you are doing the exercise, in which case please complete it at the end of the exercise.

Where would you like to go now?

  • Exercise
  • Agenda
  • Back to the top


References and More Information


  • Author: Blaise Barney, Livermore Computing.
  • POSIX Standard: www.unix.org/version3/ieee_std.html
  • "Pthreads Programming". B. Nichols et al. O'Reilly and Associates.
  • "Threads Primer". B. Lewis and D. Berg. Prentice Hall
  • "Programming With POSIX Threads". D. Butenhof. Addison Wesley
  • "Programming With Threads". S. Kleiman et al. Prentice Hall


Appendix A: Pthread Library Routines Reference


    For convenience, an alphabetical list of Pthread routines, linked to their corresponding man page, is provided below.

pthread_atfork
pthread_attr_destroy
pthread_attr_getdetachstate
pthread_attr_getguardsize
pthread_attr_getinheritsched
pthread_attr_getschedparam
pthread_attr_getschedpolicy
pthread_attr_getscope
pthread_attr_getstack
pthread_attr_getstackaddr
pthread_attr_getstacksize
pthread_attr_init
pthread_attr_setdetachstate
pthread_attr_setguardsize
pthread_attr_setinheritsched
pthread_attr_setschedparam
pthread_attr_setschedpolicy
pthread_attr_setscope
pthread_attr_setstack
pthread_attr_setstackaddr
pthread_attr_setstacksize
pthread_barrier_destroy
pthread_barrier_init
pthread_barrier_wait
pthread_barrierattr_destroy
pthread_barrierattr_getpshared
pthread_barrierattr_init
pthread_barrierattr_setpshared
pthread_cancel
pthread_cleanup_pop
pthread_cleanup_push
pthread_cond_broadcast
pthread_cond_destroy
pthread_cond_init
pthread_cond_signal
pthread_cond_timedwait
pthread_cond_wait
pthread_condattr_destroy
pthread_condattr_getclock
pthread_condattr_getpshared
pthread_condattr_init
pthread_condattr_setclock
pthread_condattr_setpshared
pthread_create
pthread_detach
pthread_equal
pthread_exit
pthread_getconcurrency
pthread_getcpuclockid
pthread_getschedparam
pthread_getspecific
pthread_join
pthread_key_create
pthread_key_delete
pthread_kill
pthread_mutex_destroy
pthread_mutex_getprioceiling
pthread_mutex_init
pthread_mutex_lock
pthread_mutex_setprioceiling
pthread_mutex_timedlock
pthread_mutex_trylock
pthread_mutex_unlock
pthread_mutexattr_destroy
pthread_mutexattr_getprioceiling
pthread_mutexattr_getprotocol
pthread_mutexattr_getpshared
pthread_mutexattr_gettype
pthread_mutexattr_init
pthread_mutexattr_setprioceiling
pthread_mutexattr_setprotocol
pthread_mutexattr_setpshared
pthread_mutexattr_settype
pthread_once
pthread_rwlock_destroy
pthread_rwlock_init
pthread_rwlock_rdlock
pthread_rwlock_timedrdlock
pthread_rwlock_timedwrlock
pthread_rwlock_tryrdlock
pthread_rwlock_trywrlock
pthread_rwlock_unlock
pthread_rwlock_wrlock
pthread_rwlockattr_destroy
pthread_rwlockattr_getpshared
pthread_rwlockattr_init
pthread_rwlockattr_setpshared
pthread_self
pthread_setcancelstate
pthread_setcanceltype
pthread_setconcurrency
pthread_setschedparam
pthread_setschedprio
pthread_setspecific
pthread_sigmask
pthread_spin_destroy
pthread_spin_init
pthread_spin_lock
pthread_spin_trylock
pthread_spin_unlock
pthread_testcancel


https://computing.llnl.gov/tutorials/pthreads/
Last Modified: 07/04/2019 00:40:09 blaiseb@llnl.gov
UCRL-MI-133316

This work was performed under the auspices of the U.S. Department of Energy by Lawrence Livermore National Laboratory under Contract DE-AC52-07NA27344.


来源:  https://computing.llnl.gov/tutorials/pthreads/

C语言实现的猜拳游戏(剪子锤子布),让你与电脑对决

这是一个简单的猜拳游戏(剪子包子锤),让你与电脑对决。你出的拳头由你自己决定,电脑则随机出拳,最后判断胜负。

下面的代码会实现一个猜拳游戏,让你与电脑对决。你出的拳头由你自己决定,电脑则随机出拳,最后判断胜负。

启动程序后,让用户出拳,截图:

用户出拳,显示对决结果:截图:

代码实现:

  1. #include <stdio.h>
  2. #include <stdlib.h>
  3. #include <time.h>
  4. int main()
  5. {
  6. char gamer; // 玩家出拳
  7. int computer; // 电脑出拳
  8. int result; // 比赛结果
  9. // 为了避免玩一次游戏就退出程序,可以将代码放在循环中
  10. while (1){
  11. printf("这是一个猜拳的小游戏,请输入你要出的拳头:\n");
  12. printf("A:剪刀\nB:石头\nC:布\nD:不玩了\n");
  13. scanf("%c%*c",&gamer);
  14. switch (gamer){
  15. case 65: //A
  16. case 97: //a
  17. gamer=4;
  18. break;
  19. case 66: //B
  20. case 98: //b
  21. gamer=7;
  22. break;
  23. case 67: //C
  24. case 99: //c
  25. gamer=10;
  26. break;
  27. case 68: //D
  28. case 100: //d
  29. return 0;
  30. default:
  31. printf("你的选择为 %c 选择错误,退出...\n",gamer);
  32. getchar();
  33. system("cls"); // 清屏
  34. return 0;
  35. break;
  36. }
  37. srand((unsigned)time(NULL)); // 随机数种子
  38. computer=rand()%3; // 产生随机数并取余,得到电脑出拳
  39. result=(int)gamer+computer; // gamer 为 char 类型,数学运算时要强制转换类型
  40. printf("电脑出了");
  41. switch (computer)
  42. {
  43. case 0:printf("剪刀\n");break; //4 1
  44. case 1:printf("石头\n");break; //7 2
  45. case 2:printf("布\n");break; //10 3
  46. }
  47. printf("你出了");
  48. switch (gamer)
  49. {
  50. case 4:printf("剪刀\n");break;
  51. case 7:printf("石头\n");break;
  52. case 10:printf("布\n");break;
  53. }
  54. if (result==6||result==7||result==11) printf("你赢了!");
  55. else if (result==5||result==9||result==10) printf("电脑赢了!");
  56. else printf("平手");
  57. system("pause>nul&&cls"); // 暂停并清屏
  58. }
  59. return 0;
  60. }

代码分析
1) 首先,我们需要定义3个变量来储存玩家出的拳头(gamer)、电脑出的拳头(computer)和最后的结果(result),然后给出文字提示,让玩家出拳。

接下来接收玩家输入:

  1. scanf("%c%*c",&gamer);

注意:由于每次输入以回车结束,缓冲区中除了玩家输入的字母,还有回车符。回车符要跳过,以免影响下次输入。Scanf() 函数的格式控制字符串个数可以多于参数个数,scanf("%c%*c",&gamer);的作用是从缓冲区多输出一个字符(回车符),却不赋给任何变量。

玩家输入结束,使用 switch 语句判断输入内容,65(A)、97(a)、66(B)、98(b)、67(C)、99(c)、68(D)、100(d)为相应字符的ASCII码。

注意:system("cls"); 语句的作用是清屏。System() 函数用来执行 dos 命令,这里相当于在 dos 里输入 cls 命令。

2) 玩家出拳结束,电脑开始出拳。

电脑通过产生随机数来出拳:

  1. srand((unsigned)time(NULL)); //为了避免多次运行结果相同,故在前面加入上(需要time.h)
  2. computer=rand()%3; //获取0~2的随机数

最后通过玩家和电脑出拳的和来判断输赢:

  1. result=(int)gamer+computer;
  2. // ...
  3. if (result==6||result==7||result==11) printf("你赢了!");
  4. else if (result==5||result==9||result==10) printf("电脑赢了!");
  5. else printf("平手");

这是一个很巧妙的算法,玩家和电脑出拳不同,result 的值就不同,且不会重复,见下表:

电脑 -- 玩家石头(4)剪刀(7)布(10)
石头(0)4710
剪刀(1)5811
布(2)6912

3) 每次猜拳结束,暂停并清屏,进入下一次猜拳:

  1. system("pause>nul&&cls"); //暂停运行和清屏


源代码:main


Maven学习总结:基本概念和配置

简介

    在前一篇文章里已经介绍了怎么安装和配置maven。在安装好之后我们这里来看看怎么通过maven来构建一个工程并详细的了解一下maven的配置文件里各配置项是什么意思。只有理解清楚这些之后我们才能够更好的运用好这个工具。


创建一个示例工程

首先我们尝试创建一个普通的工程。在命令行的情况下,我们输入如下命令:

  1. mvn archetype:generate -DgroupId=com.yunzero -DartifactId=SampleProject -DarchetypeArtifactId=maven-archetype-quickstart -DinteractiveMode=false

系统会显示如下的输出:

这表示一个工程已经建立好了。那么我们前面的这个命令表示什么意思呢?它究竟做了什么?我们又创建了一个什么样的工程呢?我们一点点详细的分析过来。

先看我们建立的这个工程的结构:


如上图所示,这里表示一个普通的java console工程结构。这是我们用命令行建立的。如果我们考虑用IDE工具来建立工程呢?也可以用类似的方式。我们以eclipse为例。

1. 首先选择新建一个maven project:

2.  然后选择Next, 在这里选择工程所在的目录,我们选择默认的位置,如下图:

3. 选择next之后再继续选择archetype

这里,也选择默认的maven-archetype-quickstart。然后继续选择Next。如果我们留意的话会发现这个类型的archetypeid也就是我们前面命令行创建工程里指定的。

4. 在这一步选择Group Id和Artifact Id:

在这一步,设置的Group Id和artifact Id也就是我们前面命令行里指定的那样。这样,我们就建立了一个简单的maven示例工程了。它的结构如下图:


这样,我们通过命令行和IDE两种方式创建了一个示例工程。下面我们针对命令行的参数和pom.xml文件里的一些项进行详细的讨论。

参数解释

我们在最开始创建maven工程的时候指定了archetype参数。然后在后面的参数里又指定了archetypeartifactId。

archetype: 指的是我们如果要通过maven创建一个项目工程的话,因为具体针对不同类型的项目它的结构组织不一样,于是maven就提供了一个项目创建的模板。这些模板包含了一些最佳实践,这样可以使得我们在构建项目的时候节约不少实践。比如说,我们需要创建一个普通的console应用,那么它的结构模板必然是一种样式,而如果要构建一个JavaEE的项目,它的结构则不一样。既然我们需要针对不同项目提供不同的模板,于是就有了一个需要怎么来定义和区分它们的问题。这样就有了archetypeArtifactId。


archetypeArtifactId: 指的是针对archetype的具体模板。比如说maven-archetype-quickstart表示的是一个创建的普通maven工程。针对不同类型的工程,我们可以在maven的官网上查找对应的类型,也可以在通过IDE创建工程的时候去筛选 。

除了上述的两个之外,还要两个比较重要的参数:

groupId: 相当于一个对应项目的唯一区分标识。这样说起来还是有点模糊。如果考虑到我们做java项目的时候,要对一些包命名,而且一些包的命名需要具有唯一性。所以这个groupId就是我们创建的项目里最高层包的命名。

artifactId: 表示生成的包的名字。当我们将一个项目编译后打包的时候,需要确定一个打包名字并部署到实际测试或者生产环境中,所以在这个地方来确定最后包的名字。

上述的几个参数就是我们创建maven工程用到的。在前面的参数里,我们还设置了 -DinteractiveMode=false。它表示禁用交互的模式来创建工程。这表示什么意思呢?因为我们在命令行里已经指定了项目的类型和包名以及结构。如果我们想省略这一点的话,可以直接运行:

  1. mvn archetype:generate

这个时候系统会显示所有的archetype类型,然后交互的提示我们输入对应的archetype,以及groupId和artifact Id。

pom.xml文件

我们再来看看通过命令行自动生成的pom.xml文件:

  1. <project xmlns="http://maven.apache.org/POM/4.0.0" xmlns:xsi="http://www.w3.org/2001/XMLSchema-instance"
  2.   xsi:schemaLocation="http://maven.apache.org/POM/4.0.0 http://maven.apache.org/xsd/maven-4.0.0.xsd">
  3.   <modelVersion>4.0.0</modelVersion>
  4.   <groupId>com.yunzero</groupId>
  5.   <artifactId>SampleProject</artifactId>
  6.   <version>0.0.1-SNAPSHOT</version>
  7.   <packaging>jar</packaging>
  8.   <name>SampleProject</name>
  9.   <url>http://maven.apache.org</url>
  10.   <properties>
  11.     <project.build.sourceEncoding>UTF-8</project.build.sourceEncoding>
  12.   </properties>
  13.   <dependencies>
  14.     <dependency>
  15.       <groupId>junit</groupId>
  16.       <artifactId>junit</artifactId>
  17.       <version>3.8.1</version>
  18.       <scope>test</scope>
  19.     </dependency>
  20.   </dependencies>
  21. </project>

前面的groupId和artifactId也定义在这里。<version>部分表示我们常用版本管理中定义的版本号,比如我们常用的RC, alpha, beta, SNAPSHOT。在这里SNAPSHOT表示当前项目处在一个开发的阶段。当一个工程使用SNAPSHOT的依赖时,Maven会每次去获取最新的SNAPSHOT版本。

还有一个是<packaging>,它表示对于这个工程,需要创建一个JAR包。

在下面的<properties>里面,我们通常用来定义一些自定义的变量,方便他们重用。比如说我们需要使用某些版本的jar组件,它们有多个组件,但是是同样的版本,我们就可以这样来定义,比如说:

  1. <properties>
  2.         <project.build.sourceEncoding>UTF-8</project.build.sourceEncoding>
  3.         <jdk.version>1.6</jdk.version>
  4.         <spring.version>4.1.2.RELEASE</spring.version>
  5.   </properties>
  6. <!-- Spring Core -->
  7.         <dependency>
  8.             <groupId>org.springframework</groupId>
  9.             <artifactId>spring-core</artifactId>
  10.             <version>${spring.version}</version>
  11.         </dependency>
  12.         <dependency>
  13.             <groupId>org.springframework</groupId>
  14.             <artifactId>spring-context</artifactId>
  15.             <version>${spring.version}</version>
  16.         </dependency>

这里我们用到了spring-core, spring-context等几个artifact,于是可以直接引用同样的版本信息变量。

除了这些以外,刚才我们看到很重要的一个就是依赖信息的定义,比如这里我们项目中需要使用到spring-core, spring-context,于是我们就需要在<dependencys>里面定义一个<dependency>的子元素。一个dependency里面指定一个组件的groupId, artifactId和version。可能我们有时候会有点疑惑,这些jar包到哪里去找呢?一般如果我们知道需要使用哪些组件的话,可以去:http://search.maven.org/来搜索需要的组件,在那里可以将需要的maven依赖定义信息直接拷过来。比如下图的spring依赖信息:

这样,一个基本的maven工程所需要的信息就配置好了。在后续的文章里,我们再讨论maven的生命周期和一些plugin的使用情况。


来源: https://www.iteye.com/blog/shmilyaw-hotmail-com-2166228


另外 mvn 命令需要的 配置信息如下

Maven-setting配置详细说明

全局配置: ${M2_HOME}/conf/settings.xml

用户配置: ${user.home}/.m2/settings.xml

note:用户配置优先于全局配置。${user.home} 和和所有其他系统属性只能在3.0+版本上使用。请注意windows和Linux使用变量的区别。

settings.xml详解
声明规范
<?xml version="1.0" encoding="UTF-8"?>
<settings xmlns="http://maven.apache.org/POM/4.0.0" xmlns:xsi="http://www.w3.org/2001/XMLSchema-instance"
xsi:schemaLocation="http://maven.apache.org/POM/4.0.0 http://maven.apache.org/xsd/settings-1.0.0.xsd">
localRepository
<!-- 本地仓库的路径。默认值为${user.home}/.m2/repository。 -->
<localRepository>usr/local/maven</localRepository>
interactiveMode
<!--Maven是否需要和用户交互以获得输入。如果Maven需要和用户交互以获得输入,则设置成true,反之则应为false。默认为true。-->
<interactiveMode>true</interactiveMode>
usePluginRegistry
<!--Maven是否需要使用plugin-registry.xml文件来管理插件版本。如果需要让Maven使用文件${user.home}/.m2/plugin-registry.xml来管理插件版本,则设为true。默认为false。-->
<usePluginRegistry>false</usePluginRegistry>
offline
<!--表示Maven是否需要在离线模式下运行。如果构建系统需要在离线模式下运行,则为true,默认为false。当由于网络设置原因或者安全因素,构建服务器不能连接远程仓库的时候,该配置就十分有用。 -->
<offline>false</offline>
pluginGroups

<!--当插件的组织Id(groupId)没有显式提供时,供搜寻插件组织Id(groupId)的列表。该元素包含一个pluginGroup元素列表,每个子元素包含了一个组织Id(groupId)。当我们使用某个插件,并且没有在命令行为其提供组织Id(groupId)的时候,Maven就会使用该列表。默认情况下该列表包含了org.apache.maven.plugins和org.codehaus.mojo -->
<pluginGroups>
<!--plugin的组织Id(groupId) -->
<pluginGroup>org.codehaus.mojo</pluginGroup>
</pluginGroups>

proxies

<!--用来配置不同的代理,多代理profiles 可以应对笔记本或移动设备的工作环境:通过简单的设置profile id就可以很容易的更换整个代理配置。 -->
<proxies>
<!--代理元素包含配置代理时需要的信息-->
<proxy>
<!--代理的唯一定义符,用来区分不同的代理元素。-->
<id>myproxy</id>
<!--该代理是否是激活的那个。true则激活代理。当我们声明了一组代理,而某个时候只需要激活一个代理的时候,该元素就可以派上用处。 -->
<active>true</active>
<!--代理的协议。 协议://主机名:端口,分隔成离散的元素以方便配置。-->
<protocol>http</protocol>
<!--代理的主机名。协议://主机名:端口,分隔成离散的元素以方便配置。 -->
<host>proxy.somewhere.com</host>
<!--代理的端口。协议://主机名:端口,分隔成离散的元素以方便配置。 -->
<port>8080</port>
<!--代理的用户名,用户名和密码表示代理服务器认证的登录名和密码。 -->
<username>proxyuser</username>
<!--代理的密码,用户名和密码表示代理服务器认证的登录名和密码。 -->
<password>somepassword</password>
<!--不该被代理的主机名列表。该列表的分隔符由代理服务器指定;例子中使用了竖线分隔符,使用逗号分隔也很常见。-->
<nonProxyHosts>*.google.com|ibiblio.org</nonProxyHosts>
</proxy>
</proxies>

servers

<!--配置服务端的一些设置。一些设置如安全证书不应该和pom.xml一起分发。这种类型的信息应该存在于构建服务器上的settings.xml文件中。-->
<servers>
<!--服务器元素包含配置服务器时需要的信息 -->
<server>
<!--这是server的id(注意不是用户登陆的id),该id与distributionManagement中repository元素的id相匹配。-->
<id>server001</id>
<!--鉴权用户名。鉴权用户名和鉴权密码表示服务器认证所需要的登录名和密码。 -->
<username>my_login</username>
<!--鉴权密码 。鉴权用户名和鉴权密码表示服务器认证所需要的登录名和密码。密码加密功能已被添加到2.1.0 +。详情请访问密码加密页面-->
<password>my_password</password>
<!--鉴权时使用的私钥位置。和前两个元素类似,私钥位置和私钥密码指定了一个私钥的路径(默认是${user.home}/.ssh/id_dsa)以及如果需要的话,一个密语。将来passphrase和password元素可能会被提取到外部,但目前它们必须在settings.xml文件以纯文本的形式声明。 -->
<privateKey>${usr.home}/.ssh/id_dsa</privateKey>
<!--鉴权时使用的私钥密码。-->
<passphrase>some_passphrase</passphrase>
<!--文件被创建时的权限。如果在部署的时候会创建一个仓库文件或者目录,这时候就可以使用权限(permission)。这两个元素合法的值是一个三位数字,其对应了unix文件系统的权限,如664,或者775。 -->
<filePermissions>664</filePermissions>
<!--目录被创建时的权限。 -->
<directoryPermissions>775</directoryPermissions>
</server>
</servers>

mirrors

<!--为仓库列表配置的下载镜像列表。高级设置请参阅镜像设置页面 -->
<mirrors>
<!--给定仓库的下载镜像。 -->
<mirror>
<!--该镜像的唯一标识符。id用来区分不同的mirror元素。 -->
<id>planetmirror.com</id>
<!--镜像名称 -->
<name>PlanetMirror Australia</name>
<!--该镜像的URL。构建系统会优先考虑使用该URL,而非使用默认的服务器URL。 -->
<url>http://downloads.planetmirror.com/pub/maven2</url>
<!--被镜像的服务器的id。例如,如果我们要设置了一个Maven中央仓库(http://repo.maven.apache.org/maven2/)的镜像,就需要将该元素设置成central。这必须和中央仓库的id central完全一致。-->
<mirrorOf>central</mirrorOf>
</mirror>
</mirrors>

profiles

<!--根据环境参数来调整构建配置的列表。settings.xml中的profile元素是pom.xml中profile元素的裁剪版本。它包含了id,activation, repositories, pluginRepositories和 properties元素。这里的profile元素只包含这五个子元素是因为这里只关心构建系统这个整体(这正是settings.xml文件的角色定位),而非单独的项目对象模型设置。如果一个settings中的profile被激活,它的值会覆盖任何其它定义在POM中或者profile.xml中的带有相同id的profile。 -->
<profiles>
<!--根据环境参数来调整的构件的配置-->
<profile>
<!--该配置的唯一标识符。 -->
<id>test</id>

Activation

<!--自动触发profile的条件逻辑。Activation是profile的开启钥匙。如POM中的profile一样,profile的力量来自于它能够在某些特定的环境中自动使用某些特定的值;这些环境通过activation元素指定。activation元素并不是激活profile的唯一方式。settings.xml文件中的activeProfile元素可以包含profile的id。profile也可以通过在命令行,使用-P标记和逗号分隔的列表来显式的激活(如,-P test)。-->
<activation>
<!--profile默认是否激活的标识-->
<activeByDefault>false</activeByDefault>
<!--当匹配的jdk被检测到,profile被激活。例如,1.4激活JDK1.4,1.4.0_2,而!1.4激活所有版本不是以1.4开头的JDK。-->
<jdk>1.5</jdk>
<!--当匹配的操作系统属性被检测到,profile被激活。os元素可以定义一些操作系统相关的属性。-->
<os>
<!--激活profile的操作系统的名字 -->
<name>Windows XP</name>
<!--激活profile的操作系统所属家族(如 'windows') -->
<family>Windows</family>
<!--激活profile的操作系统体系结构 -->
<arch>x86</arch>
<!--激活profile的操作系统版本-->
<version>5.1.2600</version>
</os>
<!--如果Maven检测到某一个属性(其值可以在POM中通过${name}引用),其拥有对应的name = 值,Profile就会被激活。如果值字段是空的,那么存在属性名称字段就会激活profile,否则按区分大小写方式匹配属性值字段-->
<property>
<!--激活profile的属性的名称-->
<name>mavenVersion</name>
<!--激活profile的属性的值 -->
<value>2.0.3</value>
</property>
<!--提供一个文件名,通过检测该文件的存在或不存在来激活profile。missing检查文件是否存在,如果不存在则激活profile。另一方面,exists则会检查文件是否存在,如果存在则激活profile。-->
<file>
<!--如果指定的文件存在,则激活profile。 -->
<exists>${basedir}/file2.properties</exists>
<!--如果指定的文件不存在,则激活profile。-->
<missing>${basedir}/file1.properties</missing>
</file>
</activation>

Properties

<!--对应profile的扩展属性列表。Maven属性和Ant中的属性一样,可以用来存放一些值。这些值可以在POM中的任何地方使用标记${X}来使用,这里X是指属性的名称。属性有五种不同的形式,并且都能在settings.xml文件中访问。
1. env.X: 在一个变量前加上"env."的前缀,会返回一个shell环境变量。例如,"env.PATH"指代了$path环境变量(在Windows上是%PATH%)。
2. project.x:指代了POM中对应的元素值。例如: <project><version>1.0</version></project>通过${project.version}获得version的值。
3. settings.x: 指代了settings.xml中对应元素的值。例如:<settings><offline>false</offline></settings>通过 ${settings.offline}获得offline的值。
4. Java System Properties: 所有可通过java.lang.System.getProperties()访问的属性都能在POM中使用该形式访问,例如 ${java.home}。
5. x: 在<properties/>元素中,或者外部文件中设置,以${someVar}的形式使用。 -->
<properties>
<user.install>${user.home}/our-project</user.install>
</properties>
note:如果该profile被激活,则可以再POM中使用${user.install}。

Repositories

<!--远程仓库列表,它是Maven用来填充构建系统本地仓库所使用的一组远程项目。 -->
<repositories>
<!--包含需要连接到远程仓库的信息 -->
<repository>
<!--远程仓库唯一标识-->
<id>codehausSnapshots</id>
<!--远程仓库名称 -->
<name>Codehaus Snapshots</name>
<!--如何处理远程仓库里发布版本的下载-->
<releases>
<!--true或者false表示该仓库是否为下载某种类型构件(发布版,快照版)开启。 -->
<enabled>false</enabled>
<!--该元素指定更新发生的频率。Maven会比较本地POM和远程POM的时间戳。这里的选项是:always(一直),daily(默认,每日),interval:X(这里X是以分钟为单位的时间间隔),或者never(从不)。 -->
<updatePolicy>always</updatePolicy>
<!--当Maven验证构件校验文件失败时该怎么做-ignore(忽略),fail(失败),或者warn(警告)。-->
<checksumPolicy>warn</checksumPolicy>
</releases>
<!--如何处理远程仓库里快照版本的下载。有了releases和snapshots这两组配置,POM就可以在每个单独的仓库中,为每种类型的构件采取不同的策略。例如,可能有人会决定只为开发目的开启对快照版本下载的支持。参见repositories/repository/releases元素-->
<snapshots>
<enabled/><updatePolicy/><checksumPolicy/>
</snapshots>
<!--远程仓库URL,按protocol://hostname/path形式 -->
<url>http://snapshots.maven.codehaus.org/maven2</url>
<!--用于定位和排序构件的仓库布局类型-可以是default(默认)或者legacy(遗留)。Maven 2为其仓库提供了一个默认的布局;然而,Maven 1.x有一种不同的布局。我们可以使用该元素指定布局是default(默认)还是legacy(遗留)。 -->
<layout>default</layout>
</repository>
</repositories>
<!--发现插件的远程仓库列表。仓库是两种主要构件的家。第一种构件被用作其它构件的依赖。这是中央仓库中存储的大部分构件类型。另外一种构件类型是插件。Maven插件是一种特殊类型的构件。由于这个原因,插件仓库独立于其它仓库。pluginRepositories元素的结构和repositories元素的结构类似。每个pluginRepository元素指定一个Maven可以用来寻找新插件的远程地址。-->
<pluginRepositories>
<!--包含需要连接到远程插件仓库的信息.参见profiles/profile/repositories/repository元素的说明-->
<pluginRepository>
<releases>
<enabled/><updatePolicy/><checksumPolicy/>
</releases>
<snapshots>
<enabled/><updatePolicy/><checksumPolicy/>
</snapshots>
<id/><name/><url/><layout/>
</pluginRepository>
</pluginRepositories>
</profile>
</profiles>

activeProfiles

<!--手动激活profiles的列表,按照profile被应用的顺序定义activeProfile。 该元素包含了一组activeProfile元素,每个activeProfile都含有一个profile id。任何在activeProfile中定义的profile id,不论环境设置如何,其对应的
profile都会被激活。如果没有匹配的profile,则什么都不会发生。例如,env-test是一个activeProfile,则在pom.xml(或者profile.xml)中对应id的profile会被激活。如果运行过程中找不到这样一个profile,Maven则会像往常一样运行。 -->
<activeProfiles>
<!-- -->
<activeProfile>env-test</activeProfile>
</activeProfiles>
</settings>

----------------------------

另外, pom.xml 配置信息如下

Maven之pom.xml配置文件详解

setting.xml主要用于配置maven的运行环境等一系列通用的属性,是全局级别的配置文件;而pom.xml主要描述了项目的maven坐标,依赖关系,开发者需要遵循的规则,缺陷管理系统,组织和licenses,以及其他所有的项目相关因素,是项目级别的配置文件。

基础配置
一个典型的pom.xml文件配置如下:
<project xmlns="http://maven.apache.org/POM/4.0.0" xmlns:xsi="http://www.w3.org/2001/XMLSchema-instance"
xsi:schemaLocation="http://maven.apache.org/POM/4.0.0http://maven.apache.org/xsd/maven-4.0.0.xsd">

<!-- 模型版本。maven2.0必须是这样写,现在是maven2唯一支持的版本 -->
<modelVersion>4.0.0</modelVersion>

<!-- 公司或者组织的唯一标志,并且配置时生成的路径也是由此生成, 如com.winner.trade,maven会将该项目打成的jar包放本地路径:/com/winner/trade -->
<groupId>com.winner.trade</groupId>

<!-- 本项目的唯一ID,一个groupId下面可能多个项目,就是靠artifactId来区分的 -->
<artifactId>trade-core</artifactId>

<!-- 本项目目前所处的版本号 -->
<version>1.0.0-SNAPSHOT</version>

<!-- 打包的机制,如pom,jar, maven-plugin, ejb, war, ear, rar, par,默认为jar -->
<packaging>jar</packaging>

<!-- 帮助定义构件输出的一些附属构件,附属构件与主构件对应,有时候需要加上classifier才能唯一的确定该构件 不能直接定义项目的classifer,因为附属构件不是项目直接默认生成的,而是由附加的插件帮助生成的 -->
<classifier>...</classifier>

<!-- 定义本项目的依赖关系 -->
<dependencies>

<!-- 每个dependency都对应这一个jar包 -->
<dependency>

<!--一般情况下,maven是通过groupId、artifactId、version这三个元素值(俗称坐标)来检索该构件, 然后引入你的工程。如果别人想引用你现在开发的这个项目(前提是已开发完毕并发布到了远程仓库),-->
<!--就需要在他的pom文件中新建一个dependency节点,将本项目的groupId、artifactId、version写入, maven就会把你上传的jar包下载到他的本地 -->
<groupId>com.winner.trade</groupId>
<artifactId>trade-test</artifactId>
<version>1.0.0-SNAPSHOT</version>

<!-- maven认为,程序对外部的依赖会随着程序的所处阶段和应用场景而变化,所以maven中的依赖关系有作用域(scope)的限制。 -->
<!--scope包含如下的取值:compile(编译范围)、provided(已提供范围)、runtime(运行时范围)、test(测试范围)、system(系统范围) -->
<scope>test</scope>

<!-- 设置指依赖是否可选,默认为false,即子项目默认都继承:为true,则子项目必需显示的引入,与dependencyManagement里定义的依赖类似 -->
<optional>false</optional>

<!-- 屏蔽依赖关系。 比如项目中使用的libA依赖某个库的1.0版,libB依赖某个库的2.0版,现在想统一使用2.0版,就应该屏蔽掉对1.0版的依赖 -->
<exclusions>
<exclusion>
<groupId>org.slf4j</groupId>
<artifactId>slf4j-api</artifactId>
</exclusion>
</exclusions>

</dependency>

</dependencies>

<!-- 为pom定义一些常量,在pom中的其它地方可以直接引用 使用方式 如下 :${file.encoding} -->
<properties>
<file.encoding>UTF-8</file.encoding>
<java.source.version>1.5</java.source.version>
<java.target.version>1.5</java.target.version>
</properties>

...
</project>
一般来说,上面的几个配置项对任何项目都是必不可少的,定义了项目的基本属性。

这里有必要对一个不太常用的属性classifier做一下解释,因为有时候引用某个jar包,classifier不写的话会报错。

classifier元素用来帮助定义构件输出的一些附属构件。附属构件与主构件对应,比如主构件是 kimi-app-2.0.0.jar,该项目可能还会通过使用一些插件生成 如kimi-app-2.0.0-javadoc.jar (Java文档)、 kimi-app-2.0.0-sources.jar(Java源代码) 这样两个附属构件。这时候,javadoc、sources就是这两个附属构件的classifier,这样附属构件也就拥有了自己唯一的坐标。

classifier的用途在于:

1. maven download javadoc / sources jar包的时候,需要借助classifier指明要下载那个附属构件

2. 引入依赖的时候,有时候仅凭groupId、artifactId、version无法唯一的确定某个构件,需要借助classifier来进一步明确目标。比如JSON-lib,有时候会同一个版本会提供多个jar包,在JDK1.5环境下是一套,在JDK1.3环境下是一套:

引用它的时候就要注明JDK版本,否则maven不知道你到底需要哪一套jar包:
<dependency>
<groupId>net.sf.json-lib</groupId>
<artifactId>json-lib</artifactId>
<version>2.4</version>
<classifier>jdk15</classifier>
</dependency>

构建配置

<build>

<!-- 产生的构件的文件名,默认值是${artifactId}-${version}。 -->
<finalName>myPorjectName</finalName>

<!-- 构建产生的所有文件存放的目录,默认为${basedir}/target,即项目根目录下的target -->
<directory>${basedir}/target</directory>

<!--当项目没有规定目标(Maven2叫做阶段(phase))时的默认值, -->
<!--必须跟命令行上的参数相同例如jar:jar,或者与某个阶段(phase)相同例如install、compile等 -->
<defaultGoal>install</defaultGoal>

<!--当filtering开关打开时,使用到的过滤器属性文件列表。 -->
<!--项目配置信息中诸如${spring.version}之类的占位符会被属性文件中的实际值替换掉 -->
<filters>
<filter>../filter.properties</filter>
</filters>

<!--项目相关的所有资源路径列表,例如和项目相关的配置文件、属性文件,这些资源被包含在最终的打包文件里。 -->
<resources>
<resource>

<!--描述了资源的目标路径。该路径相对target/classes目录(例如${project.build.outputDirectory})。 -->
<!--举个例子,如果你想资源在特定的包里(org.apache.maven.messages),你就必须该元素设置为org/apache/maven/messages。 -->
<!--然而,如果你只是想把资源放到源码目录结构里,就不需要该配置。 -->
<targetPath>resources</targetPath>

<!--是否使用参数值代替参数名。参数值取自properties元素或者文件里配置的属性,文件在filters元素里列出。 -->
<filtering>true</filtering>

<!--描述存放资源的目录,该路径相对POM路径 -->
<directory>src/main/resources</directory>

<!--包含的模式列表 -->
<includes>
<include>**/*.properties</include>
<include>**/*.xml</include>
</includes>

<!--排除的模式列表 如果<include>与<exclude>划定的范围存在冲突,以<exclude>为准 -->
<excludes>
<exclude>jdbc.properties</exclude>
</excludes>

</resource>
</resources>

<!--单元测试相关的所有资源路径,配制方法与resources类似 -->
<testResources>
<testResource>
<targetPath />
<filtering />
<directory />
<includes />
<excludes />
</testResource>
</testResources>

<!--项目源码目录,当构建项目的时候,构建系统会编译目录里的源码。该路径是相对于pom.xml的相对路径。 -->
<sourceDirectory>${basedir}\src\main\java</sourceDirectory>

<!--项目脚本源码目录,该目录和源码目录不同, <!-- 绝大多数情况下,该目录下的内容会被拷贝到输出目录(因为脚本是被解释的,而不是被编译的)。 -->
<scriptSourceDirectory>${basedir}\src\main\scripts
</scriptSourceDirectory>

<!--项目单元测试使用的源码目录,当测试项目的时候,构建系统会编译目录里的源码。该路径是相对于pom.xml的相对路径。 -->
<testSourceDirectory>${basedir}\src\test\java</testSourceDirectory>

<!--被编译过的应用程序class文件存放的目录。 -->
<outputDirectory>${basedir}\target\classes</outputDirectory>

<!--被编译过的测试class文件存放的目录。 -->
<testOutputDirectory>${basedir}\target\test-classes
</testOutputDirectory>

<!--项目的一系列构建扩展,它们是一系列build过程中要使用的产品,会包含在running bulid‘s classpath里面。 -->
<!--他们可以开启extensions,也可以通过提供条件来激活plugins。 -->
<!--简单来讲,extensions是在build过程被激活的产品 -->
<extensions>

<!--例如,通常情况下,程序开发完成后部署到线上Linux服务器,可能需要经历打包、 -->
<!--将包文件传到服务器、SSH连上服务器、敲命令启动程序等一系列繁琐的步骤。 -->
<!--实际上这些步骤都可以通过Maven的一个插件 wagon-maven-plugin 来自动完成 -->
<!--下面的扩展插件wagon-ssh用于通过SSH的方式连接远程服务器, -->
<!--类似的还有支持ftp方式的wagon-ftp插件 -->
<extension>
<groupId>org.apache.maven.wagon</groupId>
<artifactId>wagon-ssh</artifactId>
<version>2.8</version>
</extension>

</extensions>

<!--使用的插件列表 。 -->
<plugins>
<plugin>
<groupId></groupId>
<artifactId>maven-assembly-plugin</artifactId>
<version>2.5.5</version>

<!--在构建生命周期中执行一组目标的配置。每个目标可能有不同的配置。 -->
<executions>
<execution>

<!--执行目标的标识符,用于标识构建过程中的目标,或者匹配继承过程中需要合并的执行目标 -->
<id>assembly</id>

<!--绑定了目标的构建生命周期阶段,如果省略,目标会被绑定到源数据里配置的默认阶段 -->
<phase>package</phase>

<!--配置的执行目标 -->
<goals>
<goal>single</goal>
</goals>

<!--配置是否被传播到子POM -->
<inherited>false</inherited>

</execution>
</executions>

<!--作为DOM对象的配置,配置项因插件而异 -->
<configuration>
<finalName>${finalName}</finalName>
<appendAssemblyId>false</appendAssemblyId>
<descriptor>assembly.xml</descriptor>
</configuration>

<!--是否从该插件下载Maven扩展(例如打包和类型处理器), -->
<!--由于性能原因,只有在真需要下载时,该元素才被设置成true。 -->
<extensions>false</extensions>

<!--项目引入插件所需要的额外依赖 -->
<dependencies>
<dependency>...</dependency>
</dependencies>

<!--任何配置是否被传播到子项目 -->
<inherited>true</inherited>

</plugin>
</plugins>

<!--主要定义插件的共同元素、扩展元素集合,类似于dependencyManagement, -->
<!--所有继承于此项目的子项目都能使用。该插件配置项直到被引用时才会被解析或绑定到生命周期。 -->
<!--给定插件的任何本地配置都会覆盖这里的配置 -->
<pluginManagement>
<plugins>...</plugins>
</pluginManagement>

</build>
pom里面的仓库与setting.xml里的仓库功能是一样的。主要的区别在于,pom里的仓库是个性化的。比如一家大公司里的setting文件是公用的,所有项目都用一个setting文件,但各个子项目却会引用不同的第三方库,所以就需要在pom里设置自己需要的仓库地址。

分发配置
[html] view plain copy
<!--项目分发信息,在执行mvn deploy后表示要发布的位置。 -->
<!--有了这些信息就可以把网站部署到远程服务器或者把构件部署到远程仓库。 -->
<distributionManagement>

<!--部署项目产生的构件到远程仓库需要的信息 -->
<repository>

<!--是分配给快照一个唯一的版本号(由时间戳和构建流水号),还是每次都使用相同的版本号 -->
<!--参见repositories/repository元素 -->
<uniqueVersion>true</uniqueVersion>

<id> repo-id </id>
<name> repo-name</name>
<url>file://${basedir}/target/deploy </url>
<layout />

</repository>

<!--构件的快照部署到哪里,如果没有配置该元素,默认部署到repository元素配置的仓库 -->
<snapshotRepository>
<uniqueVersion />
<id />
<name />
<url />
<layout />
</snapshotRepository>

<!--部署项目的网站需要的信息 -->
<site>

<!--部署位置的唯一标识符,用来匹配站点和settings.xml文件里的配置 -->
<id> site-id </id>

<!--部署位置的名称 -->
<name> site-name</name>

<!--部署位置的URL,按protocol://hostname/path形式 -->
<url>scp://svn.baidu.com/banseon:/var/www/localhost/banseon-web </url>

</site>

<!--项目下载页面的URL。如果没有该元素,用户应该参考主页。 -->
<!--使用该元素的原因是:帮助定位那些不在仓库里的构件(由于license限制)。 -->
<downloadUrl />

<!--如果构件有了新的groupID和artifact ID(构件移到了新的位置),这里列出构件的重定位信息。 -->
<relocation>

<!--构件新的group ID -->
<groupId />

<!--构件新的artifact ID -->
<artifactId />

<!--构件新的版本号 -->
<version />

<!--显示给用户的,关于移动的额外信息,例如原因。 -->
<message />

</relocation>

<!--给出该构件在远程仓库的状态。不得在本地项目中设置该元素,因为这是工具自动更新的。 -->
<!--有效的值有:none(默认),converted(仓库管理员从Maven 1 POM转换过来), -->
<!--partner(直接从伙伴Maven 2仓库同步过来),deployed(从Maven 2实例部署),verified(被核实时正确的和最终的)。 -->
<status />

</distributionManagement>

仓库配置

<!--发现依赖和扩展的远程仓库列表。 -->
<repositories>

<!--包含需要连接到远程仓库的信息 -->
<repository>

<!--如何处理远程仓库里发布版本的下载 -->
<releases>

<!--true或者false表示该仓库是否为下载某种类型构件(发布版,快照版)开启。 -->
<enabled />

<!--该元素指定更新发生的频率。Maven会比较本地POM和远程POM的时间戳。 -->
<!--这里的选项是:always(一直),daily(默认,每日), -->
<!--interval:X(这里X是以分钟为单位的时间间隔),或者never(从不)。 -->
<updatePolicy />

<!--当Maven验证构件校验文件失败时该怎么做: -->
<!--ignore(忽略),fail(失败),或者warn(警告)。 -->
<checksumPolicy />

</releases>

<!--如何处理远程仓库里快照版本的下载。有了releases和snapshots这两组配置, -->
<!--POM就可以在每个单独的仓库中,为每种类型的构件采取不同的策略。 -->
<!--例如,可能有人会决定只为开发目的开启对快照版本下载的支持 -->
<snapshots>
<enabled />
<updatePolicy />
<checksumPolicy />
</snapshots>

<!--远程仓库唯一标识符。可以用来匹配在settings.xml文件里配置的远程仓库 -->
<id> repo-id </id>

<!--远程仓库名称 -->
<name> repo-name</name>

<!--远程仓库URL,按protocol://hostname/path形式 -->
<url>http://192.168.1.169:9999/repository/ </url>

<!--用于定位和排序构件的仓库布局类型-可以是default(默认)或者legacy(遗留)。 -->
<!--Maven 2为其仓库提供了一个默认的布局; -->
<!--然而,Maven1.x有一种不同的布局。 -->
<!--我们可以使用该元素指定布局是default(默认)还是legacy(遗留)。 -->
<layout> default</layout>

</repository>

</repositories>

<!--发现插件的远程仓库列表,这些插件用于构建和报表 -->
<pluginRepositories>

<!--包含需要连接到远程插件仓库的信息.参见repositories/repository元素 -->
<pluginRepository />

</pluginRepositories>
profile配置

<!--在列的项目构建profile,如果被激活,会修改构建处理 -->
<profiles>

<!--根据环境参数或命令行参数激活某个构建处理 -->
<profile>
<!--自动触发profile的条件逻辑。Activation是profile的开启钥匙。 -->
<activation>

<!--profile默认是否激活的标识 -->
<activeByDefault>false</activeByDefault>

<!--activation有一个内建的java版本检测,如果检测到jdk版本与期待的一样,profile被激活。 -->
<jdk>1.7</jdk>

<!--当匹配的操作系统属性被检测到,profile被激活。os元素可以定义一些操作系统相关的属性。 -->
<os>

<!--激活profile的操作系统的名字 -->
<name>Windows XP</name>

<!--激活profile的操作系统所属家族(如 'windows') -->
<family>Windows</family>

<!--激活profile的操作系统体系结构 -->
<arch>x86</arch>

<!--激活profile的操作系统版本 -->
<version>5.1.2600</version>

</os>

<!--如果Maven检测到某一个属性(其值可以在POM中通过${名称}引用),其拥有对应的名称和值,Profile就会被激活。 -->
<!-- 如果值字段是空的,那么存在属性名称字段就会激活profile,否则按区分大小写方式匹配属性值字段 -->
<property>

<!--激活profile的属性的名称 -->
<name>mavenVersion</name>

<!--激活profile的属性的值 -->
<value>2.0.3</value>

</property>

<!--提供一个文件名,通过检测该文件的存在或不存在来激活profile。missing检查文件是否存在,如果不存在则激活profile。 -->
<!--另一方面,exists则会检查文件是否存在,如果存在则激活profile。 -->
<file>

<!--如果指定的文件存在,则激活profile。 -->
<exists>/usr/local/hudson/hudson-home/jobs/maven-guide-zh-to-production/workspace/</exists>

<!--如果指定的文件不存在,则激活profile。 -->
<missing>/usr/local/hudson/hudson-home/jobs/maven-guide-zh-to-production/workspace/</missing>

</file>

</activation>
<id />
<build />
<modules />
<repositories />
<pluginRepositories />
<dependencies />
<reporting />
<dependencyManagement />
<distributionManagement />
<properties />
</profile>

profile配置项在setting.xml中也有,是pom.xml中profile元素的裁剪版本,包含了id,activation, repositories, pluginRepositories和 properties元素。这里的profile元素只包含这五个子元素是因为setting.xml只关心构建系统这个整体(这正是settings.xml文件的角色定位),而非单独的项目对象模型设置。如果一个settings中的profile被激活,它的值会覆盖任何其它定义在POM中或者profile.xml中的带有相同id的profile。
pom.xml中的profile可以看做pom.xml的副本,拥有与pom.xml相同的子元素与配置方法。它包含可选的activation(profile的触发器)和一系列的changes。例如test过程可能会指向不同的数据库(相对最终的deployment)或者不同的dependencies或者不同的repositories,并且是根据不同的JDK来改变的。只需要其中一个成立就可以激活profile,如果第一个条件满足了,那么后面就不会在进行匹配。

报表配置

<!--描述使用报表插件产生报表的规范,特定的maven 插件能输出相应的定制和配置报表. -->
<!--当用户执行“mvn site”,这些报表就会运行,在页面导航栏能看到所有报表的链接。 -->
<reporting>

<!--true,则网站不包括默认的报表。这包括“项目信息”菜单中的报表。 -->
<excludeDefaults />

<!--所有产生的报表存放到哪里。默认值是${project.build.directory}/site。 -->
<outputDirectory />

<!--使用的报表插件和他们的配置。 -->
<plugins>

<plugin>
<groupId />
<artifactId />
<version />
<inherited />
<configuration>
<links>
<link>http://java.sun.com/j2se/1.5.0/docs/api/</link>
</links>
</configuration>
<!--一组报表的多重规范,每个规范可能有不同的配置。 -->
<!--一个规范(报表集)对应一个执行目标 。例如,有1,2,3,4,5,6,7,8,9个报表。 -->
<!--1,2,5构成A报表集,对应一个执行目标。2,5,8构成B报表集,对应另一个执行目标 -->
<reportSets>

<!--表示报表的一个集合,以及产生该集合的配置 -->
<reportSet>

<!--报表集合的唯一标识符,POM继承时用到 -->
<id>sunlink</id>

<!--产生报表集合时,被使用的报表的配置 -->
<configuration />

<!--配置是否被继承到子POMs -->
<inherited />

<!--这个集合里使用到哪些报表 -->
<reports>
<report>javadoc</report>
</reports>

</reportSet>

</reportSets>

</plugin>

</plugins>

</reporting>

环境配置

<!--项目的问题管理系统(Bugzilla, Jira, Scarab,或任何你喜欢的问题管理系统)的名称和URL,本例为 jira -->
<issueManagement>

<!--问题管理系统(例如jira)的名字, -->
<system> jira </system>

<!--该项目使用的问题管理系统的URL -->
<url> http://jira.clf.com/</url>

</issueManagement>

<!--项目持续集成信息 -->
<ciManagement>

<!--持续集成系统的名字,例如continuum -->
<system />

<!--该项目使用的持续集成系统的URL(如果持续集成系统有web接口的话)。 -->
<url />

<!--构建完成时,需要通知的开发者/用户的配置项。包括被通知者信息和通知条件(错误,失败,成功,警告) -->
<notifiers>

<!--配置一种方式,当构建中断时,以该方式通知用户/开发者 -->
<notifier>

<!--传送通知的途径 -->
<type />

<!--发生错误时是否通知 -->
<sendOnError />

<!--构建失败时是否通知 -->
<sendOnFailure />

<!--构建成功时是否通知 -->
<sendOnSuccess />

<!--发生警告时是否通知 -->
<sendOnWarning />

<!--不赞成使用。通知发送到哪里 -->
<address />

<!--扩展配置项 -->
<configuration />

</notifier>

</notifiers>

</ciManagement>

项目信息配置

<!--项目的名称, Maven产生的文档用 -->
<name>banseon-maven </name>

<!--项目主页的URL, Maven产生的文档用 -->
<url>http://www.clf.com/ </url>

<!--项目的详细描述, Maven 产生的文档用。 当这个元素能够用HTML格式描述时 -->
<!--(例如,CDATA中的文本会被解析器忽略,就可以包含HTML标签),不鼓励使用纯文本描述。 -->
<!-- 如果你需要修改产生的web站点的索引页面,你应该修改你自己的索引页文件,而不是调整这里的文档。 -->
<description>A maven project to study maven. </description>

<!--描述了这个项目构建环境中的前提条件。 -->
<prerequisites>

<!--构建该项目或使用该插件所需要的Maven的最低版本 -->
<maven />

</prerequisites>

<!--项目创建年份,4位数字。当产生版权信息时需要使用这个值。 -->
<inceptionYear />

<!--项目相关邮件列表信息 -->
<mailingLists>

<!--该元素描述了项目相关的所有邮件列表。自动产生的网站引用这些信息。 -->
<mailingList>

<!--邮件的名称 -->
<name> Demo </name>

<!--发送邮件的地址或链接,如果是邮件地址,创建文档时,mailto: 链接会被自动创建 -->
<post> clf@126.com</post>

<!--订阅邮件的地址或链接,如果是邮件地址,创建文档时,mailto: 链接会被自动创建 -->
<subscribe> clf@126.com</subscribe>

<!--取消订阅邮件的地址或链接,如果是邮件地址,创建文档时,mailto: 链接会被自动创建 -->
<unsubscribe> clf@126.com</unsubscribe>

<!--你可以浏览邮件信息的URL -->
<archive> http:/hi.clf.com/</archive>

</mailingList>

</mailingLists>

<!--项目开发者列表 -->
<developers>

<!--某个项目开发者的信息 -->
<developer>

<!--SCM里项目开发者的唯一标识符 -->
<id> HELLO WORLD </id>

<!--项目开发者的全名 -->
<name> banseon </name>

<!--项目开发者的email -->
<email> banseon@126.com</email>

<!--项目开发者的主页的URL -->
<url />

<!--项目开发者在项目中扮演的角色,角色元素描述了各种角色 -->
<roles>
<role> Project Manager</role>
<role>Architect </role>
</roles>

<!--项目开发者所属组织 -->
<organization> demo</organization>

<!--项目开发者所属组织的URL -->
<organizationUrl>http://hi.clf.com/ </organizationUrl>

<!--项目开发者属性,如即时消息如何处理等 -->
<properties>
<dept> No </dept>
</properties>

<!--项目开发者所在时区, -11到12范围内的整数。 -->
<timezone> -5</timezone>

</developer>

</developers>

<!--项目的其他贡献者列表 -->
<contributors>

<!--项目的其他贡献者。参见developers/developer元素 -->
<contributor>
<name />
<email />
<url />
<organization />
<organizationUrl />
<roles />
<timezone />
<properties />
</contributor>

</contributors>

<!--该元素描述了项目所有License列表。应该只列出该项目的license列表,不要列出依赖项目的license列表。 -->
<!--如果列出多个license,用户可以选择它们中的一个而不是接受所有license。 -->
<licenses>

<!--描述了项目的license,用于生成项目的web站点的license页面,其他一些报表和validation也会用到该元素。 -->
<license>

<!--license用于法律上的名称 -->
<name> Apache 2 </name>

<!--官方的license正文页面的URL -->
<url>http://www.clf.com/LICENSE-2.0.txt </url>

<!--项目分发的主要方式: repo,可以从Maven库下载 manual, 用户必须手动下载和安装依赖 -->
<distribution> repo</distribution>

<!--关于license的补充信息 -->
<comments> Abusiness-friendly OSS license </comments>

</license>

</licenses>

<!--SCM(Source Control Management)标签允许你配置你的代码库,供Maven web站点和其它插件使用。 -->
<scm>

<!--SCM的URL,该URL描述了版本库和如何连接到版本库。欲知详情,请看SCMs提供的URL格式和列表。该连接只读。 -->
<connection>scm:svn:http://svn.baidu.com/banseon/maven/</connection>

<!--给开发者使用的,类似connection元素。即该连接不仅仅只读 -->
<developerConnection>scm:svn:http://svn.baidu.com/banseon/maven/
</developerConnection>

<!--当前代码的标签,在开发阶段默认为HEAD -->
<tag />

<!--指向项目的可浏览SCM库(例如ViewVC或者Fisheye)的URL。 -->
<url> http://svn.baidu.com/banseon</url>

</scm>

<!--描述项目所属组织的各种属性。Maven产生的文档用 -->
<organization>

<!--组织的全名 -->
<name> demo </name>

<!--组织主页的URL -->
<url> http://www.clf.com/</url>

</organization>