一、什么是Shiro
Apache Shiro是一个强大易用的Java安全框架,提供了认证、授权、加密和会话管理等功能:
认证 - 用户身份识别,常被称为用户“登录”;
授权 - 访问控制;
密码加密 - 保护或隐藏数据防止被偷窥;
会话管理 - 每用户相关的时间敏感的状态。
对于任何一个应用程序,Shiro都可以提供全面的安全管理服务。并且相对于其他安全框架,Shiro要简单的多。
二、Shiro的架构介绍
首先,来了解一下Shiro的三个核心组件:Subject, SecurityManager 和 Realms. 如下图:
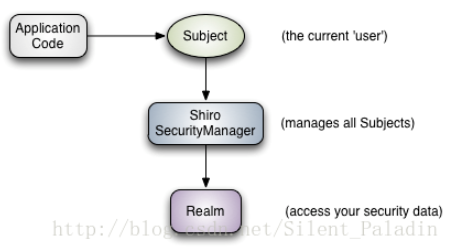
Subject:即“当前操作用户”。但是,在Shiro中,Subject这一概念并不仅仅指人,也可以是第三方进程、后台帐户(Daemon Account)或其他类似事物。它仅仅意味着“当前跟软件交互的东西”。但考虑到大多数目的和用途,你可以把它认为是Shiro的“用户”概念。
Subject代表了当前用户的安全操作,SecurityManager则管理所有用户的安全操作。
SecurityManager:它是Shiro框架的核心,典型的Facade模式,Shiro通过SecurityManager来管理内部组件实例,并通过它来提供安全管理的各种服务。
Realm: Realm充当了Shiro与应用安全数据间的“桥梁”或者“连接器”。也就是说,当对用户执行认证(登录)和授权(访问控制)验证时,Shiro会从应用配置的Realm中查找用户及其权限信息。
从这个意义上讲,Realm实质上是一个安全相关的DAO:它封装了数据源的连接细节,并在需要时将相关数据提供给Shiro。当配置Shiro时,你必须至少指定一个Realm,用于认证和(或)授权。配置多个Realm是可以的,但是至少需要一个。
Shiro内置了可以连接大量安全数据源(又名目录)的Realm,如LDAP、关系数据库(JDBC)、类似INI的文本配置资源以及属性文件等。如果缺省的Realm不能满足需求,你还可以插入代表自定义数据源的自己的Realm实现。
Shiro完整架构图:

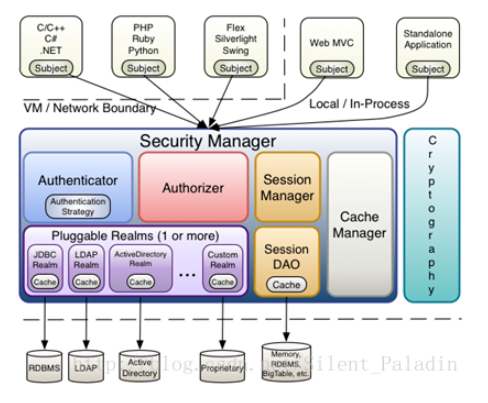
除前文所讲Subject、SecurityManager 、Realm三个核心组件外,Shiro主要组件还包括:
Authenticator :认证就是核实用户身份的过程。这个过程的常见例子是大家都熟悉的“用户/密码”组合。多数用户在登录软件系统时,通常提供自己的用户名(当事人)和支持他们的密码(证书)。如果存储在系统中的密码(或密码表示)与用户提供的匹配,他们就被认为通过认证。
Authorizer :授权实质上就是访问控制 - 控制用户能够访问应用中的哪些内容,比如资源、Web页面等等。
SessionManager :在安全框架领域,Apache Shiro提供了一些独特的东西:可在任何应用或架构层一致地使用Session API。即,Shiro为任何应用提供了一个会话编程范式 - 从小型后台独立应用到大型集群Web应用。这意味着,那些希望使用会话的应用开发者,不必被迫使用Servlet或EJB容器了。或者,如果正在使用这些容器,开发者现在也可以选择使用在任何层统一一致的会话API,取代Servlet或EJB机制。
CacheManager :对Shiro的其他组件提供缓存支持。
Shiro 认证
认证就是验证用户身份的过程。在认证过程中,用户需要提交实体信息(Principals)和凭据信息(Credentials)以检验用户是否合法。最常见的“实体/凭证”组合便是“用户名/密码”组合。
一、Shiro认证过程
1、收集实体/凭据信息
//Example using most common scenario of username/password pair:
UsernamePasswordToken token = new UsernamePasswordToken(username, password);
//”Remember Me” built-in:
token.setRememberMe(true);
UsernamePasswordToken支持最常见的用户名/密码的认证机制。同时,由于它实现了RememberMeAuthenticationToken接口,我们可以通过令牌设置“记住我”的功能。
但是,“已记住”和“已认证”是有区别的:
已记住的用户仅仅是非匿名用户,你可以通过subject.getPrincipals()获取用户信息。但是它并非是完全认证通过的用户,当你访问需要认证用户的功能时,你仍然需要重新提交认证信息。
这一区别可以参考亚马逊网站,网站会默认记住登录的用户,再次访问网站时,对于非敏感的页面功能,页面上会显示记住的用户信息,但是当你访问网站账户信息时仍然需要再次进行登录认证。
2、提交实体/凭据信息
Subject currentUser = SecurityUtils.getSubject();
currentUser.login(token);
收集了实体/凭据信息之后,我们可以通过SecurityUtils工具类,获取当前的用户,然后通过调用login方法提交认证。
3、认证处理
try {
currentUser.login(token);
} catch ( UnknownAccountException uae ) { ...
} catch ( IncorrectCredentialsException ice ) { ...
} catch ( LockedAccountException lae ) { ...
} catch ( ExcessiveAttemptsException eae ) { ...
} ... catch your own ...
} catch ( AuthenticationException ae ) {
//unexpected error?
}
如果login方法执行完毕且没有抛出任何异常信息,那么便认为用户认证通过。之后在应用程序任意地方调用SecurityUtils.getSubject() 都可以获取到当前认证通过的用户实例,使用subject.isAuthenticated()判断用户是否已验证都将返回true.
相反,如果login方法执行过程中抛出异常,那么将认为认证失败。Shiro有着丰富的层次鲜明的异常类来描述认证失败的原因,如代码示例。
二、登出操作
登出操作可以通过调用subject.logout()来删除你的登录信息,如:
currentUser.logout(); //removes all identifying information and invalidates their session too.
当执行完登出操作后,Session信息将被清空,subject将被视作为匿名用户。
三、认证内部处理机制
以上,是Shiro认证在应用程序中的处理过程,下面将详细解说Shiro认证的内部处理机制。
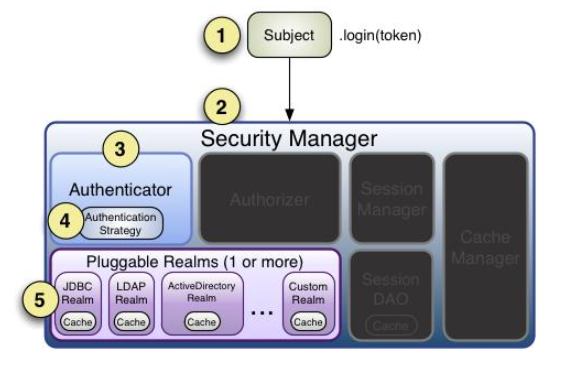
如上图,我们通过Shiro架构图的认证部分,来说明Shiro认证内部的处理顺序:
1、应用程序构建了一个终端用户认证信息的AuthenticationToken 实例后,调用Subject.login方法。
2、Sbuject的实例通常是DelegatingSubject类(或子类)的实例对象,在认证开始时,会委托应用程序设置的securityManager实例调用securityManager.login(token)方法。
3、SecurityManager接受到token(令牌)信息后会委托内置的Authenticator的实例(通常都是ModularRealmAuthenticator类的实例)调用authenticator.authenticate(token). ModularRealmAuthenticator在认证过程中会对设置的一个或多个Realm实例进行适配,它实际上为Shiro提供了一个可拔插的认证机制。
4、如果在应用程序中配置了多个Realm,ModularRealmAuthenticator会根据配置的AuthenticationStrategy(认证策略)来进行多Realm的认证过程。在Realm被调用后,AuthenticationStrategy将对每一个Realm的结果作出响应。
注:如果应用程序中仅配置了一个Realm,Realm将被直接调用而无需再配置认证策略。
5、判断每一个Realm是否支持提交的token,如果支持,Realm将调用getAuthenticationInfo(token); getAuthenticationInfo 方法就是实际认证处理,我们通过覆盖Realm的doGetAuthenticationInfo方法来编写我们自定义的认证处理。
四、使用多个Realm的处理机制:
1、Authenticator
默认实现是ModularRealmAuthenticator,它既支持单一Realm也支持多个Realm。如果仅配置了一个Realm,ModularRealmAuthenticator 会直接调用该Realm处理认证信息,如果配置了多个Realm,它会根据认证策略来适配Realm,找到合适的Realm执行认证信息。
自定义Authenticator的配置:
...
authenticator = com.foo.bar.CustomAuthenticator
securityManager.authenticator = $authenticator
2、AuthenticationStrategy(认证策略)
当应用程序配置了多个Realm时,ModularRealmAuthenticator将根据认证策略来判断认证成功或是失败。
例如,如果只有一个Realm验证成功,而其他Realm验证失败,那么这次认证是否成功呢?如果大多数的Realm验证成功了,认证是否就认为成功呢?或者,一个Realm验证成功后,是否还需要判断其他Realm的结果?认证策略就是根据应用程序的需要对这些问题作出决断。
认证策略是一个无状态的组件,在认证过程中会经过4次的调用:
在所有Realm被调用之前
在调用Realm的getAuthenticationInfo 方法之前
在调用Realm的getAuthenticationInfo 方法之后
在所有Realm被调用之后
认证策略的另外一项工作就是聚合所有Realm的结果信息封装至一个AuthenticationInfo实例中,并将此信息返回,以此作为Subject的身份信息。
Shiro有3中认证策略的具体实现:
| AtLeastOneSuccessfulStrategy | 只要有一个(或更多)的Realm验证成功,那么认证将被视为成功 |
| FirstSuccessfulStrategy | 第一个Realm验证成功,整体认证将被视为成功,且后续Realm将被忽略 |
| AllSuccessfulStrategy | 所有Realm成功,认证才视为成功 |
ModularRealmAuthenticator 内置的认证策略默认实现是AtLeastOneSuccessfulStrategy 方式,因为这种方式也是被广泛使用的一种认证策略。当然,你也可以通过配置文件定义你需要的策略,如:
...
authcStrategy = org.apache.shiro.authc.pam.FirstSuccessfulStrategy
securityManager.authenticator.authenticationStrategy = $authcStrategy
...
3、Realm的顺序
由刚才提到的认证策略,可以看到Realm在ModularRealmAuthenticator 里面的顺序对认证是有影响的。
ModularRealmAuthenticator 会读取配置在SecurityManager里的Realm。当执行认证是,它会遍历Realm集合,对所有支持提交的token的Realm调用getAuthenticationInfo 。
因此,如果Realm的顺序对你使用的认证策略结果有影响,那么你应该在配置文件中明确定义Realm的顺序,如:
blahRealm = com.company.blah.Realm
...
fooRealm = com.company.foo.Realm
...
barRealm = com.company.another.Realm
securityManager.realms = $fooRealm, $barRealm, $blahRealm
Shiro 授权
授权即访问控制,它将判断用户在应用程序中对资源是否拥有相应的访问权限。
如,判断一个用户有查看页面的权限,编辑数据的权限,拥有某一按钮的权限,以及是否拥有打印的权限等等。
一、授权的三要素
授权有着三个核心元素:权限、角色和用户。
权限
权限是Apache Shiro安全机制最核心的元素。它在应用程序中明确声明了被允许的行为和表现。一个格式良好好的权限声明可以清晰表达出用户对该资源拥有的权限。
大多数的资源会支持典型的CRUD操作(create,read,update,delete),但是任何操作建立在特定的资源上才是有意义的。因此,权限声明的根本思想就是建立在资源以及操作上。
而我们通过权限声明仅仅能了解这个权限可以在应用程序中做些什么,而不能确定谁拥有此权限。
于是,我们就需要在应用程序中对用户和权限建立关联。
通常的做法就是将权限分配给某个角色,然后将这个角色关联一个或多个用户。
权限声明及粒度
Shiro权限声明通常是使用以冒号分隔的表达式。就像前文所讲,一个权限表达式可以清晰的指定资源类型,允许的操作,可访问的数据。同时,Shiro权限表达式支持简单的通配符,可以更加灵活的进行权限设置。
下面以实例来说明权限表达式。
可查询用户数据
User:view
可查询或编辑用户数据
User:view,edit
可对用户数据进行所有操作
User:* 或 user
可编辑id为123的用户数据
User:edit:123
角色
Shiro支持两种角色模式:
1、传统角色:一个角色代表着一系列的操作,当需要对某一操作进行授权验证时,只需判断是否是该角色即可。这种角色权限相对简单、模糊,不利于扩展。
2、权限角色:一个角色拥有一个权限的集合。授权验证时,需要判断当前角色是否拥有该权限。这种角色权限可以对该角色进行详细的权限描述,适合更复杂的权限设计。
下面将详细描述对两种角色模式的授权实现。
二、授权实现
Shiro支持三种方式实现授权过程:
编码实现
注解实现
JSP Taglig实现
1、基于编码的授权实现
1.1基于传统角色授权实现
当需要验证用户是否拥有某个角色时,可以调用Subject 实例的hasRole*方法验证。
Java代码 
Subject currentUser = SecurityUtils.getSubject();
if (currentUser.hasRole("administrator")) {
//show the admin button
} else {
//don't show the button? Grey it out?
}
相关验证方法如下:
| Subject方法 | 描述 |
| hasRole(String roleName) | 当用户拥有指定角色时,返回true |
| hasRoles(List<String> roleNames) | 按照列表顺序返回相应的一个boolean值数组 |
| hasAllRoles(Collection<String> roleNames) | 如果用户拥有所有指定角色时,返回true |
断言支持
Shiro还支持以断言的方式进行授权验证。断言成功,不返回任何值,程序继续执行;断言失败时,将抛出异常信息。使用断言,可以使我们的代码更加简洁。
Java代码 
Subject currentUser = SecurityUtils.getSubject();
//guarantee that the current user is a bank teller and
//therefore allowed to open the account:
currentUser.checkRole("bankTeller");
openBankAccount();
断言的相关方法:
| Subject方法 | 描述 |
| checkRole(String roleName) | 断言用户是否拥有指定角色 |
| checkRoles(Collection<String> roleNames) | 断言用户是否拥有所有指定角色 |
| checkRoles(String... roleNames) | 对上一方法的方法重载 |
1.2 基于权限角色授权实现
相比传统角色模式,基于权限的角色模式耦合性要更低些,它不会因角色的改变而对源代码进行修改,因此,基于权限的角色模式是更好的访问控制方式。
它的代码实现有以下几种实现方式:
1、基于权限对象的实现
创建org.apache.shiro.authz.Permission的实例,将该实例对象作为参数传递给Subject.isPermitted()进行验证。
Permission printPermission = new PrinterPermission("laserjet4400n", "print");
Subject currentUser = SecurityUtils.getSubject();
if (currentUser.isPermitted(printPermission)) {
//show the Print button
} else {
//don't show the button? Grey it out?
}
Permission printPermission = new PrinterPermission("laserjet4400n", "print");
Subject currentUser = SecurityUtils.getSubject();
if (currentUser.isPermitted(printPermission)) {
//show the Print button
} else {
//don't show the button? Grey it out?
}
相关方法如下:
| Subject方法 | 描述 |
| isPermitted(Permission p) | Subject拥有制定权限时,返回treu |
| isPermitted(List<Permission> perms) | 返回对应权限的boolean数组 |
| isPermittedAll(Collection<Permission> perms) | Subject拥有所有制定权限时,返回true |
2、 基于字符串的实现
相比笨重的基于对象的实现方式,基于字符串的实现便显得更加简洁。
Subject currentUser = SecurityUtils.getSubject();
if (currentUser.isPermitted("printer:print:laserjet4400n")) {
//show the Print button
} else {
//don't show the button? Grey it out?
}
使用冒号分隔的权限表达式是org.apache.shiro.authz.permission.WildcardPermission 默认支持的实现方式。
这里分别代表了 资源类型:操作:资源ID
类似基于对象的实现相关方法,基于字符串的实现相关方法:
isPermitted(String perm)、isPermitted(String... perms)、isPermittedAll(String... perms)
基于权限对象的断言实现
Subject currentUser = SecurityUtils.getSubject();
//guarantee that the current user is permitted
//to open a bank account:
Permission p = new AccountPermission("open");
currentUser.checkPermission(p);
openBankAccount();
基于字符串的断言实现
Subject currentUser = SecurityUtils.getSubject();
//guarantee that the current user is permitted
//to open a bank account:
currentUser.checkPermission("account:open");
openBankAccount();
断言实现的相关方法
| Subject方法 | 说明 |
| checkPermission(Permission p) | 断言用户是否拥有制定权限 |
| checkPermission(String perm) | 断言用户是否拥有制定权限 |
| checkPermissions(Collection<Permission> perms) | 断言用户是否拥有所有指定权限 |
| checkPermissions(String... perms) | 断言用户是否拥有所有指定权限 |
2、基于注解的授权实现
Shiro注解支持AspectJ、Spring、Google-Guice等,可根据应用进行不同的配置。
相关的注解:
@ RequiresAuthentication
可以用户类/属性/方法,用于表明当前用户需是经过认证的用户。
@RequiresAuthentication
public void updateAccount(Account userAccount) {
//this method will only be invoked by a
//Subject that is guaranteed authenticated
...
}
@ RequiresGuest
表明该用户需为”guest”用户
@ RequiresPermissions
当前用户需拥有制定权限
@RequiresPermissions("account:create")
public void createAccount(Account account) {
//this method will only be invoked by a Subject
//that is permitted to create an account
...
}
@RequiresRoles
当前用户需拥有制定角色
@ RequiresUser
当前用户需为已认证用户或已记住用户
3、基于JSP TAG的授权实现
Shiro提供了一套JSP标签库来实现页面级的授权控制。
在使用Shiro标签库前,首先需要在JSP引入shiro标签:
<%@ taglib prefix="shiro" uri="http://shiro.apache.org/tags" %>
下面一一介绍Shiro的标签:
guest标签
验证当前用户是否为“访客”,即未认证(包含未记住)的用户
Xml代码 
<shiro:guest>
Hi there! Please <a href="login.jsp">Login</a> or <a href="signup.jsp">Signup</a> today!
</shiro:guest>
user标签
认证通过或已记住的用户
<shiro:user>
Welcome back John! Not John? Click <a href="login.jsp">here<a> to login.
</shiro:user>
authenticated标签
已认证通过的用户。不包含已记住的用户,这是与user标签的区别所在。
<shiro:authenticated>
<a href="updateAccount.jsp">Update your contact information</a>.
</shiro:authenticated>
notAuthenticated标签
未认证通过用户,与authenticated标签相对应。与guest标签的区别是,该标签包含已记住用户。
<shiro:notAuthenticated>
Please <a href="login.jsp">login</a> in order to update your credit card information.
</shiro:notAuthenticated>
principal 标签
输出当前用户信息,通常为登录帐号信息
Hello, <shiro:principal/>, how are you today?
hasRole标签
验证当前用户是否属于该角色
<shiro:hasRole name="administrator">
<a href="admin.jsp">Administer the system</a>
</shiro:hasRole>
lacksRole标签
与hasRole标签逻辑相反,当用户不属于该角色时验证通过
<shiro:lacksRole name="administrator">
Sorry, you are not allowed to administer the system.
</shiro:lacksRole>
hasAnyRole标签
验证当前用户是否属于以下任意一个角色。
<shiro:hasAnyRoles name="developer, project manager, administrator">
You are either a developer, project manager, or administrator.
</shiro:lacksRole>
hasPermission标签
验证当前用户是否拥有制定权限
<shiro:hasPermission name="user:create">
<a href="createUser.jsp">Create a new User</a>
</shiro:hasPermission>
lacksPermission标签
与hasPermission标签逻辑相反,当前用户没有制定权限时,验证通过
<shiro:hasPermission name="user:create">
<a href="createUser.jsp">Create a new User</a>
</shiro:hasPermission>
三、Shiro授权的内部处理机制
1、在应用程序中调用授权验证方法(Subject的isPermitted*或hasRole*等)
2、Sbuject的实例通常是DelegatingSubject类(或子类)的实例对象,在认证开始时,会委托应用程序设置的securityManager实例调用相应的isPermitted*或hasRole*方法。
3、接下来SecurityManager会委托内置的Authorizer的实例(默认是ModularRealmAuthorizer 类的实例,类似认证实例,它同样支持一个或多个Realm实例认证)调用相应的授权方法。
4、每一个Realm将检查是否实现了相同的 Authorizer 接口。然后,将调用Reaml自己的相应的授权验证方法。
当使用多个Realm时,不同于认证策略处理方式,授权处理过程中:
1、当调用Realm出现异常时,将立即抛出异常,结束授权验证。
2、只要有一个Realm验证成功,那么将认为授权成功,立即返回,结束认证。
Realm 实现
在认证、授权内部实现机制中都有提到,最终处理都将交给Real进行处理。因为在Shiro中,最终是通过Realm来获取应用程序中的用户、角色及权限信息的。通常情况下,在Realm中会直接从我们的数据源中获取Shiro需要的验证信息。可以说,Realm是专用于安全框架的DAO.
一、认证实现
正如前文所提到的,Shiro的认证过程最终会交由Realm执行,这时会调用Realm的getAuthenticationInfo(token)方法。
该方法主要执行以下操作:
1、检查提交的进行认证的令牌信息
2、根据令牌信息从数据源(通常为数据库)中获取用户信息
3、对用户信息进行匹配验证。
4、验证通过将返回一个封装了用户信息的AuthenticationInfo实例。
5、验证失败则抛出AuthenticationException异常信息。
而在我们的应用程序中要做的就是自定义一个Realm类,继承AuthorizingRealm抽象类,重载doGetAuthenticationInfo (),重写获取用户信息的方法。
Java代码 
protected AuthenticationInfo doGetAuthenticationInfo(AuthenticationToken authcToken) throws AuthenticationException {
UsernamePasswordToken token = (UsernamePasswordToken) authcToken;
User user = accountManager.findUserByUserName(token.getUsername());
if (user != null) {
return new SimpleAuthenticationInfo(user.getUserName(), user.getPassword(), getName());
} else {
return null;
}
}
二、授权实现
而授权实现则与认证实现非常相似,在我们自定义的Realm中,重载doGetAuthorizationInfo()方法,重写获取用户权限的方法即可。
protected AuthorizationInfo doGetAuthorizationInfo(PrincipalCollection principals) {
String userName = (String) principals.fromRealm(getName()).iterator().next();
User user = accountManager.findUserByUserName(userName);
if (user != null) {
SimpleAuthorizationInfo info = new SimpleAuthorizationInfo();
for (Group group : user.getGroupList()) {
info.addStringPermissions(group.getPermissionList());
}
return info;
} else {
return null;
}
}
Shiro 配置说明
Apache Shiro的配置主要分为四部分:
对象和属性的定义与配置
URL的过滤器配置
静态用户配置
静态角色配置
其中,由于用户、角色一般由后台进行操作的动态数据,因此Shiro配置一般仅包含前两项的配置。
Apache Shiro的大多数组件是基于POJO的,因此我们可以使用POJO兼容的任何配置机制进行配置,例如:Java代码、Sping XML、YAML、JSON、ini文件等等。下面,以Spring XML的配置方式为例,并且对其中的一些配置参数进行一些简单说明。
Shiro对象的配置:
主要是对Shiro各个组件的实现进行定义配置,主要组件在前文已做过简单介绍,这里不再一一说明。 
<bean id="securityManager" class="org.apache.shiro.mgt.DefaultSecurityManager">
<property name="cacheManager" ref="cacheManager"/>
<property name="sessionMode" value="native"/>
<!-- Single realm app. If you have multiple realms, use the 'realms' property instead. -->
<property name="realm" ref="myRealm"/>
<property name="sessionManager" ref="sessionManager"/>
</bean>
Shiro过滤器的配置
Shiro主要是通过URL过滤来进行安全管理,这里的配置便是指定具体授权规则定义。
<bean id="shiroFilter" class="org.apache.shiro.spring.web.ShiroFilterFactoryBean">
<property name="securityManager" ref="securityManager"/>
<property name="loginUrl" value="/login.jsp"/>
<property name="successUrl" value="/home.jsp"/>
<property name="unauthorizedUrl" value="/unauthorized.jsp"/> -->
<property name="filterChainDefinitions">
<value>
# some example chain definitions:
/admin/** = authc, roles[admin]
/docs/** = authc, perms[document:read]
/** = authc
# more URL-to-FilterChain definitions here
</value>
</property>
</bean>
URL过滤器配置说明:
Shiro可以通过配置文件实现基于URL的授权验证。FilterChain定义格式:
URL_Ant_Path_Expression = Path_Specific_Filter_Chain
每个URL配置,表示匹配该URL的应用程序请求将由对应的过滤器进行验证。
例如:
[urls]
/index.html = anon
/user/create = anon
/user/** = authc
/admin/** = authc, roles[administrator]
/rest/** = authc, rest
/remoting/rpc/** = authc, perms["remote:invoke"]
URL表达式说明
1、URL目录是基于HttpServletRequest.getContextPath()此目录设置
2、URL可使用通配符,**代表任意子目录
3、Shiro验证URL时,URL匹配成功便不再继续匹配查找。所以要注意配置文件中的URL顺序,尤其在使用通配符时。
Filter Chain定义说明
1、一个URL可以配置多个Filter,使用逗号分隔
2、当设置多个过滤器时,全部验证通过,才视为通过
3、部分过滤器可指定参数,如perms,roles
Shiro内置的FilterChain
| Filter Name | Class |
| anon | org.apache.shiro.web.filter.authc.AnonymousFilter |
| authc | org.apache.shiro.web.filter.authc.FormAuthenticationFilter |
| authcBasic | org.apache.shiro.web.filter.authc.BasicHttpAuthenticationFilter |
| perms | org.apache.shiro.web.filter.authz.PermissionsAuthorizationFilter |
| port | org.apache.shiro.web.filter.authz.PortFilter |
| rest | org.apache.shiro.web.filter.authz.HttpMethodPermissionFilter |
| roles | org.apache.shiro.web.filter.authz.RolesAuthorizationFilter |
| ssl | org.apache.shiro.web.filter.authz.SslFilter |
| user | org.apache.shiro.web.filter.authc.UserFilter |


