OAuth2.0是一个开放标准,允许用户让第三方应用访问该用户在某一网站上存储用户信息,而无需将用户名和密码提供给第三方应用,CAS3.5.x(x>1)提供了OAuth2.0的支持,包括客户端和服务端,依赖cas-server-support-oauth.jar包。
基本工作过程如下:
OAuth 2.0 Authorization
| Jakob Jenkov Last update: 2014-06-15 |
When a client applications wants access to the resources of a resource owner, hosted on a resource server, the client application must first obtain an authorization grant. This text explains how such an application grant is obtained.
Client ID, Client Secret and Redirect URI
Before a client application can request access to resources on a resource server, the client application must first register with the authorization server associated with the resource server.
The registration is typically a one-time task. Once registered, the registration remains valid, unless the client app registration is revoked.
At registration the client application is assigned a client ID and a client secret (password) by the authorization server. The client ID and secret is unique to the client application on that authorization server. If a client application registers with multiple authorization servers (e.g. both Facebook, Twitter and Google), each authorization server will issue its own unique client ID to the client application.
Whenever the client application requests access to resources stored on that same resource server, the client application needs to authenticate itself by sending along the client ID and the client secret to the autorhization server.
During the registration the client also registers a redirect URI. This redirect URI is used when a resource owner grants authorization to the client application. When a resource owner has successfully authorized the client application via the authorization server, the resource owner is redirected back to the client application, to the redirect URI.
Authorization Grant
The authorization grant is given to a client application by the resource owner, in cooperation with the authorization server associated with the resource server.
The OAuth 2.0 specification lists four different types of authorization grants. Each type has different security characteristics. The authorization grant types are:
- Authorization Code
- Implicit
- Resource Owner Password Credentials
- Client Credentials
Each of these authorization grant types is covered in the following sections.
Authorization Code
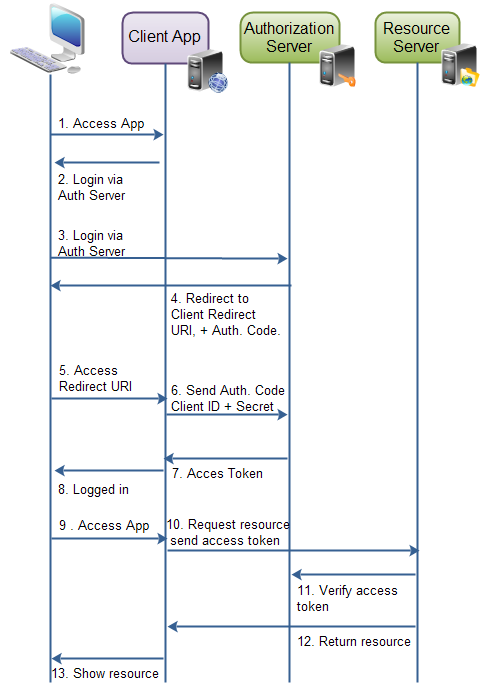
An authorization grant using an authorization code works like this (the numbers correspond to the steps shown in the diagram below the description):
1) The resource owner (user) accesses the client application.
2) The client application tells the user to login to the client application via an authorization server (e.g. Facebook, Twitter, Google etc.).
3) To login via the authorizaion server, the user is redirected to the authorization server by the client application. The client application sends its client ID along to the authorization server, so the authorization server knows which application is trying to access the protected resources.
4) The user logs in via the authorization server. After successful login the user is asked if she wants to grant access to her resources to the client application. If the user accepts, the user is redirected back to the client application.
5) When redirected back to the client application, the authorization server sends the user to a specific redirect URI, which the client application has registered with the authorization server ahead of time. Along with the redirection, the authorization server sends an authorization code, representing the authorization.
6) When the redirect URI in the client application is accessed, the client application connects directly to the authorization server. The client application sends the authorization code along with its own client ID and and client secret.
7) If the authorization server can accept these values, the authorization server sends back an access token.
10) The client application can now use the access token to request resources from the resource server. The access token serves as both authentication of the client, resource owner (user) and authorization to access the resources.
Here is a diagram illustrating the authorization process when using authorization code to authorize a client application:
 |
| Authorization grant via authorization code. |
Implicit
An implicit authorization grant is similar to an authorization code grant, except the access token is returned to the client application already after the user has finished the authorization. The access token is thus returned when the user agent is redirected to the redirect URI.
This of course means that the access token is accessible in the user agent, or native application participating in the implicit authorization grant. The access token is not stored securely on a web server.
Furthermore, the client application can only send its client ID to the authorization server. If the client were to send its client secret too, the client secret would have to be stored in the user agent or native application too. That would make it vulnerable to hacking.
Implicit authorization grant is mostly used in a user agent or native client application. The user agent or native application would receive the access token from the authorization server.
Here is an illustration of implicit authorization grant:
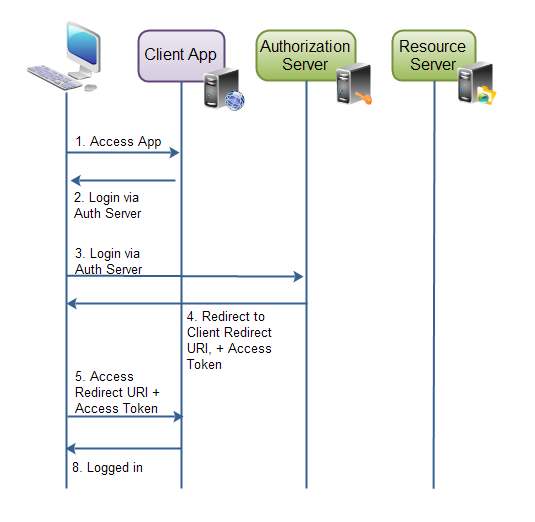 |
| Implicit authorization grant. |
Resource Owner Password Credentials
The resource owner password credentials authorization grant method works by giving the client application access to the resource owners credentials. For instance, a user could type his Twitter user name and password (credentials) into the client application. The client application could then use the user name and password to access resources in Twitter.
Using the resource owner password credentials requires a lot of trust in the client application. You do not want to type your credentials into an application you suspect might abuse it.
The resource owner password credentials would normally be used by user agent client applications, or native client applications.
Client Credentials
Client credential authorization is for the situations where the client application needs to access resources or call functions in the resource server, which are not related to a specific resource owner (e.g. user). For instance, obtaining a list of venues from Foursquare. This does not necessary have anything to do with a specific Foursquare user.
cas 3.5.2下载地址:https://github.com/apereo/cas/releases/tag/v3.5.2
/oauth2.0/authorize
需要输入GET参数:client_id和redirect_uri
/oauth2.0/accessToken
需要输入GET参数:client_id,redirect_uri,client_secret和代码
/oauth2.0/profile
需要输入GET参数:access_token
关于CAS3.5.x Server版本接入oauth2.0 Server配置步骤,下面为本站素文宅www.yoodb.com大家分享一下个人总结,仅供大家参考学习使用。
1、将cas-server-support-oauth工程引入cas-server-webapp项目中,通过pom.xml文件,增加内容如下:
<dependency>
<groupId>org.jasig.cas</groupId>
<artifactId>cas-server-support-oauth</artifactId>
<version>${project.version}</version>
</dependency>
2、配置应用获得client_id和client_secret
在QQ、新浪等使用第三方登录中,通常提供页面供用户申请应用,然后提供用户client_id和client_secret,并允许用户配置回调地址,那么oauth2.0 server考虑的就是需要持久化这些配置,CAS默认在文件deployerConfigContext.xml的serviceRegistryDao中配置应用服务,注意实际使用可以将申请的应用信息存储在数据库中,具体配置如下:
<bean
id="serviceRegistryDao"
        class="org.jasig.cas.services.InMemoryServiceRegistryDaoImpl">
            <property name="registeredServices">
                <list>
                    <bean class="org.jasig.cas.services.RegexRegisteredService">
                        <property name="id" value="0" />
                        <property name="name" value="HTTP and IMAP" />
                        <property name="description" value="Allows HTTP(S) and IMAP(S) protocols" />
                        <property name="serviceId" value="^(https?|imaps?)://.*" />
                        <property name="evaluationOrder" value="10000001" />
<!-- 参数回传 -->
                        <property name="ignoreAttributes" value="true"/>
                    </bean>
                    <bean class="org.jasig.cas.services.RegisteredServiceImpl">
                    <property name="id" value="1" />
                    <property name="name" value="HTTP" />
                    <property name="description" value="oauth wrapper callback url" /><!-- oauth wrapper callback url -->
                    <property name="serviceId" value="${server.prefix}/oauth2.0/callbackAuthorize" />
                </bean>
               <bean class="org.jasig.cas.services.RegisteredServiceImpl">
                <property name="id" value="2" />
                <property name="name" value="key" />
                <property name="description" value="secret" />
                <property name="serviceId" value="http://www.yoodb.com/" />
                <property name="theme" value="Yoodb" />
              </bean>
                </list>
            </property>
        </bean>
如上述代码所示,新注册了两个bean,第一个bean不需要考虑那是默认存在的bean,如果想了解参考地址:bean http://blog.yoodb.com/yoodb/article/detail/1223,我们新增的第二个bean中,name为client_id,description为client_secret,serviceId为回调地址,theme为应用名称,下面为大家说说第一个bean的用法及其用途。
3、 Oauth client构造url获得authorization_code(ST票据)
1)cas server对/oauth2.0/authorize的url进行拦截处理,需要配置映射,在web.xml中增加配置信息如下:
<servlet-mapping>
    <servlet-name>cas</servlet-name>
    <url-pattern>/oauth2.0/*</url-pattern>
</servlet-mapping>
2)在cas-servlet.xml配置文件,增加内容如下:
<bean
      id="handlerMappingC"
      class="org.springframework.web.servlet.handler.SimpleUrlHandlerMapping">
    <property name="mappings">
      <props>
...
...
<prop key="/oauth2.0/*">oauth20WrapperController</prop>
...
...
<props>
</bean>
<bean id="oauth20WrapperController"
    class="org.jasig.cas.support.oauth.web.OAuth20WrapperController"
    p:loginUrl="${server.prefix}/login" p:servicesManager-ref="servicesManager"
    p:ticketRegistry-ref="ticketRegistry" p:timeout="7200" />
配置完成后,我们获取授权码的链接会转向login页面,此时的service地址就是第二步时新增的bean配置的第一个bean的serviceId,通过这个默认提供的地址间接的获取到ST票据,具体请求如下:
CAS Server在浏览器中打开地址:
http://localhost:8080/cas/oauth2.0/authorize?client_id=key&redirect_uri=http://www.yoodb.com/&response_type=codea
将会跳转到地址:
http://localhost:8080/cas/login?service=http%3A%2F%2F127.0.0.1%3A8080%2Fcas%2Foauth2.0%2FcallbackAuthorize
,从而间接的获取到ST票据。认证成功之后,就会携带值为ST票据的参数跳转到callbackAuthorize页面,此时生成的ST即为授权码,其中回调地址、服务名称是通过session传递过来的,注意到浏览器地址变为如下:
http://localhost:8080/cas/oauth2.0/callbackAuthorize?ticket=ST-5-u53bEqNQz2phBhnocFsb-www.yoodb.com
默认授权码只能使用一次且有效时间为10s,可以参考http://blog.yoodb.com/yoodb/article/detail/1225文章,通过修改票据过期策略进行配置时间。
4、通过ST票据授权码获得access_token
在浏览器中输入如下地址:
http://localhost:8080/cas/oauth2.0/accessToken?client_id=key&client_secret=secret&
grant_type=authorization_code&redirect_uri=http://www.yoodb.com/&code=ST-3-KIxamZyWgOYFcoXggdfs-www.yoodb.com
返回access_token信息如下:
access_token=TGT-6-csg7B16Pc09aZ6bx9j3Y6INMzScyZFhZcOGEqpnBUvoiLJkv93-www.yoodb.com&expires=7193
5、根据access_token获取用户信息
在浏览器中输入如下地址:
http://localhost:8080/cas/oauth2.0/cas/oauth2.0/profile?access_token=TGT-4-bxgrfir4tdCJ2O1EbR6eeguc3tcdpToZeyFBv416vdvvH1g3Nk-www.yoodb.com
根据access_token等到的返回用户信息如下:
{
    "id": "000000000000000001",
    "attributes": [
        {
            "uid": "000000000000000001"
        },
        {
            "username": "mrwang"
        },
        {
            "password": "123456"
        }
    ]
}
通过上述描述CAS3.5.x Server认证成功之后生成ST,此值即为授权码,传递给应用的回调地址即可,OAuth2的实现并不是很标准,对于CAS3.5.x Server版本需要扩展org.jasig.cas.support.oauth.web.OAuth20WrapperController类来进一步完善oauth2.0协议。
本站文章除注明转载外,均由 素文宅 整理发布,欢迎任何形式的转载,但请务必注明出处。
转载请注明:文章转载自 素文宅博客
本文标题:CAS3.5.2 Server 集成 OAuth2.0 Server 详细介绍
本文地址:https://blog.yoodb.com/yoodb/article/detail/1226

