度娘搜的配置Oauth2.0只搜到了3.5.x版本的配置,和4.x版本的配置不太一样了,感谢@Sayi,很有参考价值,原文地址:https://my.oschina.net/sayi/blog/200278
4.2.5版本的配置其实非常简化了,暂时根据官方文档配置了json配置客户端的方式,分享一下,稍后研究一下把客户端配置到数据库中,如果成功了再开新帖。
根据官方文档:https://apereo.github.io/cas/4.2.x/installation/OAuth-OpenId-Authentication的说明,加入JAR包(注意版本与cas-server-webapp项目一致,本文中是4.2.5):
cas-server-support-oauth
然后在web.xml里加入以下内容:
<servlet-mapping>
  <servlet-name>cas</servlet-name>
  <url-pattern>/oauth2.0/*</url-pattern>
</servlet-mapping>
其实就是加了oauth2.0的地址入口。
然后别的什么都不需要改了,根据 deployerConfigContext.xml 里面的 serviceRegistryDao 的配置:
<alias name="jsonServiceRegistryDao" alias="serviceRegistryDao" /> 这是默认的配置指向的是jsonServiceRegistryDao,当时困扰了挺长时间,不知道下一步怎么配,后来找了json的文档:https://apereo.github.io/cas/4.2.x/installation/JSON-Service-Management
看完文档,恍然大明白,需要在server工程下的 /WEB-INF/classes/services/ 里面 加入一个json格式的文本文件,根据文档要求,配置属性和文件名,以下是示例:
{
  "@class" : "org.jasig.cas.support.oauth.services.OAuthRegisteredService",
  "clientId": "key",
  "clientSecret": "secret",
  "bypassApprovalPrompt": false,
  "serviceId" : "^http://xxxx.com",
  "name" : "keyName",
  "id" : 10000005
}
然后保存成 keyName-10000005.json 格式是:
JSON fileName = serviceName + "-" + serviceNumericId + ".json"
以上配置完成后,重启tomcat大功告成。CAS支持的Oatuth2.0,提供3个服务:
- /oauth2.0/authorize
It’s the url to call to authorize the user: the CAS login page will be displayed and the user will authenticate. After successful authentication, the user will be redirected to the OAuth callback url with a code. Input GET parameters required: client_id and redirect_uri - /oauth2.0/accessToken
It’s the url to call to exchange the code for an access token. Input GET parameters required: client_id, redirect_uri, client_secret and code. - /oauth2.0/profile
It’s the url to call to get the profile of the authorized user. Input GET parameter required: access_token. The response is in JSON format with all attributes of the user.
粗暴翻译一下:
1、/oauth2.0/authorize 客户端点登录钮的时候要调用的地址,同时需要是get请求,要求传递2个参数:client_id 和 redirect_uri,client_id即是json 里的【clientId】,redirect_uri是登录成功后的重定向地址,没例子说个毛线:
http://localhost:8080/cas/oauth2.0/authorize?client_id=key&redirect_uri=http://xxx.com
访问后进入登录地址,登录成功后,地址栏变成:
http://localhost:8080/cas/oauth2.0/callbackAuthorize?ticket=ST-4-l1CgC2ecL4EuJHnxC9Ef-cas01.example.org
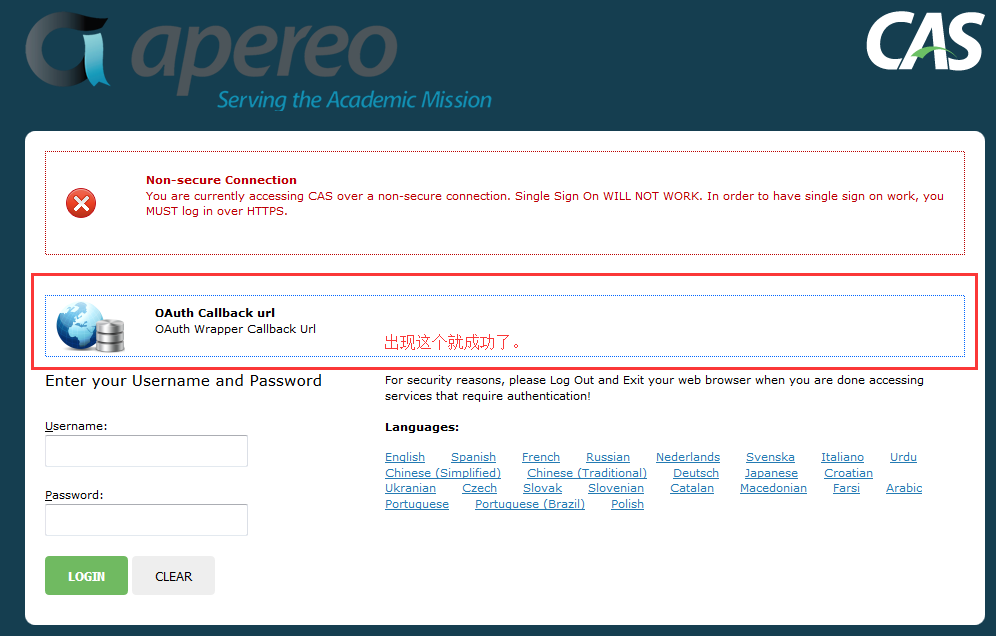
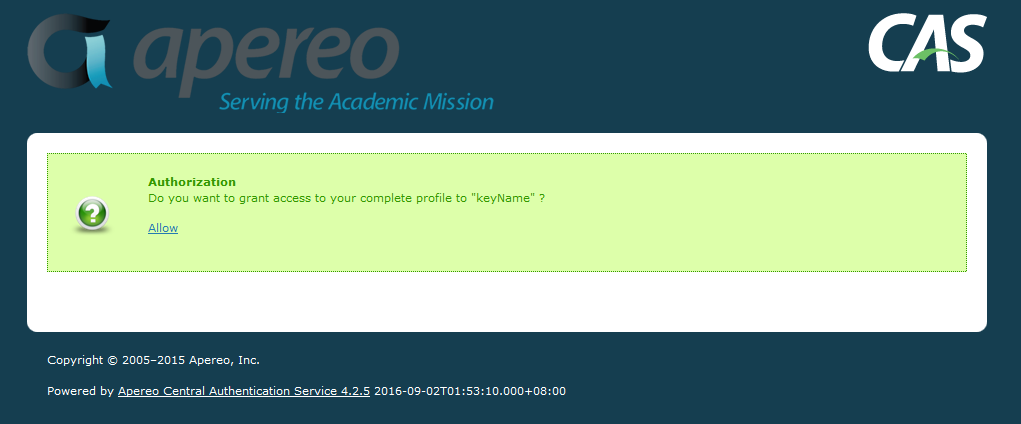
点击页面的allow就跳转到重定向地址了。不会执行2、3个地址哦。注意注意,而且获得的ticket有效期很短,据说是10秒,据说可配置,暂时没管,10秒足够用了。
2、/oauth2.0/accessToken 需要获取访问token的地址,要求传递4个参数:client_id, redirect_uri, client_secret and code,前面3个自行领会,code是访问第一个地址后得到的
示例:http://localhost:8080/cas/oauth2.0/accessToken?client_id=key&redirect_uri=http://bbs.ittenyear.com&client_secret=secret&code=ST-4-l1CgC2ecL4EuJHnxC9Ef-cas01.example.org
访问后会得到一个字符串:
access_token=VEdULTctQWZEdnhWSkFCVGNjdGNZcUxJZ2FnOWlYNVdvb1ZqcUtTeElYTWdhbWJuWXBtaWpmT2QtY2FzMDEuZXhhbXBsZS5vcmcjMTAwMDAwMDU=&expires_in=7191
3、/oauth2.0/profile 这个是获取用户信息的,我这个例子没配全,所以只取到一个id,属性报错了。
示例:http://localhost:8080/cas/oauth2.0/profile?access_token=VEdULTctQWZEdnhWSkFCVGNjdGNZcUxJZ2FnOWlYNVdvb1ZqcUtTeElYTWdhbWJuWXBtaWpmT2QtY2FzMDEuZXhhbXBsZS5vcmcjMTAwMDAwMDU=&expires_in=7191
{"id":"admin","attributes":[{"error":"invalid_request. null"}]}以上就是配置OAuth2.0的全过程,留下两个坑:
client在数据库配置。
用户属性返回配置。
有机会补上。
来源: https://my.oschina.net/u/2541179/blog/757859


