Ignite是什么?
Apache Ignite是一个以内存为中心的分布式数据库、缓存和处理平台,支持事务、分析以及流式负载,可以在PB级数据上享有内存级的性能。

1.1.Ignite定位
Ignite是不是内存数据库?
是,虽然Ignite的固化内存在内存和磁盘中都工作得很好,但是磁盘持久化可以禁用从而成为一个纯粹的内存数据库,支持SQL和分布式关联。
Ignite是不是内存数据网格(IMDG)?
是,Ignite是一个全功能的分布式键-值数据网格,它既可以用于纯内存模式,也可以带有Ignite的原生持久化,它也可以与任何第三方数据库集成,包括RDBMS和NoSQL。
Ignite是不是一个分布式缓存?
是,如果禁用原生持久化,Ignite就是一个分布式缓存,它实现了JCache规范(JSR107),并且提供了比规范更多的功能,包括分区和复制分布式模式、分布式ACID事务、SQL查询、原生持久化等等。
Ignite是不是分布式数据库?
是,在整个集群的多个节点中,Ignite中的数据要么是分区模式的,要么是复制模式的,这给系统带来了伸缩性,增加了弹性。Ignite可以自动地控制数据如何分区,另外,开发者也可以插入自定义(关系)函数,以及为了提高效率将部分数据并置在一起。
Ignite是不是关系型SQL数据库?
不完整,尽管Ignite的目标是和其他的关系型SQL数据库具有类似的行为,但是在处理约束和索引方面还是有不同的。Ignite支持一级和二级索引,但是只有一级索引支持唯一性,Ignite还不支持外键约束。
Ignite是不是磁盘或者只有内存的存储?
都是,Ignite中的原生持久化是可以开关的,这使得Ignite可以持有比可用内存量大得多的数据。尤其是,少量的操作型数据集可以只保存在内存中,而更大的无法放在内存中的数据集,可以放在磁盘上,将内存作为一个缓存层,可以获得更好的性能。
Ignite是不是一个NoSQL数据库?
不确切,和其他的NoSQL数据库一样,Ignite支持高可用和水平伸缩,但是,和其它的NoSQL数据库不同,Ignite支持跨越整个集群的ACID事务和SQL。
Ignite是不是事务型数据库?
不完整,ACID事务是支持的,但是仅仅在键-值API级别,Ignite还支持跨分区的事务,这意味着事务可以跨越不同服务器不同分区中的键。
在SQL层,Ignite支持原子性,还不是事务型一致性,社区计划在未来的版本中实现SQL事务。
Ignite是不是一个多模型数据库?
是,Ignite数据的建模和访问,同时支持键值和SQL,另外,Ignite还为在分布式数据上的计算处理,提供了强大的API。
Ignite是不是一个键-值存储?
是,Ignite提供了丰富的键-值API,兼容于JCache (JSR-107),并且支持Java,C++和.NET。
2.关键特性
2.1.分布式内存级SQL数据库
Ignite内存数据网格是从头开始构建的,具有水平扩展概念和实时按需添加节点的能力; 它被设计为线性扩展到数百个节点,具有强大的语义,用于数据局部性和亲和性数据路由,以减少冗余数据噪声。
Ignite数据网格in-memory distributed key-value store可以被视为分布式分区哈希映射,每个集群节点拥有整个数据的一部分。这样,我们添加的集群节点越多,我们可以缓存的数据就越多。
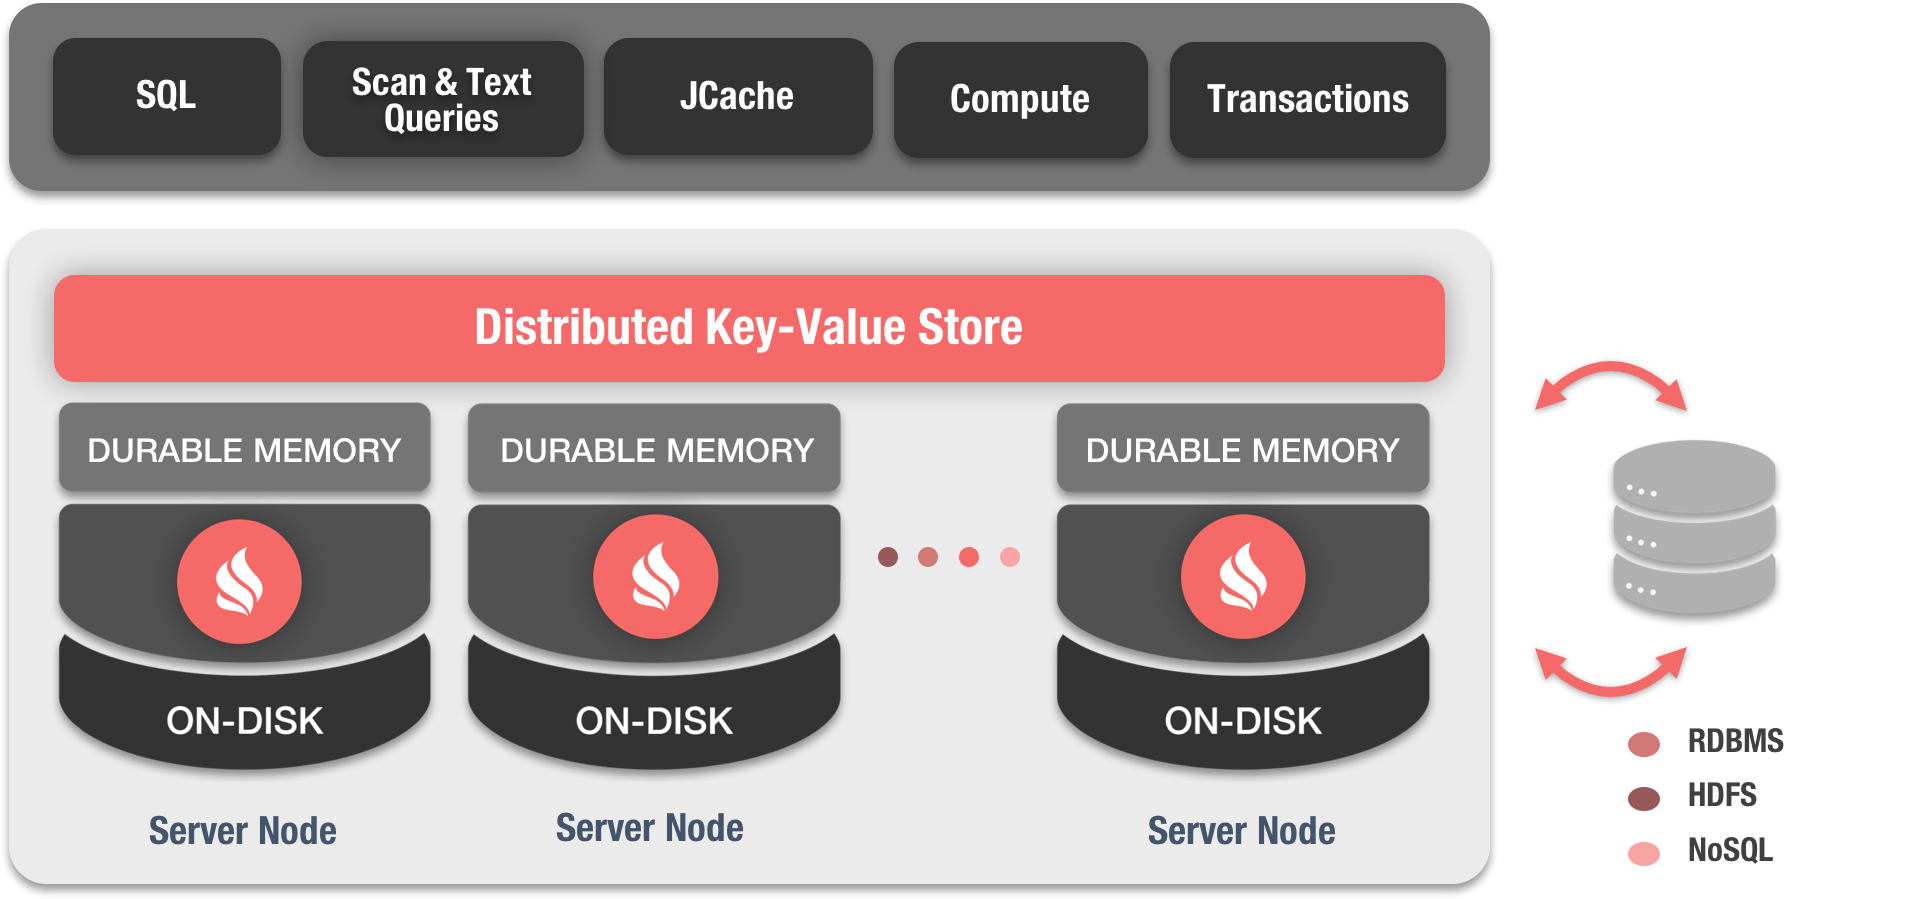
与其他键值存储不同,Ignite使用可插入散列算法确定数据位置。每个客户端都可以通过将密钥插入散列函数来确定密钥属于哪个节点,而无需任何特殊的映射服务器或名称节点。
Ignite数据网格支持本地,复制和分区数据集,并允许使用标准SQL语法在这些数据集之间自由交叉查询。Ignite支持用于查询数据的标准SQL,包括对分布式SQL连接的支持。
Ignite数据网格速度非常快,是当今集群中事务或原子数据最快的实现之一。
数据一致性
只要您的群集处于活动状态,Ignite就会保证不管崩溃或拓扑更改,不同群集节点之间的数据始终保持一致。
JCache(JSR 107)
Ignite Data Grid实现了JCache(JSR 107)规范。
特征
Getting Started
This page will help you get started with Apache Ignite. You'll be up and running in a jiffy!
Apache Ignite Essentials Series
Once you are finished with this getting started guide, we recommend you to watch the recordings of Apache Ignite Essentials webinars to gain a deeper understanding of how the product works:
Prerequisites
Apache Ignite was officially tested on:
JDK
Oracle JDK 8 and later
Open JDK 8 and later
IBM JDK 8 and later
If you use Java version 9 or later, see Running Ignite with Java 9 or later for details.
OS
Linux (any flavor),
Mac OSX (10.6 and up)
Windows (XP and up),
Windows Server (2008 and up)
Oracle Solaris
ISA
x86, x64, SPARC, PowerPC
Network
No restrictions (10G recommended)
Running Ignite with Java 9/10/11
To run Ignite with Java 9/10/11, perform the following steps:
- Set the
JAVA_HOMEvariable to point to the Java installation directory. - Ignite uses proprietary SDK APIs that are not available by default. You need to pass specific flags to JVM to make these APIs available. If you use the start-up script
ignite.sh, you do not need to do anything because these flags are already set up in the script. Otherwise, provide the following parameters to the JVM of your application: - TLSv1.3, which is available in Java 11, is not supported at the moment. Consider adding
-Djdk.tls.client.protocols=TLSv1.2if SSL between nodes is used.
--add-exports=java.base/jdk.internal.misc=ALL-UNNAMED
--add-exports=java.base/sun.nio.ch=ALL-UNNAMED
--add-exports=java.management/com.sun.jmx.mbeanserver=ALL-UNNAMED
--add-exports=jdk.internal.jvmstat/sun.jvmstat.monitor=ALL-UNNAMED
--add-exports=java.base/sun.reflect.generics.reflectiveObjects=ALL-UNNAMED
--illegal-access=permit
-Djdk.tls.client.protocols=TLSv1.2
Launching First Ignite Cluster
Using Binary Distribution
To get started with Apache Ignite:
- Download the Ignite Binary distribution as a ZIP archive from https://ignite.apache.org/
- Unzip the ZIP archive into the installation folder in your system
- (Optional) Set
IGNITE_HOMEenvironment variable to point to the installation folder and make sure there is no trailing/in the path
Alternative Installation Options
In addition to the binary distribution, Ignite is available in sources, docker and cloud images, and via RPM. See corresponding sections below.
Maven is suggested to be used from applications source code; this section will be covered later in this getting started guide.
You can now start your first Ignite cluster using a command line interface (as shown below) with the default configuration or by passing a custom configuration file. You can start as many nodes as you like and they will discover each other automatically.
With Default Configuration
To start a cluster node with the default configuration, open the command shell and, assuming you are in IGNITE_HOME (Ignite installation folder), just type this:
You will see the output similar to this:
[02:49:12] Ignite node started OK (id=ab5d18a6)
[02:49:12] Topology snapshot [ver=1, nodes=1, CPUs=8, heap=1.0GB]
By default ignite.sh starts a node with the default configuration which is config/default-config.xml.
Passing Configuration File
To use a custom configuration file, pass the file as a parameter to ignite.sh/bat as follows:
The path to the configuration file can be absolute, or relative to either IGNITE_HOME(Ignite installation folder) or META-INF folder in your classpath.
Interactive Mode
To pick a configuration file from interactive mode just pass -i flag, like so: ignite.sh -i.
Congratulations! You've just launched your first Ignite cluster.
Hooking up to Maven
The next step is to embed Ignite APIs into your applications. The easiest way to get started with Apache Ignite in Java is by relying on Maven 2 dependency management.
Ignite requires only one ignite-core mandatory dependency. Usually, you will also need to add ignite-spring for spring-based XML configuration and ignite-indexing for SQL querying.
Replace ${ignite-version} with the actual Ignite version.
<dependency>
    <groupId>org.apache.ignite</groupId>
    <artifactId>ignite-core</artifactId>
    <version>${ignite.version}</version>
</dependency>
<dependency>
    <groupId>org.apache.ignite</groupId>
    <artifactId>ignite-spring</artifactId>
    <version>${ignite.version}</version>
</dependency>
<dependency>
    <groupId>org.apache.ignite</groupId>
    <artifactId>ignite-indexing</artifactId>
    <version>${ignite.version}</version>
</dependency>
Maven Setup
See Maven Setup for more information on how to include individual Ignite maven artifacts.
Every Ignite distribution comes with Ignite examples project. Open this project in your development environment by navigating to the {ignite_version}/examples folder of the distribution and picking pom.xml file from there. Once the project is opened, try out various examples that demonstrate most of the functionality available in Ignite.
Ready to write custom code? Refer to "First Ignite # Application" series below.
First Ignite SQL Application
Let's begin by creating two tables and two indexes on these tables. We will use examples from the Ignite SQL Getting Started guide.
We have a City table and a Person table. People live in a City and a City can have many people. We can collocate Person objects with City objects for where a person lives. To achieve this, we use the WITH clause and specify affinityKey=city_id as follows:
Start Ignite cluster's nodes from command line or as a part of your application. Create the SQL schema using the statements below:
// Register JDBC driver.
Class.forName("org.apache.ignite.IgniteJdbcThinDriver");

// Open JDBC connection.
Connection conn = DriverManager.getConnection("jdbc:ignite:thin://127.0.0.1/");

// Create database tables.
try (Statement stmt = conn.createStatement()) {

    // Create table based on REPLICATED template.
    stmt.executeUpdate("CREATE TABLE City (" +
    " id LONG PRIMARY KEY, name VARCHAR) " +
    " WITH \"template=replicated\"");

    // Create table based on PARTITIONED template with one backup.
    stmt.executeUpdate("CREATE TABLE Person (" +
    " id LONG, name VARCHAR, city_id LONG, " +
    " PRIMARY KEY (id, city_id)) " +
    " WITH \"backups=1, affinityKey=city_id\"");

    // Create an index on the City table.
    stmt.executeUpdate("CREATE INDEX idx_city_name ON City (name)");

    // Create an index on the Person table.
    stmt.executeUpdate("CREATE INDEX idx_person_name ON Person (name)");
}
Next, we will populate the two tables with some example data, as follows:
// Register JDBC driver
Class.forName("org.apache.ignite.IgniteJdbcThinDriver");

// Open JDBC connection
Connection conn = DriverManager.getConnection("jdbc:ignite:thin://127.0.0.1/");

// Populate City table
try (PreparedStatement stmt =
conn.prepareStatement("INSERT INTO City (id, name) VALUES (?, ?)")) {

    stmt.setLong(1, 1L);
    stmt.setString(2, "Forest Hill");
    stmt.executeUpdate();

    stmt.setLong(1, 2L);
    stmt.setString(2, "Denver");
    stmt.executeUpdate();

    stmt.setLong(1, 3L);
    stmt.setString(2, "St. Petersburg");
    stmt.executeUpdate();
}

// Populate Person table
try (PreparedStatement stmt =
conn.prepareStatement("INSERT INTO Person (id, name, city_id) VALUES (?, ?, ?)")) {

    stmt.setLong(1, 1L);
    stmt.setString(2, "John Doe");
    stmt.setLong(3, 3L);
    stmt.executeUpdate();

    stmt.setLong(1, 2L);
    stmt.setString(2, "Jane Roe");
    stmt.setLong(3, 2L);
    stmt.executeUpdate();

    stmt.setLong(1, 3L);
    stmt.setString(2, "Mary Major");
    stmt.setLong(3, 1L);
    stmt.executeUpdate();

    stmt.setLong(1, 4L);
    stmt.setString(2, "Richard Miles");
    stmt.setLong(3, 2L);
    stmt.executeUpdate();
}
Now we are ready to query the data. An example query would be to find people and the cities that they live in. This would involve a join across the two tables, as follows:
This would produce the following output:
Mary Major, Forest Hill
Jane Roe, Denver
Richard Miles, Denver
John Doe, St. Petersburg
First Ignite Compute Application
Let's write our first compute grid application which will count the number of non-white-space characters in a sentence. As an example, we will take a sentence, split it into multiple words, and have every compute job count number of characters in each word. In the end, we simply add up results received from individual jobs to get our total count.
try (Ignite ignite = Ignition.start("examples/config/example-ignite.xml")) {
  Collection<IgniteCallable<Integer>> calls = new ArrayList<>();

  // Iterate through all the words in the sentence and create Callable jobs.
  for (final String word : "Count characters using callable".split(" "))
    calls.add(word::length);

  // Execute collection of Callables on the grid.
  Collection<Integer> res = ignite.compute().call(calls);

  // Add up all the results.
  int sum = res.stream().mapToInt(Integer::intValue).sum();

	System.out.println("Total number of characters is '" + sum + "'.");
}
Zero Deployment
Note that because of the Zero Deployment feature, when running the above application from your IDE, remote nodes will execute received jobs without explicit deployment.
For another example, let's create an application that will retrieve the objects that we had previously saved using our first SQL application, and perform some additional processing on those objects.
We will create a weather warning application. Let's assume that Denver has a weather warning and we need to alert Denver residents to prepare for the inclement weather. Previously, we used an affinityKey and we'll make use of that in our example application.
Here is the code snippet:
Ignite ignite = Ignition.start();
long cityId = 2; // Id for Denver
// Sending the logic to a cluster node that stores Denver and its residents.
ignite.compute().affinityRun("SQL_PUBLIC_CITY", cityId, new IgniteRunnable() {
Ignite ignite;
public void run() {
// Getting an access to Persons cache.
IgniteCache<BinaryObject, BinaryObject> people = ignite.cache(
"Person").withKeepBinary();
ScanQuery<BinaryObject, BinaryObject> query =
new ScanQuery <BinaryObject, BinaryObject>();
try (QueryCursor<Cache.Entry<BinaryObject, BinaryObject>> cursor =
people.query(query)) {
// Iteration over the local cluster node data using the scan query.
for (Cache.Entry<BinaryObject, BinaryObject> entry : cursor) {
BinaryObject personKey = entry.getKey();
// Picking Denver residents only only.
if (personKey.<Long>field("CITY_ID") == cityId) {
person = entry.getValue();
// Sending the warning message to the person.
}
}
}
}
}In the above example, we use affinityRun() method and specify the SQL_PUBLIC_CITY cache, cityId, and a new IgniteRunnable(). This ensures that the computation is sent to the node that stores records of Denver and its residents. This approach allows us to execute advanced logic exactly where the data is stored avoiding expensive serialization and network trips.
First Ignite Data Grid Application
Now let's write a simple set of mini-examples which will put and get values to/from distributed cache, and perform basic transactions.
Since we are using cache in this example, we should make sure that it is configured. Let's use the example configuration shipped with Ignite that already has several caches configured:
$ bin/ignite.sh examples/config/example-cache.xmltry (Ignite ignite = Ignition.start("examples/config/example-ignite.xml")) {
IgniteCache<Integer, String> cache = ignite.getOrCreateCache("myCacheName");
// Store keys in cache (values will end up on different cache nodes).
for (int i = 0; i < 10; i++)
cache.put(i, Integer.toString(i));
for (int i = 0; i < 10; i++)
System.out.println("Got [key=" + i + ", val=" + cache.get(i) + ']');
}First Ignite Service Grid Application
Ignite Service Grid is useful for deployment of microservices in the cluster. Ignite handles lifecycle related tasks of a service deployment, providing a simple way to call the service from an application.
As an example, let's develop a service that will return the current weather forecast for a specific city. First, we will create a service interface with a single API method. The interface has to extend org.apache.ignite.services.Service.
import org.apache.ignite.services.Service;

public interface WeatherService extends Service {
    /**
     * Get a current temperature for a specific city in the world.
     *
     * @param countryCode Country code (ISO 3166 country codes).
     * @param cityName City name.
     * @return Current temperature in the city in JSON format.
     * @throws Exception if an exception happened.
     */
    String getCurrentTemperature(String countryCode, String cityName)
        throws Exception;
}
An implementation of the service will connect to the weather channel to retrieve the latest weather information. Our weather service implementation will be as follows:
import java.io.BufferedReader;
import java.io.InputStreamReader;
import java.net.HttpURLConnection;
import java.net.URL;
import org.apache.ignite.services.ServiceContext;
public class WeatherServiceImpl implements WeatherService {
/** Weather service URL. */
private static final String WEATHER_URL = "http://api.openweathermap.org/data/2.5/weather?";
/** Sample app ID. */
private static final String appId = "ca7345b4a1ef8c037f7749c09fcbf808";
/** {@inheritDoc}. */
public void init(ServiceContext ctx) throws Exception {
System.out.println("Weather Service is initialized!");
}
/** {@inheritDoc}. */
public void execute(ServiceContext ctx) throws Exception {
System.out.println("Weather Service is started!");
}
/** {@inheritDoc}. */
public void cancel(ServiceContext ctx) {
System.out.println("Weather Service is stopped!");
}
/** {@inheritDoc}. */
public String getCurrentTemperature(String cityName,
String countryCode) throws Exception {
System.out.println(">>> Requested weather forecast [city="
+ cityName + ", countryCode=" + countryCode + "]");
String connStr = WEATHER_URL + "q=" + cityName + ","
+ countryCode + "&appid=" + appId;
URL url = new URL(connStr);
HttpURLConnection conn = null;
try {
// Connecting to the weather service.
conn = (HttpURLConnection) url.openConnection();
conn.setRequestMethod("GET");
conn.connect();
// Read data from the weather server.
try (BufferedReader reader = new BufferedReader(
new InputStreamReader(conn.getInputStream()))) {
String line;
StringBuilder builder = new StringBuilder();
while ((line = reader.readLine()) != null)
builder.append(line);
return builder.toString();
}
} finally {
if (conn != null)
conn.disconnect();
}
}
}Finally, the service needs to be deployed in the cluster and can be called from the application side. For the sake of simplicity, the service will be deployed and called from the same application, as follows:
import org.apache.ignite.Ignite;
import org.apache.ignite.Ignition;

public class ServiceGridExample {

    public static void main(String[] args) throws Exception {
        try (Ignite ignite = Ignition.start()) {

            // Deploying a single instance of the Weather Service
            // in the whole cluster.
            ignite.services().deployClusterSingleton("WeatherService",
               new WeatherServiceImpl());

            // Requesting current weather for London.
            WeatherService service = ignite.services().service("WeatherService");

            String forecast = service.getCurrentTemperature("London", "UK");

            System.out.println("Weather forecast in London:" + forecast);
        }
    }
}
Zero Deployment and Service Grid
Zero Deployment feature is not supported for Ignite Service Grid. If you decide to deploy the service from the example above on the nodes started with ignite.shor ignite.bat file, include the service implementation into a custom JAR file and add it to the {apache_ignite_version}/libs folder.
Cluster Management and Monitoring
The easiest way to examine the content of the data grid as well as perform other management and monitoring operations is to use the Ignite Web Console and Ignite Visor Command Line utility.
Docker and Cloud Images Installation
The latest Ignite docker and cloud images for AWS and Google Compute Engine can be taken from Ignite downloads page: https://ignite.apache.org/download.cgi#docker
RPM and DEB Packages Installation
Apache Ignite can be installed from the official RPM and DEB repositories.
Building From Source
If you downloaded a source package, you can build the binary using the following commands:
# Unpack the source package
$ unzip -q apache-ignite-{version}-src.zip
$ cd apache-ignite-{version}-src

# Build In-Memory Data Fabric release (without LGPL dependencies)
$ mvn clean package -DskipTests

# Build In-Memory Data Fabric release (with LGPL dependencies)
$ mvn clean package -DskipTests -Prelease,lgpl

# Build In-Memory Hadoop Accelerator release
# (optionally specify version of hadoop to use)
$ mvn clean package -DskipTests -Dignite.edition=hadoop [-Dhadoop.version=X.X.X]
Refer to DEVNOTES.txt from the source package for more details.
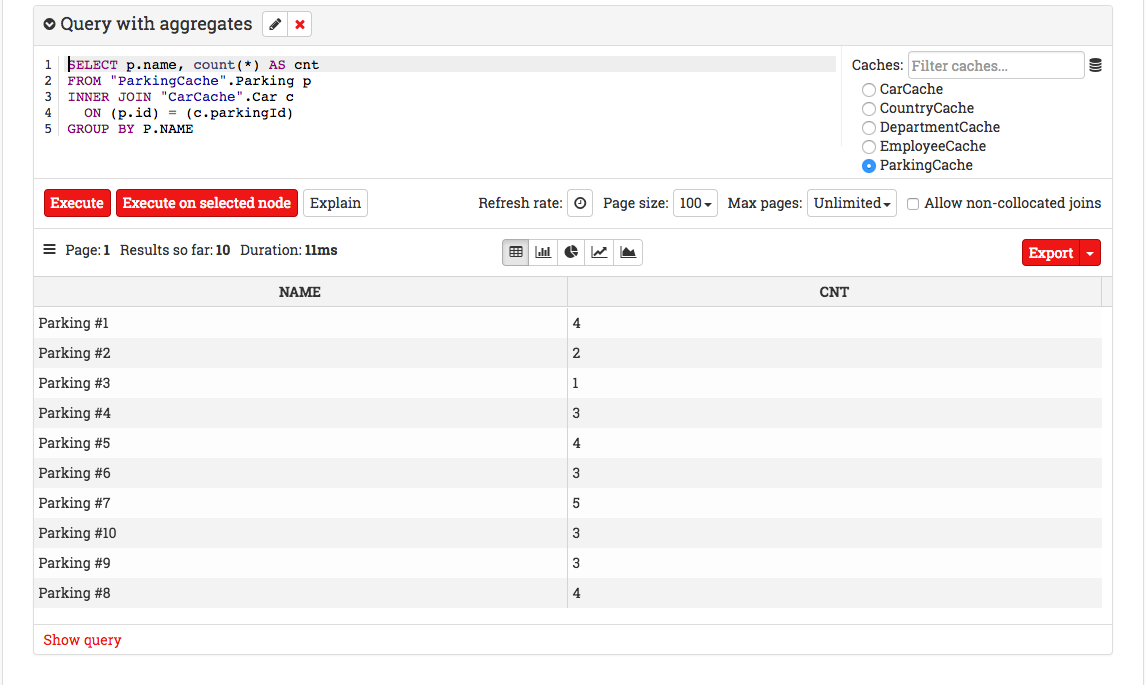
Queries Execution
Execute SQL queries on your Ignite caches.
You can connect your Ignite cluster with the Web Console and run SQL queries on it. You can also view the execution plan, in-memory schema, and streaming charts for your cluster.
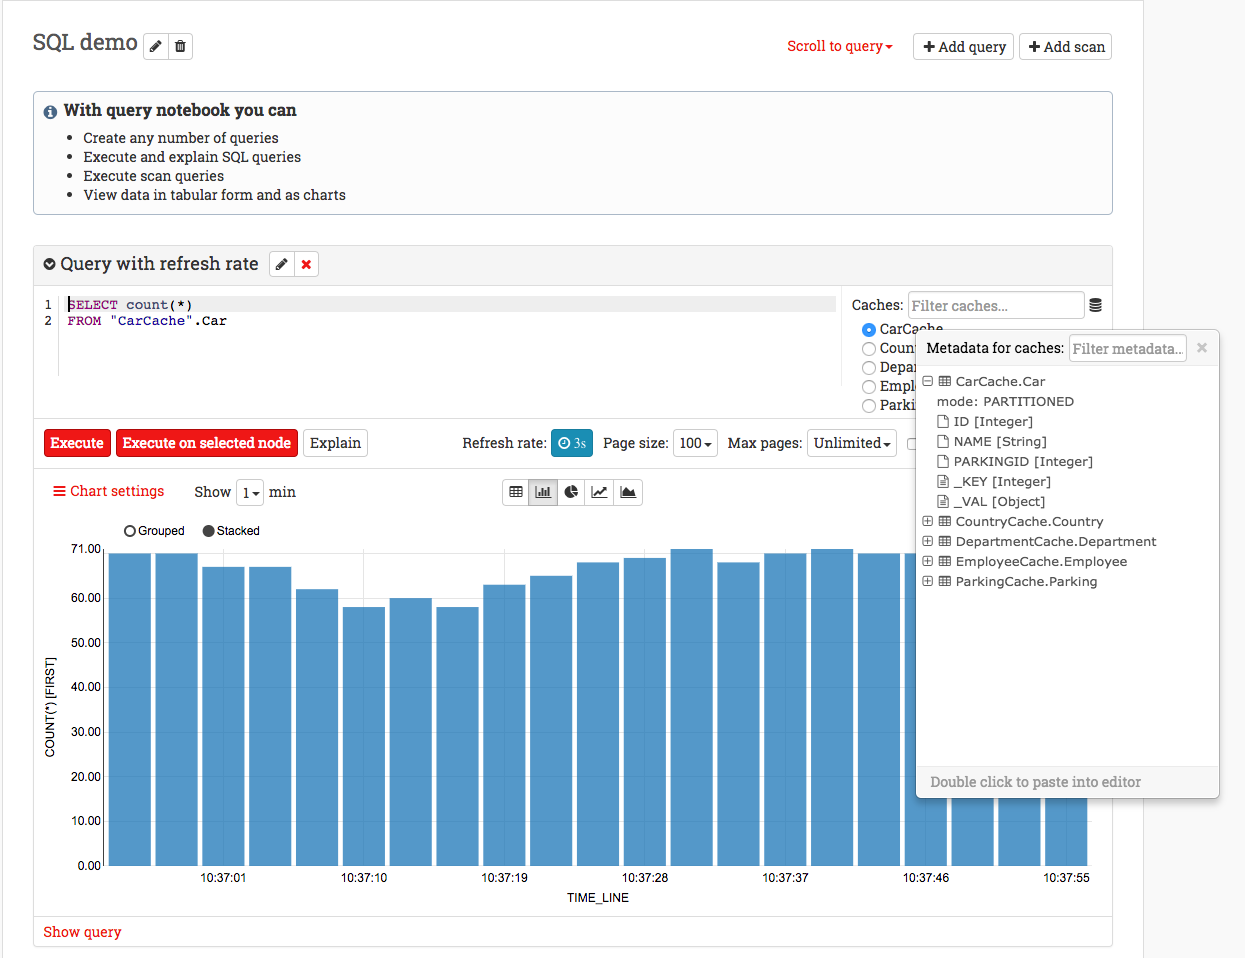
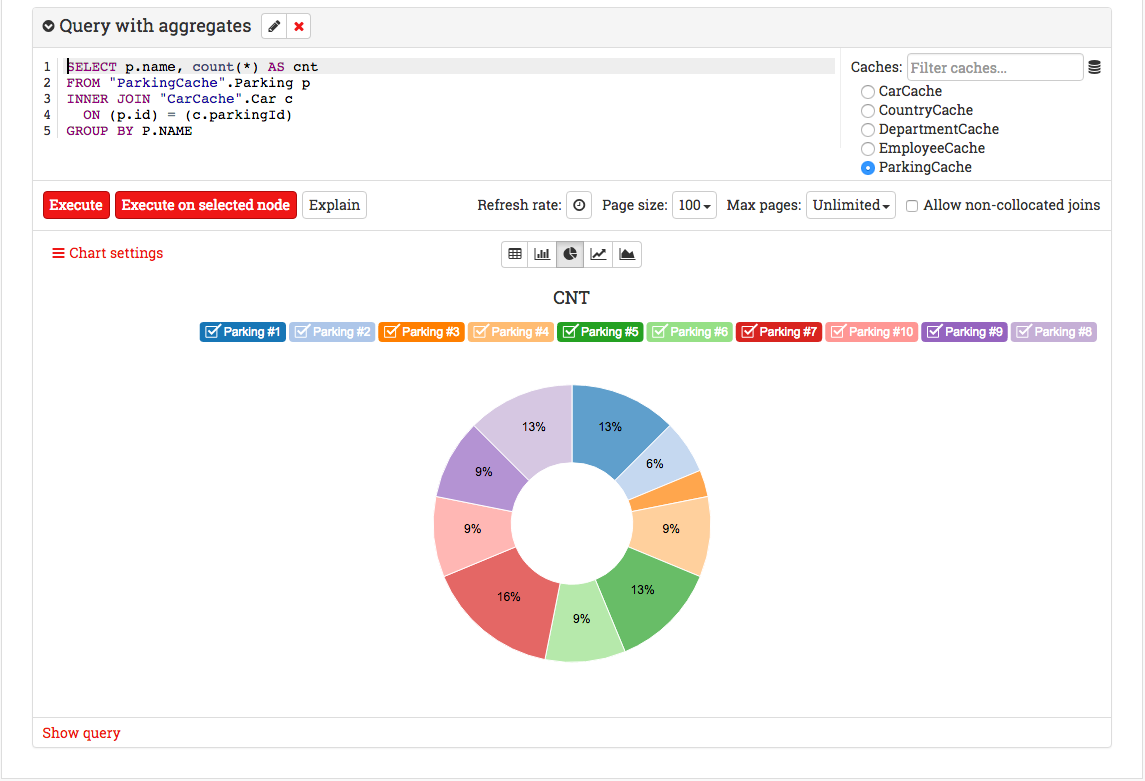
Ignite supports free-form SQL queries without any limitations. The SQL syntax is ANSI-99 compliant which means that you can use any SQL function, aggregation, grouping or join. You can create and execute any number of queries on the same page and the results can be viewed in tabular form or graphs.
Here is the query result as a pie chart:
Ignite Web Console Demo
You can use Ignite Web Console's demo mode to explore and evaluate its various features. Note that Ignite Web Console can be deployed locally on your system environment. However, for convenience purposes, you can try an already deployed instance of Ignite Web Console.
https://apacheignite-tools.readme.io/docs/queries-execution


