mybatis是个非常的东西, 开发他若是手工做配置文件的编写等等还是很麻烦的, 因此mybatis提供了插件辅助生产各种配置文件等
一。 老的mybatis插件安装
以前的mybatis的插件是Mybatis Generator, 安装方法如下:
下面是参考http://www.cnblogs.com/wjqblogs/p/4048989.html
这个安装方法好像目前不好用了, 本文介绍另外一种安装方法,但是原来的方法也保留, 若是有需求也可以参考.
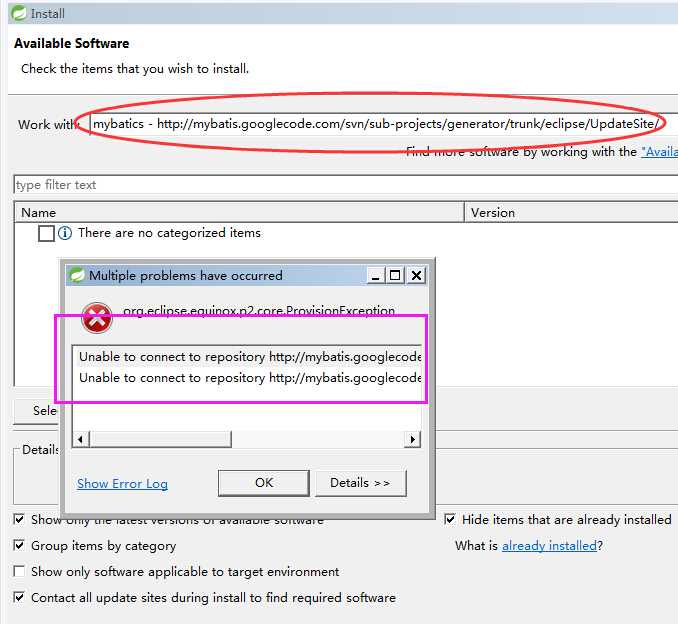
1.在IDE的Help——》Install New Solftware ——》Add
填写mybatis 插件地址 http://mybatis.googlecode.com/svn/sub-projects/generator/trunk/eclipse/UpdateSite/
详细信息参考原文
2.在项目下新建一个XML文件,命名一般为MyBatis-config.xml
内容配置如下:
1 <?xml version="1.0" encoding="UTF-8" ?> 2 <!DOCTYPE generatorConfiguration PUBLIC "-//mybatis.org//DTD MyBatis Generator Configuration 1.0//EN" "http://mybatis.org/dtd/mybatis-generator-config_1_0.dtd" > 3 <generatorConfiguration> 4 <classPathEntry 5 location="C:\Users\Administrator\.m2\repository\mysql\mysql-connector-java\5.1.31\mysql-connector-java-5.1.31.jar" /> 6 7 <context id="context1"> 8 9 <!-- 去除自动生成的注释 --> 10 <commentGenerator> 11 <property name="suppressAllComments" value="true" /> 12 <property name="suppressDate" value="true" /> 13 </commentGenerator> 14 15 <jdbcConnection driverClass="com.mysql.jdbc.Driver" 16 connectionURL="jdbc:mysql://127.0.0.1:3306/manager?useUnicode=true&characterEncoding=UTF-8" 17 userId="root" password="123456" /> 18 19 <!-- 数据表对应的model 层 --> 20 <javaModelGenerator targetPackage="com.wjq.test.manager.domain" 21 targetProject="manager/src/main/java" /> 22 23 <!-- sql mapper 映射配置文件 --> 24 <sqlMapGenerator targetPackage="com.wjq.test.manager.dao.mapper" 25 targetProject="manager/src/main/java" /> 26 27 <!-- 生成DAO对象 --> 28 <javaClientGenerator targetPackage="com.wjq.test.manager.dao" 29 targetProject="manager/src/main/java" type="XMLMAPPER"> 30 <property name="enableSubPackages" value="true" /> 31 </javaClientGenerator> 32 33 <!-- 生成相关的接口方法 --> 34 <table schema="test" tableName="testphone" 35 domainObjectName="TestPhone" enableInsert="true" 36 enableSelectByPrimaryKey="true" enableUpdateByPrimaryKey="true" 37 enableDeleteByPrimaryKey="true" enableSelectByExample="false" 38 enableDeleteByExample="false" enableCountByExample="false" 39 enableUpdateByExample="false"> 40 </table> 41 </context> 42 </generatorConfiguration>
3.在配置好的MyBatis-config.xml 上右键点击有generate Mybatis,就会生成你所配置的相应文件。
由于网络等原因老的插件安装不了, 如下图
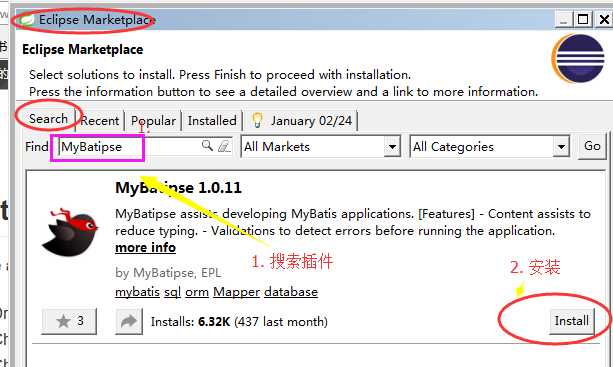
二。 新MyBatipse插件安装
新插件提供了很多好的功能, 详情参考:https://github.com/harawata/mybatipse
安装方法可以参考上面的网站, 也可以参考下图: