Realm在验证用户身份的时候,要进行密码匹配。最简单的情况就是明文直接匹配,然后就是加密匹配,这里的匹配工作则就是交给CredentialsMatcher来完成的。先看下它的接口方法:
public interface CredentialsMatcher {
boolean doCredentialsMatch(AuthenticationToken token, AuthenticationInfo info);
}
根据用户名获取AuthenticationInfo ,然后就需要将用户提交的AuthenticationToken和AuthenticationInfo 进行匹配。
AuthenticatingRealm从第三篇文章知道是用来进行认证流程的,它有一个属性CredentialsMatcher credentialsMatcher,使用如下:
public final AuthenticationInfo getAuthenticationInfo(AuthenticationToken token) throws AuthenticationException {
AuthenticationInfo info = getCachedAuthenticationInfo(token);
if (info == null) {
//otherwise not cached, perform the lookup:
info = doGetAuthenticationInfo(token);
log.debug("Looked up AuthenticationInfo [{}] from doGetAuthenticationInfo", info);
if (token != null && info != null) {
cacheAuthenticationInfoIfPossible(token, info);
}
} else {
log.debug("Using cached authentication info [{}] to perform credentials matching.", info);
}
if (info != null) {
//在这里进行认证密码匹配
assertCredentialsMatch(token, info);
} else {
log.debug("No AuthenticationInfo found for submitted AuthenticationToken [{}]. Returning null.", token);
}
return info;
}
protected void assertCredentialsMatch(AuthenticationToken token, AuthenticationInfo info) throws AuthenticationException {
CredentialsMatcher cm = getCredentialsMatcher();
if (cm != null) {
if (!cm.doCredentialsMatch(token, info)) {
//not successful - throw an exception to indicate this:
String msg = "Submitted credentials for token [" + token + "] did not match the expected credentials.";
throw new IncorrectCredentialsException(msg);
}
} else {
throw new AuthenticationException("A CredentialsMatcher must be configured in order to verify " +
"credentials during authentication. If you do not wish for credentials to be examined, you " +
"can configure an " + AllowAllCredentialsMatcher.class.getName() + " instance.");
}
}
以上我们知道了CredentialsMatcher所处的认证的位置及作用,下面就要详细看看具体的匹配过程,还是接口设计图:

对于上图的三个分支,一个一个来说。
对于AllowAllCredentialsMatcher:
public class AllowAllCredentialsMatcher implements CredentialsMatcher {
public boolean doCredentialsMatch(AuthenticationToken token, AuthenticationInfo info) {
return true;
}
}
都返回true,这意味着,只要该用户名存在即可,不用去验证密码是否匹配。
对于PasswordMatcher:
public class PasswordMatcher implements CredentialsMatcher {
private PasswordService passwordService;
public PasswordMatcher() {
this.passwordService = new DefaultPasswordService();
}
public boolean doCredentialsMatch(AuthenticationToken token, AuthenticationInfo info) {
//确保有PasswordService,若没有抛异常
PasswordService service = ensurePasswordService();
//获取提交的密码
Object submittedPassword = getSubmittedPassword(token);
//获取服务器端存储的密码
Object storedCredentials = getStoredPassword(info);
//服务器端存储的密码必须是String或者Hash类型(待会详细介绍什么是Hash),见该方法
assertStoredCredentialsType(storedCredentials);
//对服务器端存储的密码分成两类来处理,一类是String,另一类是Hash
if (storedCredentials instanceof Hash) {
Hash hashedPassword = (Hash)storedCredentials;
HashingPasswordService hashingService = assertHashingPasswordService(service);
return hashingService.passwordsMatch(submittedPassword, hashedPassword);
}
//otherwise they are a String (asserted in the 'assertStoredCredentialsType' method call above):
String formatted = (String)storedCredentials;
return passwordService.passwordsMatch(submittedPassword, formatted);
}
private void assertStoredCredentialsType(Object credentials) {
if (credentials instanceof String || credentials instanceof Hash) {
return;
}
String msg = "Stored account credentials are expected to be either a " +
Hash.class.getName() + " instance or a formatted hash String.";
throw new IllegalArgumentException(msg);
}
}
内部使用一个PasswordService 来完成匹配。从上面的匹配过程中,我们了解到了,对于服务器端存储的密码分成String和Hash两种,然后由PasswordService 来分别处理。所以PasswordMatcher 也只是完成了一个流程工作,具体的内容要到PasswordService 来看。
到底什么是Hash呢?
先看下接口图:
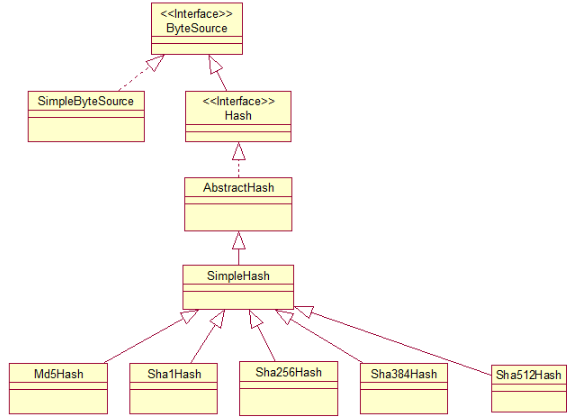
看下ByteSource:
public interface ByteSource {
byte[] getBytes();
String toHex();
String toBase64();
//略
}
就维护了一个byte[]数组。
看下SimpleByteSource的实现:
public class SimpleByteSource implements ByteSource {
private final byte[] bytes;
private String cachedHex;
private String cachedBase64;
public SimpleByteSource(byte[] bytes) {
this.bytes = bytes;
}
public String toHex() {
if ( this.cachedHex == null ) {
this.cachedHex = Hex.encodeToString(getBytes());
}
return this.cachedHex;
}
public String toBase64() {
if ( this.cachedBase64 == null ) {
this.cachedBase64 = Base64.encodeToString(getBytes());
}
return this.cachedBase64;
}
//略
}
toHex就是将byte数组准换成16进制形式的字符串。toBase64就是将byte数组进行base64编码。
Hex.encodeToString(getBytes()) 详情如下:
public class Hex {
/**
* Used to build output as Hex
*/
private static final char[] DIGITS = {
'0', '1', '2', '3', '4', '5', '6', '7',
'8', '9', 'a', 'b', 'c', 'd', 'e', 'f'
};
public static String encodeToString(byte[] bytes) {
char[] encodedChars = encode(bytes);
return new String(encodedChars);
}
public static char[] encode(byte[] data) {
int l = data.length;
char[] out = new char[l << 1];
// two characters form the hex value.
for (int i = 0, j = 0; i < l; i++) {
out[j++] = DIGITS[(0xF0 & data[i]) >>> 4];
out[j++] = DIGITS[0x0F & data[i]];
}
return out;
}
//略
}
对于一个byte[] data数组,byte含有8位,(0xF0 & data[i]) >>> 4 表示取其高四位的值。如
当data[i]=01001111时,0xF0 & data[i]则为01000000,然后右移四位则变成00000100即为值4,所以DIGITS[(0xF0 & data[i])=DIGITS[4]=4,同理data[i]的低四位变成f。最终的结果为一个byte 01001111变成两个char 4f。
Base64.encodeToString(getBytes()):就稍微比较麻烦,这里不再详细说明。原理的话可以到网上搜下,有很多这样的文章。还是回到ByteSource的接口图,该轮到Hash了。
public interface Hash extends ByteSource {
String getAlgorithmName();
ByteSource getSalt();
int getIterations();
}
多添加了三个属性,算法名、盐值、hash次数。
继续看Hash的实现者AbstractHash:
public AbstractHash(Object source, Object salt, int hashIterations) throws CodecException {
byte[] sourceBytes = toBytes(source);
byte[] saltBytes = null;
if (salt != null) {
saltBytes = toBytes(salt);
}
byte[] hashedBytes = hash(sourceBytes, saltBytes, hashIterations);
setBytes(hashedBytes);
}
整个过程就是根据源source和salt和hashIterations(hash次数),算出一个新的byte数组。
再来看下是如何生成新数组的:
protected byte[] hash(byte[] bytes, byte[] salt, int hashIterations) throws UnknownAlgorithmException {
MessageDigest digest = getDigest(getAlgorithmName());
if (salt != null) {
digest.reset();
digest.update(salt);
}
byte[] hashed = digest.digest(bytes);
int iterations = hashIterations - 1; //already hashed once above
//iterate remaining number:
for (int i = 0; i < iterations; i++) {
digest.reset();
hashed = digest.digest(hashed);
}
return hashed;
}
看到这里就明白了,MessageDigest 是jdk自带的java.security包中的工具,用于对数据进行加密。可以使用不同的加密算法,举个简单的例子,如用md5进行加密。md5是对一个任意的byte数组进行加密变成固定长度的128位,即16个字节。然后这16个字节的展现有多种形式,这就与md5本身没关系了。展现形式如:把加密后的128位即16个字节进行Hex.encodeToString操作,即每个字节转换成两个字符(高四位一个字符,低四位一个字符)。到这个网址http://www.cmd5.com/中去输入字符串"lg",得到的md5("lg",32)的结果为 a608b9c44912c72db6855ad555397470,下面我们就来做出此结果
public static void main(String[] args) throws NoSuchAlgorithmException, UnsupportedEncodingException{
MessageDigest md5=MessageDigest.getInstance("MD5");
String str="lg";
md5.reset();
byte[] ret=md5.digest(str.getBytes("UTF-8"));
System.out.println(Hex.encodeToString(ret));
}
md5.reset()表示要清空要加密的源数据。digest(byte[])表示将该数据填充到源数据中,然后加密。
md5算出结果byte[] ret后,我们选择的展现形式是Hex.encodeToString(ret)即转换成16进制字符表示。这里的Hex就是借用shiro的Hex。结果如下:
a608b9c44912c72db6855ad555397470
和上面的结果一样,也就是说该网址对md5加密后的结果也是采用转换成16进制字符的展现形式。该网址的md5(lg,16) = 4912c72db6855ad5 则是取自上述结果的中间字符。
简单介绍完md5后,继续回到AbstractHash的hash方法中,就变得很简单。digest.update(salt)方法就是向源数据中继续添加要加密的数据,digest.digest(hashed)内部调用了update方法即先填充数据,然后执行加密过程。
所以这里的过程为:
第一轮: salt和bytes作为源数据加密得到hashed byte数组
第二轮:如果传递进来的hashIterations hash次数大于1的话,要对上述结果继续进行加密
得到最终的加密结果。
AbstractHash对子类留了一个抽象方法public abstract String getAlgorithmName(),用于获取加密算法名称。然而此类被标记为过时,推荐使用它的子类SimpleHash,不过上述原理仍然没有变,不再详细去说,可以自己去查看,Hash终于解释完了,总结一下,就是根据源字节数组、算法、salt、hash次数得到一个加密的byte数组。
回到CredentialsMatcher的实现类PasswordMatcher中,在该类中,对服务器端存储的密码形式分成了两类,一类是String,另一类就是Hash,Hash中包含了加密采用的算法、salt、hash次数等信息。 PasswordMatcher中的PasswordService 来完成匹配过程。我们就可以试想匹配过程:若服务器端存储的密码为Hash a,则我们就能知道加密过程所采用的算法、salt、hash次数信息,然后对原密码进行这样的加密,算出一个Hash b,然后比较a b的byte数组是否一致,这只是推想,然后来看下实际内容:
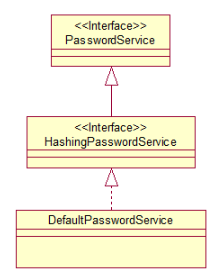
PasswordService 接口图如下:
public interface PasswordService {
String encryptPassword(Object plaintextPassword) throws IllegalArgumentException;
boolean passwordsMatch(Object submittedPlaintext, String encrypted);
}
HashingPasswordService:继承了PasswordService ,加入了对Hash处理的功能
public interface HashingPasswordService extends PasswordService {
//根据服务器端存储的Hash的采用的算法、salt、hash次数和原始密码得到一个进过相同加密过程的Hash
Hash hashPassword(Object plaintext) throws IllegalArgumentException;
boolean passwordsMatch(Object plaintext, Hash savedPasswordHash);
}
最终的实现类DefaultPasswordService:
public class DefaultPasswordService implements HashingPasswordService {
public static final String DEFAULT_HASH_ALGORITHM = "SHA-256";
public static final int DEFAULT_HASH_ITERATIONS = 500000; //500,000
private static final Logger log = LoggerFactory.getLogger(DefaultPasswordService.class);
private HashService hashService;
private HashFormat hashFormat;
private HashFormatFactory hashFormatFactory;
private volatile boolean hashFormatWarned; //used to avoid excessive log noise
public DefaultPasswordService() {
this.hashFormatWarned = false;
DefaultHashService hashService = new DefaultHashService();
hashService.setHashAlgorithmName(DEFAULT_HASH_ALGORITHM);
hashService.setHashIterations(DEFAULT_HASH_ITERATIONS);
hashService.setGeneratePublicSalt(true); //always want generated salts for user passwords to be most secure
this.hashService = hashService;
this.hashFormat = new Shiro1CryptFormat();
this.hashFormatFactory = new DefaultHashFormatFactory();
}
//略
}
首先还是先了解属性,三个重要属性HashService 、HashFormat、HashFormatFactory 。
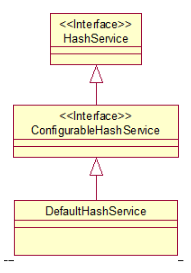
HashService接口类图:
public interface HashService {
Hash computeHash(HashRequest request);
}
将一个HashRequest计算出一个Hash。什么是HashRequest?
public interface HashRequest {
ByteSource getSource();
ByteSource getSalt();
int getIterations();
String getAlgorithmName();
//略
}
就是我们上述所说的那几个重要元素。原密码、salt、hash次数、算法名称。这个计算过程也就是上述AbstractHash的过程。
再看HashService 的子类ConfigurableHashService:
public interface ConfigurableHashService extends HashService {
void setPrivateSalt(ByteSource privateSalt);
void setHashIterations(int iterations);
void setHashAlgorithmName(String name);
void setRandomNumberGenerator(RandomNumberGenerator rng);
}
就是可以对上述几个重要元素进行设置。privateSalt和RandomNumberGenerator接下来再说,再看ConfigurableHashService的实现类DefaultHashService:
public class DefaultHashService implements ConfigurableHashService {
//主要是用来生成随机的publicSalt
private RandomNumberGenerator rng;
private String algorithmName;
private ByteSource privateSalt;
private int iterations;
//标志是否去产生publicSalt
private boolean generatePublicSalt;
public DefaultHashService() {
this.algorithmName = "SHA-512";
this.iterations = 1;
this.generatePublicSalt = false;
this.rng = new SecureRandomNumberGenerator();
}
}
来看下它是怎么实现将HashRequest变成Hash的:
public Hash computeHash(HashRequest request) {
if (request == null || request.getSource() == null || request.getSource().isEmpty()) {
return null;
}
//获取算法名字
String algorithmName = getAlgorithmName(request);
//获取原密码
ByteSource source = request.getSource();
//获取hash次数
int iterations = getIterations(request);
//获取publicSalt
ByteSource publicSalt = getPublicSalt(request);
//获取privateSalt
ByteSource privateSalt = getPrivateSalt();
//结合两者
ByteSource salt = combine(privateSalt, publicSalt);
//这就是之前始终强调的原理部分,就是根据算法、原始数据、salt、hash次数进行加密
Hash computed = new SimpleHash(algorithmName, source, salt, iterations);
//对于computed 有很多信息,只想对外暴漏某些信息。如publicSalt
SimpleHash result = new SimpleHash(algorithmName);
result.setBytes(computed.getBytes());
result.setIterations(iterations);
//Only expose the public salt - not the real/combined salt that might have been used:
result.setSalt(publicSalt);
return result;
}
第一步:获取算法,先获取request本身的算法,如果没有,则使用DefaultHashService 默认的算法,在DefaultHashService 的构造函数中默认使用SHA-512的加密算法。同理对于hash次数也是同样的逻辑。
第二步:获取publicSalt
protected ByteSource getPublicSalt(HashRequest request) {
ByteSource publicSalt = request.getSalt();
if (publicSalt != null && !publicSalt.isEmpty()) {
//a public salt was explicitly requested to be used - go ahead and use it:
return publicSalt;
}
publicSalt = null;
//check to see if we need to generate one:
ByteSource privateSalt = getPrivateSalt();
boolean privateSaltExists = privateSalt != null && !privateSalt.isEmpty();
//If a private salt exists, we must generate a public salt to protect the integrity of the private salt.
//Or generate it if the instance is explicitly configured to do so:
if (privateSaltExists || isGeneratePublicSalt()) {
publicSalt = getRandomNumberGenerator().nextBytes();
}
return publicSalt;
}
当HashRequest request本身有salt时,则充当publicSalt直接返回。当没有时,则需要去使用RandomNumberGenerator产生一个publicSalt,当DefaultHashService 的privateSalt 存在或者DefaultHashService 的generatePublicSalt标志为true,都会去产生publicSalt。
第三步:结合publicSalt和privateSalt
第四步:Hash computed = new SimpleHash(algorithmName, source, salt, iterations)这就就是上文我们强调的加密核心,不再说明了,可以到上面去找。
第五步:仅仅暴漏Hash computed中的某些属性,不把privateSalt 暴漏出去。至此DefaultHashService 的工作就全部完成了。
继续回到DefaultPasswordService:看下一个类HashFormat:
public interface HashFormat {
String format(Hash hash);
}
这个就是对Hash进行格式化输出而已,看下接口设计:
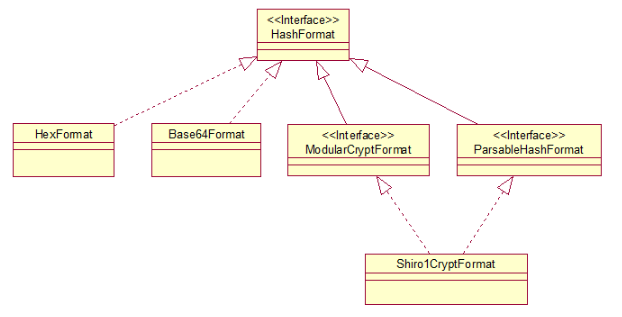
HexFormat如下
public class HexFormat implements HashFormat {
public String format(Hash hash) {
return hash != null ? hash.toHex() : null;
}
}
就是调用Hash本身的toHex方法,同理Hash本身也有String toBase64()方法,所以Base64Format也是同样的道理。
ModularCryptFormat和ParsableHashFormat 如下
public interface ModularCryptFormat extends HashFormat {
public static final String TOKEN_DELIMITER = "$";
String getId();
}
public interface ParsableHashFormat extends HashFormat {
Hash parse(String formatted);
}
他们的实现类Shiro1CryptFormat,来看看是如何format的和如何parse的:
public String format(Hash hash) {
if (hash == null) {
return null;
}
String algorithmName = hash.getAlgorithmName();
ByteSource salt = hash.getSalt();
int iterations = hash.getIterations();
StringBuilder sb = new StringBuilder(MCF_PREFIX).append(algorithmName).append(TOKEN_DELIMITER).append(iterations).append(TOKEN_DELIMITER);
if (salt != null) {
sb.append(salt.toBase64());
}
sb.append(TOKEN_DELIMITER);
sb.append(hash.toBase64());
return sb.toString();
}
format就是将一些算法信息、hash次数、salt等进行字符串的拼接,parse过程则是根据拼接的信息逆向获取算法信息、hash次数、salt等信息而已。这里就终于明白了,为什么PasswordMatcher 对服务器端存储的密码分成Hash和String来处理了,他们都是存储算法、salt、hash次数等信息的地方,Hash直接是以结构化的类来存储,而String则是以格式化的字符串来存储,需要parse才能获取算法、salt等信息。
HashFormat则也完成了。DefaultPasswordService还剩最后一个HashFormatFactory了,它则是用来生成不同的HashFormat的。
public interface HashFormatFactory {
HashFormat getInstance(String token);
}
根据String密码(格式化过的)来寻找对应的HashFormat。这里不再详细介绍了,有兴趣的可以自己去研究。
回到我们关注的重点,密码匹配过程:DefaultPasswordService
public DefaultPasswordService() {
this.hashFormatWarned = false;
DefaultHashService hashService = new DefaultHashService();
hashService.setHashAlgorithmName(DEFAULT_HASH_ALGORITHM);
hashService.setHashIterations(DEFAULT_HASH_ITERATIONS);
hashService.setGeneratePublicSalt(true); //always want generated salts for user passwords to be most secure
this.hashService = hashService;
this.hashFormat = new Shiro1CryptFormat();
this.hashFormatFactory = new DefaultHashFormatFactory();
}
使用了,DefaultHashService 和Shiro1CryptFormat和DefaultHashFormatFactory。
先来看看是如何匹配加密密码是String的,后面再看看是如何匹配Hash的
public boolean passwordsMatch(Object submittedPlaintext, String saved) {
ByteSource plaintextBytes = createByteSource(submittedPlaintext);
if (saved == null || saved.length() == 0) {
return plaintextBytes == null || plaintextBytes.isEmpty();
} else {
if (plaintextBytes == null || plaintextBytes.isEmpty()) {
return false;
}
}
//First check to see if we can reconstitute the original hash - this allows us to
//perform password hash comparisons even for previously saved passwords that don't
//match the current HashService configuration values. This is a very nice feature
//for password comparisons because it ensures backwards compatibility even after
//configuration changes.
HashFormat discoveredFormat = this.hashFormatFactory.getInstance(saved);
if (discoveredFormat != null && discoveredFormat instanceof ParsableHashFormat) {
ParsableHashFormat parsableHashFormat = (ParsableHashFormat)discoveredFormat;
Hash savedHash = parsableHashFormat.parse(saved);
return passwordsMatch(submittedPlaintext, savedHash);
}
//If we're at this point in the method's execution, We couldn't reconstitute the original hash.
//So, we need to hash the submittedPlaintext using current HashService configuration and then
//compare the formatted output with the saved string. This will correctly compare passwords,
//but does not allow changing the HashService configuration without breaking previously saved
//passwords:
//The saved text value can't be reconstituted into a Hash instance. We need to format the
//submittedPlaintext and then compare this formatted value with the saved value:
HashRequest request = createHashRequest(plaintextBytes);
Hash computed = this.hashService.computeHash(request);
String formatted = this.hashFormat.format(computed);
return saved.equals(formatted);
}
分成了两个分支,第一个分支就是能将加密的String密码使用HashFormat解析成Hash,然后调用public boolean passwordsMatch(Object plaintext, Hash saved)即Hash的匹配方式,第二个分支就是,不能解析的情况下,把原始密码封装成HashRequest ,然后使用HashService来讲HashRequest计算出一个Hash,再用HashFormat来格式化它变成String字符串,两个字符串进行equals比较。
对于Hash的匹配方式:
public boolean passwordsMatch(Object plaintext, Hash saved) {
ByteSource plaintextBytes = createByteSource(plaintext);
if (saved == null || saved.isEmpty()) {
return plaintextBytes == null || plaintextBytes.isEmpty();
} else {
if (plaintextBytes == null || plaintextBytes.isEmpty()) {
return false;
}
}
HashRequest request = buildHashRequest(plaintextBytes, saved);
Hash computed = this.hashService.computeHash(request);
return saved.equals(computed);
}
protected HashRequest buildHashRequest(ByteSource plaintext, Hash saved) {
//keep everything from the saved hash except for the source:
return new HashRequest.Builder().setSource(plaintext)
//now use the existing saved data:
.setAlgorithmName(saved.getAlgorithmName())
.setSalt(saved.getSalt())
.setIterations(saved.getIterations())
.build();
}
这个过程就是我们之前设想的过程,就是很据已由的Hash saved的算法、salt、hash次数对Object plaintext进行同样的加密过程,然后匹配saved.equals(computed)的信息是否一致。至此我们就走通了PasswordMatcher的整个过程。这是CredentialsMatcher的第二个分支,我们继续看CredentialsMatcher的第三个分支SimpleCredentialsMatcher:
public boolean doCredentialsMatch(AuthenticationToken token, AuthenticationInfo info) {
Object tokenCredentials = getCredentials(token);
Object accountCredentials = getCredentials(info);
return equals(tokenCredentials, accountCredentials);
}
protected Object getCredentials(AuthenticationToken token) {
return token.getCredentials();
}
protected Object getCredentials(AuthenticationInfo info) {
return info.getCredentials();
}
protected boolean equals(Object tokenCredentials, Object accountCredentials) {
if (log.isDebugEnabled()) {
log.debug("Performing credentials equality check for tokenCredentials of type [" +
tokenCredentials.getClass().getName() + " and accountCredentials of type [" +
accountCredentials.getClass().getName() + "]");
}
if (isByteSource(tokenCredentials) && isByteSource(accountCredentials)) {
if (log.isDebugEnabled()) {
log.debug("Both credentials arguments can be easily converted to byte arrays. Performing " +
"array equals comparison");
}
byte[] tokenBytes = toBytes(tokenCredentials);
byte[] accountBytes = toBytes(accountCredentials);
return Arrays.equals(tokenBytes, accountBytes);
} else {
return accountCredentials.equals(tokenCredentials);
}
}
它的实现比较简单,就是直接比较AuthenticationToken的getCredentials() 和AuthenticationInfo 的getCredentials()内容,若为ByteSource则匹配下具体的内容,否则直接匹配引用。
看下它的子类HashedCredentialsMatcher的匹配过程:
public boolean doCredentialsMatch(AuthenticationToken token, AuthenticationInfo info) {
Object tokenHashedCredentials = hashProvidedCredentials(token, info);
Object accountCredentials = getCredentials(info);
return equals(tokenHashedCredentials, accountCredentials);
}
其中equals方法仍然是调用父类的方法,即一旦为ByteSource则进行byte匹配,否则进行引用匹配。只是这里的tokenHashedCredentials 和accountCredentials 和父类的方式不一样,如下:
protected Object hashProvidedCredentials(AuthenticationToken token, AuthenticationInfo info) {
Object salt = null;
if (info instanceof SaltedAuthenticationInfo) {
salt = ((SaltedAuthenticationInfo) info).getCredentialsSalt();
} else {
//retain 1.0 backwards compatibility:
if (isHashSalted()) {
salt = getSalt(token);
}
}
return hashProvidedCredentials(token.getCredentials(), salt, getHashIterations());
}
protected Hash hashProvidedCredentials(Object credentials, Object salt, int hashIterations) {
String hashAlgorithmName = assertHashAlgorithmName();
return new SimpleHash(hashAlgorithmName, credentials, salt, hashIterations);
}
可以看到仍然是使用算法名称和credentials(用户提交的未加密的)、salt、hash次数构建一个SimpleHash(构造时进行加密)。
再看对于已加密的credentials则是也构建一个SimpleHash,但是不再进行加密过程:
protected Object getCredentials(AuthenticationInfo info) {
Object credentials = info.getCredentials();
byte[] storedBytes = toBytes(credentials);
if (credentials instanceof String || credentials instanceof char[]) {
//account.credentials were a char[] or String, so
//we need to do text decoding first:
if (isStoredCredentialsHexEncoded()) {
storedBytes = Hex.decode(storedBytes);
} else {
storedBytes = Base64.decode(storedBytes);
}
}
AbstractHash hash = newHashInstance();
hash.setBytes(storedBytes);
return hash;
}
protected AbstractHash newHashInstance() {
String hashAlgorithmName = assertHashAlgorithmName();
return new SimpleHash(hashAlgorithmName);
}
对于HashedCredentialsMatcher也就是说AuthenticationToken token, AuthenticationInfo info都去构建一个SimpleHash,前者构建时执行加密过程,后者(已加密)不需要去执行加密过程,然后匹配这两个SimpleHash是否一致。然后就是HashedCredentialsMatcher的子类(全部被标记为已废弃),如Md5CredentialsMatcher:
public class Md5CredentialsMatcher extends HashedCredentialsMatcher {
public Md5CredentialsMatcher() {
super();
setHashAlgorithmName(Md5Hash.ALGORITHM_NAME);
}
}
仅仅是将HashedCredentialsMatcher的算法改为md5,所以Md5CredentialsMatcher 本身就没有存在的价值。HashedCredentialsMatcher其他子类都是同样的道理。
至此CredentialsMatcher的三个分支都完成了。
已经很长了,下一篇文章以具体的案例来使用上述原理。
来源: http://lgbolgger.iteye.com/blog/2168520
