月度归档:2017年06月

Spring Boot日志管理

在研究spring boot访问mongodb中发现有大量日志信息输出于是到网络上搜索了一下, 发现下面介绍日志信息比较详细, 抄录如下

Spring Boot在所有内部日志中使用Commons Logging,但是默认配置也提供了对常用日志的支持,如:Java Util Logging,Log4J, Log4J2和Logback。每种Logger都可以通过配置使用控制台或者文件输出日志内容。

格式化日志

默认的日志输出如下:

1

2016-04-13 08:23:50.120 INFO 37397 --- [ main] org.hibernate.Version : HHH000412: Hibernate Core {4.3.11.Final}

输出内容元素具体如下:

时间日期 — 精确到毫秒
日志级别 — ERROR, WARN, INFO, DEBUG or TRACE
进程ID
分隔符 — --- 标识实际日志的开始
线程名 — 方括号括起来(可能会截断控制台输出)
Logger名 — 通常使用源代码的类名
日志内容

控制台输出

在Spring Boot中默认配置了ERROR、WARN和INFO级别的日志输出到控制台。

我们可以通过两种方式切换至DEBUG级别:

在运行命令后加入--debug标志,如:$ java -jar myapp.jar --debug
在application.properties中配置debug=true,该属性置为true的时候,核心Logger(包含嵌入式容器、hibernate、spring)会输出更多内容,但是你自己应用的日志并不会输出为DEBUG级别。

多彩输出

如果你的终端支持ANSI,设置彩色输出会让日志更具可读性。通过在application.properties中设置spring.output.ansi.enabled参数来支持。

NEVER:禁用ANSI-colored输出(默认项)
DETECT:会检查终端是否支持ANSI,是的话就采用彩色输出(推荐项)
ALWAYS:总是使用ANSI-colored格式输出,若终端不支持的时候,会有很多干扰信息,不推荐使用

文件输出

Spring Boot默认配置只会输出到控制台,并不会记录到文件中,但是我们通常生产环境使用时都需要以文件方式记录。

若要增加文件输出,需要在application.properties中配置logging.file或logging.path属性。

logging.file,设置文件,可以是绝对路径,也可以是相对路径。如:logging.file=my.log
logging.path,设置目录,会在该目录下创建spring.log文件,并写入日志内容,如:logging.path=/var/log

日志文件会在10Mb大小的时候被截断,产生新的日志文件,默认级别为:ERROR、WARN、INFO
级别控制

在Spring Boot中只需要在application.properties中进行配置完成日志记录的级别控制。

配置格式:logging.level.*=LEVEL

logging.level:日志级别控制前缀,*为包名或Logger名
LEVEL:选项TRACE, DEBUG, INFO, WARN, ERROR, FATAL, OFF

举例:

logging.level.com.didispace=DEBUG:com.didispace包下所有class以DEBUG级别输出
logging.level.root=WARN:root日志以WARN级别输出

自定义日志配置

由于日志服务一般都在ApplicationContext创建前就初始化了,它并不是必须通过Spring的配置文件控制。因此通过系统属性和传统的Spring Boot外部配置文件依然可以很好的支持日志控制和管理。

根据不同的日志系统,你可以按如下规则组织配置文件名,就能被正确加载:

Logback:logback-spring.xml, logback-spring.groovy, logback.xml, logback.groovy
Log4j:log4j-spring.properties, log4j-spring.xml, log4j.properties, log4j.xml
Log4j2:log4j2-spring.xml, log4j2.xml
JDK (Java Util Logging):logging.properties

Spring Boot官方推荐优先使用带有-spring的文件名作为你的日志配置(如使用logback-spring.xml,而不是logback.xml)
自定义输出格式

在Spring Boot中可以通过在application.properties配置如下参数控制输出格式:

logging.pattern.console:定义输出到控制台的样式(不支持JDK Logger)
logging.pattern.file:定义输出到文件的样式(不支持JDK Logger)

原文:  http://blog.didispace.com/springbootlog/

spring boot访问mongodb方法2

前面已经通过spring boot完成了对mongodb的集群访问, 但是访问方法中应用的配置是固定, 详情参考: spring boot访问mongodb副本集方法1

这里我们将完善前面的程序, 变为一个使用的, 可用通过控制台或者参数文件进行设置的可用系统

一. spring boot中传参的方法

 1、自动化配置

spring Boot 对于开发人员最大的好处在于可以对 Spring 应用进行自动配置。Spring Boot 会根据应用中声明的第三方依赖来自动配置 Spring 框架,而不需要进行显式的声明。比如
当声明了对 HSQLDB 的依赖时,Spring Boot 会自动配置成使用 HSQLDB 进行数据库操作。

Spring Boot 推荐采用基于 Java 注解的配置方式,而不是传统的 XML。只需要在主配置 Java 类上添加“@EnableAutoConfiguration”注解就可以启用自动配置。Spring Boot 的自动配置
功能是没有侵入性的,只是作为一种基本的默认实现。开发人员可以通过定义其他 bean 来替代自动配置所提供的功能。比如当应用中定义了自己的数据源 bean 时,自动配置所提供的
HSQLDB 就不会生效。这给予了开发人员很大的灵活性。既可以快速的创建一个可以立即运行的原型应用,又可以不断的修改和调整以适应应用开发在不同阶段的需要。可能在应用最开始的时
候,嵌入式的内存数据库(如 HSQLDB)就足够了,在后期则需要换成 MySQL 等数据库。Spring Boot 使得这样的切换变得很简单。

2、外部化的配置

在应用中管理配置并不是一个容易的任务,尤其是在应用需要部署到多个环境中时。通常会需要为每个环境提供一个对应的属性文件,用来配置各自的数据库连接信息、服务器信息和第
三方服务账号等。通常的应用部署会包含开发、测试和生产等若干个环境。不同的环境之间的配置存在覆盖关系。测试环境中的配置会覆盖开发环境,而生产环境中的配置会覆盖测试环境。
Spring 框架本身提供了多种的方式来管理配置属性文件。Spring 3.1 之前可以使用 PropertyPlaceholderConfigurer。Spring 3.1 引入了新的环境(Environment)和概要信息(Profile)
API,是一种更加灵活的处理不同环境和配置文件的方式。不过 Spring 这些配置管理方式的问题在于选择太多,让开发人员无所适从。Spring Boot 提供了一种统一的方式来管理应用的配置
,允许开发人员使用属性文件、YAML 文件、环境变量和命令行参数来定义优先级不同的配置值。

Spring Boot 所提供的配置优先级顺序比较复杂。按照优先级从高到低的顺序,具体的列表如下所示。

(1) 命令行参数
(2) java:comp/env 里的JNDI属性
(3) JVM系统属性
(4) 操作系统环境变量
(5) 随机生成的带 random.* 前缀的属性(在设置其他属性时,可以引用它们,比如 ${random.
long} )
(6) 应用程序以外的application.properties或者appliaction.yml文件
(7) 打包在应用程序内的application.properties或者appliaction.yml文件
(8) 通过 @PropertySource 标注的属性源
(9) 默认属性

这个列表按照优先级排序,也就是说,任何在高优先级属性源里设置的属性都会覆盖低优先级的相同属性。例如,命令行参数会覆盖其他属性源里的属性。

application.properties和application.yml文件能放在以下四个位置。
(1) 外置,在相对于应用程序运行目录的/config子目录里。
(2) 外置,在应用程序运行的目录里。
(3) 内置,在config包内。
(4) 内置,在Classpath根目录。
同样,这个列表按照优先级排序。也就是说,/config子目录里的application.properties会覆盖应用程序Classpath里的application.properties中的相同属性。
此外,如果我们在同一优先级位置同时有application.properties和application.yml,那么application.yml里的属性会覆盖application.properties里的属性。
命令行参数

通过Java -jar app.jar --name="Spring" --server.port=9090方式来传递参数。

SpringApplication 类默认会把以“--”开头的命令行参数转化成应用中可以使用的配置参数,如 “--name=Alex” 会设置配置参数 “name” 的值为 “Alex”.

可以使用的参数可以是我们自己定义的,也可以是Spring Boot中默认的参数。

注意:命令行参数在app.jar的后面!

可以通过SpringApplication.setAddCommandLineProperties(false)禁用命令行配置。
Java系统属性

注意Java系统属性位置java -Dname="isea533" -jar app.jar,可以配置的属性都是一样的,优先级不同。

例如java -Dname="isea533" -jar app.jar --name="Spring!"中name值为Spring.

有些系统,关于一些数据库或其他第三方账户等信息,由于安全问题,其配置并不会提前配置在项目中暴露给开发人员。
对于这种情况,我们在运行程序的时候,可以通过参数指定一个外部配置文件。
以 demo.jar 为例,方法如下: java -jar demo.jar --spring.config.location=/opt/config/application.properties

其中文件名随便定义,无固定要求。

RandomValuePropertySource

RandomValuePropertySource 可以用来生成测试所需要的各种不同类型的随机值,从而免去了在代码中生成的麻烦。RandomValuePropertySource 可以生成数字和字符串。数字的类型
包含 int 和 long,可以限定数字的大小范围。以“random.”作为前缀的配置属性名称由 RandomValuePropertySource 来生成:

系统中用到随机数的地方,例如 使用 RandomValuePropertySource 生成的配置属性:

user.id=${random.value}
user.count=${random.int}
user.max=${random.long}
user.number=${random.int(100)}
user.range=${random.int[100, 1000]

random.int*支持value参数和,max参数,当提供max参数的时候,value就是最小值

3. 读取属性

读取application.yml中的localhost配置的值

package com.gwc.context;

import org.springframework.boot.context.properties.ConfigurationProperties;
import org.springframework.stereotype.Component;

/**
* Created by gwcheng on 2017/3/6.
*/
@Component
@ConfigurationProperties
public class SystemProperties
{
private String localhost;

public String getLocalhost() {
return localhost;
}

public void setLocalhost(String localhost) {
this.localhost = localhost;
}
}

还可以在Bean中使用

@Value("${server.port}")
private String serverPort;

来读取配置文件中的属性值

当前目录的“/config”子目录。
当前目录。
classpath 中的“/config”包。
classpath

上面的顺序也表示了该位置上包含的属性文件的优先级。优先级按照从高到低的顺序排列。 即:/config优先于classpath根目录

可以通过“spring.config.name”配置属性来指定不同的属性文件名称。也可以通过“spring.config.location”来添加额外的属性文件的搜索路径。如果应用中包含多个 profile,
可以为每个 profile 定义各自的属性文件,按照“application-{profile}”来命名。

@PropertySource优先级比较

这个注解可以指定具体的属性配置文件,优先级比较低。

SpringApplication.setDefaultProperties

例如:

SpringApplication application = new SpringApplication(Application.class);
Map<String, Object> defaultMap = new HashMap<String, Object>();
defaultMap.put("name", "Isea-Blog");
//还可以是Properties对象
application.setDefaultProperties(defaultMap);
application.run(args);
应用程序使用属性@Value(“${xxx}”)

对于配置属性,可以在代码中通过“@Value”来使用,如:

@RestController
@EnableAutoConfiguration
public class Application {
@Value("${name}")
private String name;
@RequestMapping("/")
String home() {
return String.format("Hello %s!", name);
}
}

变量 name 的值来自配置属性中的“name”属性。

比如application.properties有 port=8081

@Value("${port:8082}")
private String port;

即可获取8081这个值

属性占位符

例如:

app.name=MyApp

app.description=${app.name} is a Spring Boot application

可以在配置文件中引用前面配置过的属性(优先级前面配置过的这里都能用)。

通过如${app.name:默认名称}方法还可以设置默认值,当找不到引用的属性时,会使用默认的属性。

由于${}方式会被Maven处理。如果你pom继承的spring-boot-starter-parent,Spring Boot 已经将maven-resources-plugins默认的${}方式改为了@ @方式,例如@name@。

如果你是引入的Spring Boot,你可以修改使用其他的分隔符

通过属性占位符还能缩短命令参数

例如修改web默认端口需要使用--server.port=9090方式,如果在配置中写上:

server.port=${port:8080}

那么就可以使用更短的--port=9090,当不提供该参数的时候使用默认值8080。

属性名匹配规则

例如有如下配置对象:

@Component
@ConfigurationProperties(prefix="person")
public class ConnectionSettings {
private String firstName;
}

firstName可以使用的属性名如下:

person.firstName,标准的驼峰式命名
person.first-name,虚线(-)分割方式,推荐在.properties和.yml配置文件中使用
PERSON_FIRST_NAME,大写下划线形式,建议在系统环境变量中使用

属性验证

可以使用JSR-303注解进行验证,例如:

@Component
@ConfigurationProperties(prefix="connection")
public class ConnectionSettings {

@NotNull
private InetAddress remoteAddress;

// ... getters and setters

}

这些内容已经足够本文使用来做一个可以配置的连接mongodb的程序了, 网络上还有更多的介绍关于spring boot属性文件的, 大家可以去百度搜搜。

二. 改造 spring boot的mongodb项目

1. 改造中遇到的一个问题

经过上面的关于spring boot的摸索, 编写了如下一个代码

package cn.iigrowing.study.mongodb;

... 代码详情后面会提供

@Component    // 这个很重要, 否则类不会被扫描
public class MyMongoClient {
 @Bean   // 生命这个是一个bean
 @ConditionalOnMissingBean(MongoClient.class)   // 说明这个替换那个默认的
 public MongoClient getMongodbClients() {
 
 ..... 
 
 MongoCredential credential = MongoCredential.createMongoCRCredential(myUsername, database, myPassword.toCharArray());
 MongoClient client = new MongoClient(addresses, Arrays.asList(credential));
 return client;
 }
 
 // mongodb://192.168.128.189:27017,192.168.128.132:27017,192.168.128.133:27017/mytest03
 @Value("${mongodb.uri}")    // 获取uri然后进行解析
 private String myUri;
 
 @Value("${mongodb.username}")  // 获取用户名
 private String myUsername;
 
 @Value("${mongodb.password}")  // 获取密码
 private String myPassword;

}

然后启动程序, 最后报如下异常:

java.lang.IllegalStateException: Failed to execute CommandLineRunner
 at org.springframework.boot.SpringApplication.callRunner(SpringApplication.java:779)
 at org.springframework.boot.SpringApplication.callRunners(SpringApplication.java:760)
 at org.springframework.boot.SpringApplication.afterRefresh(SpringApplication.java:747)
 at org.springframework.boot.SpringApplication.run(SpringApplication.java:315)
 at org.springframework.boot.SpringApplication.run(SpringApplication.java:1162)
 at org.springframework.boot.SpringApplication.run(SpringApplication.java:1151)
 at cn.iigrowing.study.mongodb.Application.main(Application.java:14)
Caused by: org.springframework.data.mongodb.UncategorizedMongoDbException: Command failed with error 13: 'not authorized on test to execute command { insert: "customer", ordered: true, documents: [ { _id: ObjectId('5955fad2bb844c23906eff87'), _class: "cn.iigrowing.study.mongodb.Customer", firstName: "Alice", lastName: "Smith", address: { aa: "100000", ddd: "20000" } } ] }' on server node3.iigrowing.cn:27017. The full response is { "ok" : 0.0, "errmsg" : "not authorized on test to execute command { insert: \"customer\", ordered: true, documents: [ { _id: ObjectId('5955fad2bb844c23906eff87'), _class: \"cn.iigrowing.study.mongodb.Customer\", firstName: \"Alice\", lastName: \"Smith\", address: { aa: \"100000\", ddd: \"20000\" } } ] }", "code" : 13 }; nested exception is com.mongodb.MongoCommandException: Command failed with error 13: 'not authorized on test to execute command { insert: "customer", ordered: true, documents: [ { _id: ObjectId('5955fad2bb844c23906eff87'), _class: "cn.iigrowing.study.mongodb.Customer", firstName: "Alice", lastName: "Smith", address: { aa: "100000", ddd: "20000" } } ] }' on server node3.iigrowing.cn:27017. The full response is { "ok" : 0.0, "errmsg" : "not authorized on test to execute command { insert: \"customer\", ordered: true, documents: [ { _id: ObjectId('5955fad2bb844c23906eff87'), _class: \"cn.iigrowing.study.mongodb.Customer\", firstName: \"Alice\", lastName: \"Smith\", address: { aa: \"100000\", ddd: \"20000\" } } ] }", "code" : 13 }
 at org.springframework.data.mongodb.core.MongoExceptionTranslator.translateExceptionIfPossible(MongoExceptionTranslator.java:107)
 at org.springframework.data.mongodb.core.MongoTemplate.potentiallyConvertRuntimeException(MongoTemplate.java:2135)
 at org.springframework.data.mongodb.core.MongoTemplate.execute(MongoTemplate.java:481)
 at org.springframework.data.mongodb.core.MongoTemplate.insertDBObject(MongoTemplate.java:1046)
 at org.springframework.data.mongodb.core.MongoTemplate.doInsert(MongoTemplate.java:855)
 at org.springframework.data.mongodb.core.MongoTemplate.insert(MongoTemplate.java:796)
 at org.springframework.data.mongodb.repository.support.SimpleMongoRepository.save(SimpleMongoRepository.java:80)
 at sun.reflect.NativeMethodAccessorImpl.invoke0(Native Method)
 at sun.reflect.NativeMethodAccessorImpl.invoke(Unknown Source)
 at sun.reflect.DelegatingMethodAccessorImpl.invoke(Unknown Source)
 at java.lang.reflect.Method.invoke(Unknown Source)
 at org.springframework.data.repository.core.support.RepositoryFactorySupport$QueryExecutorMethodInterceptor.executeMethodOn(RepositoryFactorySupport.java:504)
 at org.springframework.data.repository.core.support.RepositoryFactorySupport$QueryExecutorMethodInterceptor.doInvoke(RepositoryFactorySupport.java:489)
 at org.springframework.data.repository.core.support.RepositoryFactorySupport$QueryExecutorMethodInterceptor.invoke(RepositoryFactorySupport.java:461)
 at org.springframework.aop.framework.ReflectiveMethodInvocation.proceed(ReflectiveMethodInvocation.java:179)
 at org.springframework.aop.interceptor.ExposeInvocationInterceptor.invoke(ExposeInvocationInterceptor.java:92)
 at org.springframework.aop.framework.ReflectiveMethodInvocation.proceed(ReflectiveMethodInvocation.java:179)
 at org.springframework.data.repository.core.support.SurroundingTransactionDetectorMethodInterceptor.invoke(SurroundingTransactionDetectorMethodInterceptor.java:57)
 at org.springframework.aop.framework.ReflectiveMethodInvocation.proceed(ReflectiveMethodInvocation.java:179)
 at org.springframework.aop.framework.JdkDynamicAopProxy.invoke(JdkDynamicAopProxy.java:213)
 at com.sun.proxy.$Proxy45.save(Unknown Source)
 at cn.iigrowing.study.mongodb.Application.run(Application.java:28)
 at org.springframework.boot.SpringApplication.callRunner(SpringApplication.java:776)
 ... 6 common frames omitted
Caused by: com.mongodb.MongoCommandException: Command failed with error 13: 'not authorized on test to execute command { insert: "customer", ordered: true, documents: [ { _id: ObjectId('5955fad2bb844c23906eff87'), _class: "cn.iigrowing.study.mongodb.Customer", firstName: "Alice", lastName: "Smith", address: { aa: "100000", ddd: "20000" } } ] }' on server node3.iigrowing.cn:27017. The full response is { "ok" : 0.0, "errmsg" : "not authorized on test to execute command { insert: \"customer\", ordered: true, documents: [ { _id: ObjectId('5955fad2bb844c23906eff87'), _class: \"cn.iigrowing.study.mongodb.Customer\", firstName: \"Alice\", lastName: \"Smith\", address: { aa: \"100000\", ddd: \"20000\" } } ] }", "code" : 13 }
 at com.mongodb.connection.ProtocolHelper.getCommandFailureException(ProtocolHelper.java:115)
 at com.mongodb.connection.WriteCommandProtocol.receiveMessage(WriteCommandProtocol.java:268)

为了查明原因仔细检查了前文:   spring boot访问mongodb副本集方法1

里面的访问方法, 并且运行了那个程序, 程序正确执行, 说明用户名和密码等都正确, 那到底是哪里的问题?

最后发现两个项目的默认配置文件不同, 如下图

spring-boot中不同配置名称造成启动问题

原因分析, 在spring boot中 ,程序会自动扫描配置, 根据这些配置属性, 来启动一系列的相关程序, 在刚刚有问题程序中, 由于没有采用默认的spring的mongodb的配置名称, 可能造成spring boot的mongodb环境不完整,因此有问题, 然后修改配置问题后, 启动程序, 程序正确运行了。

另外程序运行过程中有大量日志输出, 不利观察程序运行情况, 对日志进行了设置, 请参考: Spring Boot日志管理

然后在application.properties 文件中, 添加 logging.level.root=INFO

修改了默认的日志级别

2. 修正后的改造

修改应用的 application.properties 配置文件如下

spring.data.mongodb.username=mytest03
spring.data.mongodb.password=password
spring.data.mongodb.uri=mongodb://192.168.128.189:27017,192.168.128.132:27017,192.168.128.133:27017/mytest03

logging.level.root=INFO

以及读取的配置文件的部分

@Value("${spring.data.mongodb.uri}")
 private String myUri;
 
 @Value("${spring.data.mongodb.username}")
 private String myUsername;
 
 @Value("${spring.data.mongodb.password}")
 private String myPassword;

然后从新编译了程序, 启动程序后运行正确

程序源代码 请下载    iigrowing.mongo02


3. 测试各种修改参数的方法

拷贝jar文件到一个临时目录中

创建一个config目录, 在目录里面创建配置文件application.properties

内容下

spring.data.mongodb.username=mytest03
spring.data.mongodb.password=password
spring.data.mongodb.uri=mongodb://192.168.128.133:27017,192.168.128.132:27017,192.168.128.189:27017/mytest03

logging.level.root=INFO

然后用  java -jar iigrowing.mongo02-0.0.1.jar

最后对比两次输出的结果如下图

spring-boot不同目录下配置的优先级

通过上图我们应该能了解到, 文章前面说的 配置文件的优先级了,

其他的优先级还有很多,大家可以自己去测试了。

spring boot访问mongodb副本集方法1

前面介绍了mongodb集群安装方法, 主要是docker下安装副本集的, 然后介绍了spring 访问副本集的方法。

一. 准备工作

1. 您需要用docker 安装mongodb的副本集 集群, 参考: Docker部署一个MongoDB集群   通过这个您才有了可以操作的对象

2. 您需要看过前面的 spring 访问mongodb的文章, 这样您才能配置相关权限,和创建好数据库等, 请参考: spring访问mongodb集群

本文在最后会 给出相关代码

二. 遇到的问题

正常情况下在spring boot中配置 mongodb的链接可以用

spring.data.mongodb.uri=mongodb://localhost/test  方式
spring.data.mongodb.username=mytest03
spring.data.mongodb.password=password

通过上面的uri我们指定了 连接, 下面的是用户名和密码 但是这个方式紧急能指定一个 mongodb的服务器, 无法指定多个 经过搜索, 发现mongodb还有别的配置方式

下面是在    appendix-application-properties.adoc 文件中搜索到全部mongodb的配置
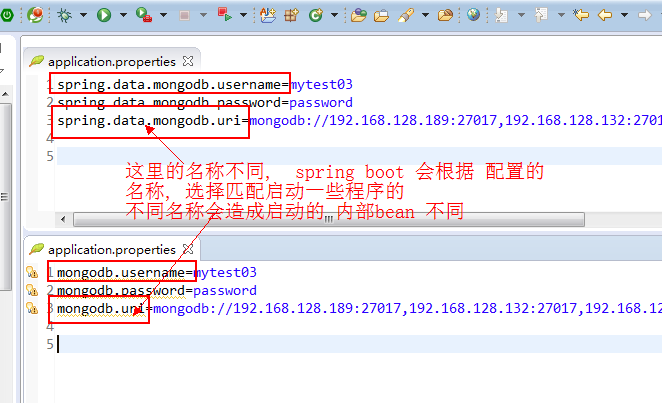
# MONGODB ({sc-spring-boot-autoconfigure}/mongo/MongoProperties.{sc-ext}[MongoProperties])
spring.data.mongodb.authentication-database= # Authentication database name.
spring.data.mongodb.database=test # Database name.
spring.data.mongodb.field-naming-strategy= # Fully qualified name of the FieldNamingStrategy to use.
spring.data.mongodb.grid-fs-database= # GridFS database name.
spring.data.mongodb.host=localhost # Mongo server host. Cannot be set with uri.
spring.data.mongodb.password= # Login password of the mongo server. Cannot be set with uri.
spring.data.mongodb.port=27017 # Mongo server port. Cannot be set with uri.
spring.data.mongodb.reactive-repositories.enabled=true # Enable Mongo reactive repositories.
spring.data.mongodb.repositories.enabled=true # Enable Mongo repositories.
spring.data.mongodb.uri=mongodb://localhost/test # Mongo database URI. Cannot be set with host, port and credentials.
spring.data.mongodb.username= # Login user of the mongo server. Cannot be set with uri.
另外这个文件还有很多 其他的配置, 大家都可以参考, 这个配置文件在spring boot的 源代码中

 1. 探索方法

采用下面的写法

spring.data.mongodb.uri=mongodb://mytest03:password@192.168.128.189:27017,mytest03:password@192.168.128.132:27017,mytest03:password@192.168.128.133:27017

结果运行时报解析配置异常

2. 探索方法

spring.data.mongodb.uri=mongodb://192.168.128.189:27017,192.168.128.132:27017,192.168.128.133:27017/mytest03

采用了上面的写法仍然出问题

最后通过搜索可以发现, 可以采用覆盖spring boot bean的方法覆盖掉系统默认呢的mongodb client的处理方法

三. 覆盖spring  boot的bean的方法解决mongodb的问题

 1. 覆盖的必要性

mongodb副本集中客户端连接
mongodb副本集中客户端连接

如上图, 在默认的 mongodb副本集链接中, 客户需要连接到主的 机器上, 但是若是副本集的主和从发生了切换, 就会造成 原来连接的不是主了, 因此影响工作。

在mongodb的客户端中支持同时连接多个的(对副本集进行支持的)

List<ServerAddress> addresses = new ArrayList<ServerAddress>();
 ServerAddress address1 = new ServerAddress("192.168.128.189", 27017);
 ServerAddress address2 = new ServerAddress("192.168.128.132", 27017);
 ServerAddress address3 = new ServerAddress("192.168.128.133", 27017);
 addresses.add(address1);
 addresses.add(address2);
 addresses.add(address3);

 MongoCredential credential = MongoCredential.createMongoCRCredential("mytest03", "mytest03", "password".toCharArray());
 MongoClient client = new MongoClient(addresses, Arrays.asList(credential));
 return client;

上面是连接方法

但是, 由于前面spring boot的配置中仅仅能配置一个ip地址, 因此对上面的多地址的客户端连接不支持, 因此spring boot的默认mongodb方法不能满足需求

 2. 自定义spring bean的方法解决问题

代码如下:

package cn.iigrowing.study.mongodb;

import java.util.ArrayList;
import java.util.Arrays;
import java.util.List;

import org.springframework.boot.autoconfigure.condition.ConditionalOnMissingBean;
import org.springframework.context.annotation.Bean;
import org.springframework.stereotype.Component;

import com.mongodb.MongoClient;
import com.mongodb.MongoCredential;
import com.mongodb.ServerAddress;

@Component
public class MongoClass {
 @Bean
 @ConditionalOnMissingBean(MongoClient.class)
 public MongoClient getMongodbClients() {
 
 
 List<ServerAddress> addresses = new ArrayList<ServerAddress>();
 ServerAddress address1 = new ServerAddress("192.168.128.189", 27017);
 ServerAddress address2 = new ServerAddress("192.168.128.132", 27017);
 ServerAddress address3 = new ServerAddress("192.168.128.133", 27017);
 addresses.add(address1);
 addresses.add(address2);
 addresses.add(address3);


 MongoCredential credential = MongoCredential.createMongoCRCredential("mytest03", "mytest03", "password".toCharArray());
 MongoClient client = new MongoClient(addresses, Arrays.asList(credential));
 return client;
 }

}


在上面代码中重点要注意的是:

@Bean 这个声明了一个bean
@ConditionalOnMissingBean(MongoClient.class) 这个非常重要,
这个是告诉系统, 下面的bean是要替换系统默认的那个bean的(mongodb)

最后

@Component这个是告诉spring boot 要扫描着类, 否则,前面的注解都没用。

本文的配置都是写在程序代码中的, 后面还会修改进行, 参数配置, 稍后提供相关的文档等

spring访问mongodb集群

前面采用docker方式搭建了一个mongodb的集群, 今天采用spring boot方式访问这个集群

本文 参考 Spring Boot中使用MongoDB数据库   内容, 一步一步进行实现,

另外, 本文需要的 mongodb集群是前文搭建的 一个集群, 没有准备好的 可以参考: Docker部署一个MongoDB集群

一。 配置java访问mongodb程序的主机的hosts文件

在前面集群安装中,采用了域名配置3个节点,这样在java的程序的主机上要进行配置

或者这些域名是dns能够正确解析的, 否则就出现如下图的socket连接超时的情况

mongo集群需要各个节点dns或者hosts文件不一致造成连接超时

为了解决问题,我们配置了我们的hosts文件图

正确配置Java访问mongodbhosts文件配置

在windows下要用管理员身份进行操作, 否则无法保存

 二。 编写java代码访问集群

package cn.iigrowing.study.mongodb;

import java.util.ArrayList;
import java.util.List;

import com.mongodb.BasicDBObject;
import com.mongodb.DB;
import com.mongodb.DBCollection;
import com.mongodb.DBCursor;
import com.mongodb.DBObject;
import com.mongodb.MongoClient;
import com.mongodb.ServerAddress;

public class TestMongoDBReplSet {
    public static void main(String[] args) {
        try {
            List<ServerAddress> addresses = new ArrayList<ServerAddress>();
            ServerAddress address1 = new ServerAddress("192.168.128.189", 27017);
            ServerAddress address2 = new ServerAddress("192.168.128.132", 27017);
            ServerAddress address3 = new ServerAddress("192.168.128.133", 27017);
            addresses.add(address1);
            addresses.add(address2);
            addresses.add(address3);
            MongoClient client = new MongoClient(addresses);
            DB db = client.getDB("test");
            DBCollection coll = db.getCollection("testdb");
            // 插入
            BasicDBObject object = new BasicDBObject();
            object.append("test2", "testval2");
            coll.insert(object);
            DBCursor dbCursor = coll.find();
            while (dbCursor.hasNext()) {
                DBObject dbObject = dbCursor.next();
                System.out.println(dbObject.toString());
            }
        } catch (Exception e) {
            e.printStackTrace();
        }
    }
}

拷贝上面程序到sts中, 运行后会报如下异常

"errmsg" : "not authorized on test to execute command { insert: \"testdb\"

原因是程序里面没有正确配置用户名和密码造成,修改程序里面的用户名和密码

注意:

为了访问mongodb的数据库系统,需要首先在mongo中添加相关的用户和数据库

然后用rockmongo创建数据库, 最后失败, 原因不详, 后来查询获取到在mongodb用 认证模式启动后, 必须超级管理员才能创建数据库,普通用户不能

关于权限信息参考:   MongoDB 用户和身份验证

另外, 在副本集这个集群模式中, 也必须在PRIMARY这个集群上才能创建。

由于对mongo了解的不多, 因此只好登录mongo的主节点进行操作

在mongodb的主的 机器中 运行  docker exec -t -i mongo bash

进入了容器里面, 然后运行mongo命令进入控制台, 如下:

[root@my03 rockmongo]# docker exec -t -i mongo bash
root@node3:/# mongo
MongoDB shell version: 2.6.5
connecting to: test
rs0:PRIMARY>
rs0:PRIMARY>


然后用下面命令登录  rs0:PRIMARY> db.auth("siteRootAdmin","password");
1


用下面命令创建数据库

rs0:PRIMARY> use mytest03;
switched to db mytest03

用下面命令 创建一个用户

rs0:PRIMARY> db.createUser( {
... user: "mytest03",
... pwd: "password",
... roles: [ { role: "dbOwner", db: "mytest03" } ]
... });
Successfully added user: {
"user" : "mytest03",
"roles" : [
{
"role" : "dbOwner",
"db" : "mytest03"
}
]
}

用下面命令登录

rs0:PRIMARY> db.auth("mytest03","password");
1


最后在修改java代码添加数据库的用户名和密码

下面是从网络上搜索到的 访问mongodb时的java例子

Java Code Examples for com.mongodb.MongoCredential

The following are top voted examples for showing how to use com.mongodb.MongoCredential. These examples are extracted from open source projects. You can vote up the examples you like and your votes will be used in our system to product more good examples.
+ Save this class to your library
Example 1
Project: Trivial4b   File: TrivialAPI.java View source code     9 votes     vote down vote up

private static DB conectar() {
    MongoClient mongoClient = null;
    MongoCredential mongoCredential = MongoCredential
            .createMongoCRCredential("trivialuser", "trivial",
                    "4btrivialmongouser".toCharArray());
    try {
        mongoClient = new MongoClient(new ServerAddress(
                "ds062797.mongolab.com", 62797),
                Arrays.asList(mongoCredential));
    } catch (UnknownHostException e) {
        e.printStackTrace();
    }

    DB db = mongoClient.getDB("trivial");
    System.out.println("Conexion creada con la base de datos");
    return db;
}
 

Example 2
Project: ff4j   File: FeatureStoreMongoCollectionCore1Test.java View source code     7 votes     vote down vote up

/**
 * Open real connection to MongoDB.
 *
 * @return
 *      target mongo client
 * @throws UnknownHostException
 *      exeption when creating server address
 */
private MongoClient getMongoClient() throws UnknownHostException {
    // Given (using real connection)
    MongoCredential credential = MongoCredential.createMongoCRCredential("username", "FF4J", "password".toCharArray());
    ServerAddress adr = new ServerAddress("localhost", 22012);
    return new MongoClient(adr, Arrays.asList(credential));
}
 

Example 3
Project: deep-spark   File: MongoReader.java View source code     6 votes     vote down vote up

/**
 * Init void.
 *
 * @param partition the partition
 */
public void init(Partition partition) {
    try {

        List<ServerAddress> addressList = new ArrayList<>();

        for (String s : (List<String>) ((DeepPartition) partition).splitWrapper().getReplicas()) {
            addressList.add(new ServerAddress(s));
        }

        //Credentials
        List<MongoCredential> mongoCredentials = new ArrayList<>();

        if (mongoDeepJobConfig.getUsername() != null && mongoDeepJobConfig.getPassword() != null) {
            MongoCredential credential = MongoCredential.createMongoCRCredential(mongoDeepJobConfig.getUsername(),
                    mongoDeepJobConfig.getDatabase(),
                    mongoDeepJobConfig.getPassword().toCharArray());
            mongoCredentials.add(credential);

        }

        mongoClient = new MongoClient(addressList, mongoCredentials);
        mongoClient.setReadPreference(ReadPreference.valueOf(mongoDeepJobConfig.getReadPreference()));
        db = mongoClient.getDB(mongoDeepJobConfig.getDatabase());
        collection = db.getCollection(mongoDeepJobConfig.getCollection());

        dbCursor = collection.find(generateFilterQuery((MongoPartition) partition),
                mongoDeepJobConfig.getDBFields());

    } catch (UnknownHostException e) {
        throw new DeepExtractorInitializationException(e);
    }
}
 

Example 4
Project: opensearchserver   File: DatabaseCrawlMongoDb.java View source code     6 votes     vote down vote up

MongoClient getMongoClient() throws URISyntaxException,
        UnknownHostException {
    String user = getUser();
    String password = getPassword();
    URI uri = new URI(getUrl());
    MongoCredential credential = null;
    if (!StringUtils.isEmpty(user) && !StringUtils.isEmpty(password)) {
        credential = MongoCredential.createMongoCRCredential(user,
                databaseName, password.toCharArray());
        return new MongoClient(new ServerAddress(uri.getHost(),
                uri.getPort()), Arrays.asList(credential));
    }
    return new MongoClient(new ServerAddress(uri.getHost(), uri.getPort()));
}
 

Example 5
Project: zest-java   File: MongoMapEntityStoreMixin.java View source code     6 votes     vote down vote up

@Override
public void activateService()
    throws Exception
{
    loadConfiguration();

    // Create Mongo driver and open the database
    if( username.isEmpty() )
    {
        mongo = new MongoClient( serverAddresses );
    }
    else
    {
        MongoCredential credential = MongoCredential.createMongoCRCredential( username, databaseName, password );
        mongo = new MongoClient( serverAddresses, Arrays.asList( credential ) );
    }
    db = mongo.getDB( databaseName );

    // Create index if needed
    db.requestStart();
    DBCollection entities = db.getCollection( collectionName );
    if( entities.getIndexInfo().isEmpty() )
    {
        entities.createIndex( new BasicDBObject( IDENTITY_COLUMN, 1 ) );
    }
    db.requestDone();
}
 

Example 6
Project: XBDD   File: ServletContextMongoClientFactory.java View source code     6 votes     vote down vote up

private MongoDBAccessor getMongoDBAccessor() throws UnknownHostException {
    final MongoClient mc;
    if (this.username != null) {
        MongoCredential credentials = MongoCredential.createMongoCRCredential(this.username, "admin", this.password);
        mc = new MongoClient(new ServerAddress(this.host, this.port), Arrays.asList(credentials));
    } else {
        mc = new MongoClient(this.host, this.port);
    }
    
    return new MongoDBAccessor(mc);
}
 

Example 7
Project: spacesimulator   File: MongoClientTest.java View source code     6 votes     vote down vote up

@Test
public void herokuTest() throws UnknownHostException {
    MongoCredential credential = MongoCredential.createMongoCRCredential("heroku_app25459577", "heroku_app25459577", "gsps2dbe8l7ovbot1jkto5lnid".toCharArray());
    MongoClient mongoClient = new MongoClient(new ServerAddress("ds041841.mongolab.com" , 41841), 
                            Arrays.asList(credential));
    MongoDatabase db = mongoClient.getDatabase("heroku_app25459577");
    ListCollectionsIterable<Document> list = db.listCollections();
    System.out.println(list.toString());        
    mongoClient.close();
}
 

Example 8
Project: metric   File: DashboardApi.java View source code     6 votes     vote down vote up

@Override
public void init() throws ServletException {
    try {
        Properties p = Conf.load("Mongo");
        ServerAddress addr = new ServerAddress(p.getProperty("host"),
                Numbers.parseInt(p.getProperty("port"), 27017));
        String database = p.getProperty("db");
        String username = p.getProperty("username");
        String password = p.getProperty("password");
        if (username == null || password == null) {
            mongo = new MongoClient(addr);
        } else {
            mongo = new MongoClient(addr, Collections.singletonList(MongoCredential.
                    createMongoCRCredential(username, database, password.toCharArray())));
        }
        db = mongo.getDB(database);

        maxTagValues = Numbers.parseInt(Conf.
                load("Dashboard").getProperty("max_tag_values"));
    } catch (IOException e) {
        throw new ServletException(e);
    }
}
 

Example 9
Project: incubator-brooklyn   File: MongoDBClientSupport.java View source code     6 votes     vote down vote up

private MongoClient baseClient(MongoClientOptions connectionOptions) {
    if (usesAuthentication) {
        MongoCredential credential = MongoCredential.createMongoCRCredential(username, authenticationDatabase, password.toCharArray());
        return new MongoClient(address, ImmutableList.of(credential), connectionOptions);
    } else {
        return new MongoClient(address, connectionOptions);
    }
}
 

Example 10
Project: muikku   File: MongoLogProvider.java View source code     6 votes     vote down vote up

@PostConstruct
public void init() {
  String user = pluginSettingsController.getPluginSetting("mongo-log", "database.user");
  String password = pluginSettingsController.getPluginSetting("mongo-log", "database.password");
  String host = pluginSettingsController.getPluginSetting("mongo-log", "database.host");
  String port = pluginSettingsController.getPluginSetting("mongo-log", "database.port");
  String database = pluginSettingsController.getPluginSetting("mongo-log", "database.name");

  try {
    if (StringUtils.isNotBlank(user) && StringUtils.isNotBlank(password) && StringUtils.isNumeric(port) && 
        StringUtils.isNotBlank(host) && StringUtils.isNotBlank(database)) {
      MongoCredential credential = MongoCredential.createMongoCRCredential(user, database, password.toCharArray());
      ServerAddress addr = new ServerAddress(host, NumberUtils.createInteger(port));
      mongo = new MongoClient(addr, Arrays.asList(credential));
      db = mongo.getDB(database);
    } else {
      logger.warning("Could not initialize mongo log because some of the settings were missing");
    }
  } catch (Exception e) {
    logger.warning("Cannot initialize connection to mongoDB");
    enabled = false;
  }
}
 

Example 11
Project: opencga   File: MongoCredentials.java View source code     6 votes     vote down vote up

public MongoCredentials(String mongoHost, int mongoPort, String mongoDbName, String mongoUser, String mongoPassword)
        throws IllegalOpenCGACredentialsException {
    dataStoreServerAddresses = new LinkedList<>();
    dataStoreServerAddresses.add(new DataStoreServerAddress(mongoHost, mongoPort));
    this.mongoDbName = mongoDbName;
    if (mongoUser != null && mongoPassword != null) {
        mongoCredentials = MongoCredential.createMongoCRCredential(mongoUser, mongoDbName, mongoPassword.toCharArray());
    }

    check();
}
 

Example 12
Project: IPM_MediaCenter   File: Database.java View source code     6 votes     vote down vote up

private Database() {
    MongoCredential credential = MongoCredential.createMongoCRCredential(SettingsManager.getSetting("mongo", "user"),
            SettingsManager.getSetting("mongo", "authentication_db"),
            SettingsManager.getSetting("mongo", "password").toCharArray());
    try {
        mongo = new MongoClient(new ServerAddress(SettingsManager.getSetting("mongo", "server"),
                SettingsManager.getIntegerSetting("mongo", "port")), Arrays.asList(credential));
        morphia = new Morphia();
        ds = morphia.createDatastore(mongo, SettingsManager.getSetting("mongo", "database"));
        ds.ensureIndexes();
    } catch (UnknownHostException e) {
        e.printStackTrace();
    }
}
 

Example 13
Project: SEAS   File: RestrictedService.java View source code     6 votes     vote down vote up

public void init() throws ServletException { 
     if(!gateInited) { 
       try { 
              // GATE home is setted, so it can be used by SAGA.
           ServletContext ctx = getServletContext(); 
           File gateHome = new File(ctx.getRealPath("/WEB-INF")); 
           Gate.setGateHome(gateHome); 
           // GATE user configuration file is setted. 
           Gate.setUserConfigFile(new File(gateHome, "user-gate.xml")); 
           //GATE is initialized as non visible.
           Gate.init(); 
           // We load the plugins that are going to be used by the SAGA modules.
           // Load ANNIE.
           Gate.getCreoleRegister().registerDirectories( 
                   ctx.getResource("/WEB-INF/plugins/ANNIE")); 
           // Load processingResources (from SAGA)
           Gate.getCreoleRegister().registerDirectories( 
                   ctx.getResource("/WEB-INF/plugins/processingResources"));
           // Load webProcessingResources (from SAGA)
           Gate.getCreoleRegister().registerDirectories( 
                   ctx.getResource("/WEB-INF/plugins/webProcessingResources")); 
           // Now we create the sentiment analysis modules that are going to be provided by the service.
           // English financial module.
         ArrayList<URL> dictionaries = new ArrayList<URL>();
dictionaries.add((new RestrictedService()).getClass().getResource("/LoughranMcDonald/lists.def"));
         modules.put("enFinancial", new DictionaryBasedSentimentAnalyzer("SAGA - Sentiment Analyzer", dictionaries));
         // English financial + emoticon module.
         ArrayList<URL> dictionaries2 = new ArrayList<URL>();
dictionaries2.add((new RestrictedService()).getClass().getResource("/LoughranMcDonald/lists.def"));
dictionaries2.add((new RestrictedService()).getClass().getResource("/resources/gazetteer/emoticon/lists.def")); 
         modules.put("enFinancialEmoticon", new DictionaryBasedSentimentAnalyzer("SAGA - Sentiment Analyzer", dictionaries2));
         // Mongo login
         String user = "";
         String password = "";
         MongoCredential credential = MongoCredential.createMongoCRCredential(user,"RestrictedDictionaries",password.toCharArray());
         MongoClient mongoClient = new MongoClient(new ServerAddress("localhost"), Arrays.asList(credential));
         db = mongoClient.getDB("RestrictedDictionaries");
         
         gateInited = true; 
       
     } 
     catch(Exception ex) { 
         throw new ServletException("Exception initialising GATE", ex); 
       } 
     } 
 }
 

Example 14
Project: Duke   File: MongoDBDataSource.java View source code     5 votes     vote down vote up

public RecordIterator getRecords() {
  verifyProperty(dbname, "database");
  verifyProperty(collectionName, "collection");
  
  try {
    final MongoClient mongo;
    final DB database;
    final DBCollection collection;
    final DBCursor result;
    
    final DBObject queryDocument;
    final DBObject projectionDocument;
    
 // authentication mecanism via MONGODB-CR authentication http://docs.mongodb.org/manual/core/authentication/#authentication-mongodb-cr
    if(auth.equals(AUTH_ON_DB)){
      verifyProperty(username, "user-name");
      verifyProperty(password, "password");
      
      mongo = new MongoClient(
        new ServerAddress(mongouri, port), 
        Arrays.asList(MongoCredential.createMongoCRCredential(username, dbname, password.toCharArray()))
      );
    }
    else if(auth.equals(AUTH_ON_ADMIN)){
      verifyProperty(username, "user-name");
      verifyProperty(password, "password");
      
        mongo = new MongoClient(
        new ServerAddress(mongouri, port), 
        Arrays.asList(MongoCredential.createMongoCRCredential(username, AUTH_ON_ADMIN, password.toCharArray()))
      );
    }
    else{
      mongo = new MongoClient(new ServerAddress(mongouri, port));
    }
    
    // get db, collection
    database = mongo.getDB(dbname);
    collection = database.getCollection(collectionName);
    
    // execute query
    queryDocument = (DBObject)JSON.parse(query);
    if(projection==null){
      result = collection.find(queryDocument);
    }
    else{
        projectionDocument = (DBObject)JSON.parse(projection);
        result = collection.find(queryDocument, projectionDocument);
    }
    
    // See: http://api.mongodb.org/java/current/com/mongodb/DBCursor.html#addOption(int)
    // and http://api.mongodb.org/java/current/com/mongodb/Bytes.html#QUERYOPTION_NOTIMEOUT
    if(noTimeOut){
      result.addOption(Bytes.QUERYOPTION_NOTIMEOUT);
    }
 
    return new MongoDBIterator(result, mongo);
  
  } catch (UnknownHostException e) {
    throw new RuntimeException(e);
  } catch (Exception ex){
 throw new DukeException(ex);
  }
}
 

Example 15
Project: MedtronicUploader   File: MedtronicCGMService.java View source code     5 votes     vote down vote up

/**
 * This method initializes only one instance of mongo db (It would be better use something like Google guice but ...) 
 * @return DB initialized successfully
 */
private boolean initializeDB(){
    dbURI = prefs.getString("MongoDB URI", null);
       collectionName = prefs.getString("Collection Name", "entries");
       dsCollectionName = prefs.getString("DeviceStatus Collection Name", "devicestatus");
       gdCollectionName = prefs.getString("gcdCollectionName", null);
       devicesCollectionName = "devices";
     
        db = null;
        if (dbURI != null) {
            log.debug("URI != null");
          
            try {
            if (!prefs.getBoolean("isMongoRest", false)){ 
                // connect to db gYumpKyCgbOhcAGOTXvkCcq4V04W6K1Z
                MongoClientURI uri = new MongoClientURI(dbURI.trim());
                Builder b = MongoClientOptions.builder();
                b.heartbeatConnectTimeout(150000);
                b.heartbeatFrequency(120000);
                b.heartbeatSocketTimeout(150000);
                b.maxWaitTime(150000);
                b.connectTimeout(150000);
                boolean bAchieved = false;
                String user = "";
                String password = "";
                String source = "";
                String host = "";
                String port = "";
                int iPort = -1;
                if  (dbURI.length() > 0){
                    String[] splitted = dbURI.split(":");
                    if (splitted.length >= 4 ){
                        user = splitted[1].substring(2);
                        if (splitted[2].indexOf("@") < 0)
                            bAchieved = false;
                        else{
                            password = splitted[2].substring(0,splitted[2].indexOf("@"));
                            host = splitted[2].substring(splitted[2].indexOf("@")+1, splitted[2].length());
                            if (splitted[3].indexOf("/") < 0)
                                bAchieved = false;
                            else{
                                port = splitted[3].substring(0, splitted[3].indexOf("/"));
                                source = splitted[3].substring(splitted[3].indexOf("/")+1, splitted[3].length());
                                try{
                                iPort = Integer.parseInt(port);
                                }catch(Exception ne){
                                    iPort = -1;
                                }
                                if (iPort > -1)
                                    bAchieved = true;
                            }
                        }
                    }
                }
                log.debug("Uri TO CHANGE user "+user+" host "+source+" password "+password);
                if (bAchieved){
                    MongoCredential mc = MongoCredential.createMongoCRCredential(user, source , password.toCharArray());
                    ServerAddress  sa = new ServerAddress(host, iPort);
                    List<MongoCredential> lcredential = new ArrayList<MongoCredential>();
                    lcredential.add(mc);
                    if (sa != null && sa.getHost() != null && sa.getHost().indexOf("localhost") < 0){
                        client = new MongoClient(sa, lcredential, b.build());
                    }
                }
                // get db
                db = client.getDatabase(uri.getDatabase());
                

                // get collection
                dexcomData = null;
                glucomData = null;
                deviceData = db.getCollection(devicesCollectionName);
                if (deviceData == null){
                    db.createCollection("device", null);
                    deviceData = db.getCollection("device");
                }
                if (collectionName != null)
                    dexcomData = db.getCollection(collectionName.trim());
                if (gdCollectionName != null)
                    glucomData = db.getCollection(gdCollectionName.trim());
                dsCollection = db.getCollection(dsCollectionName);
                if (dsCollection == null){
                    db.createCollection("devicestatus", null);
                    dsCollection =  db.getCollection("devicestatus");
                }
            }
           }catch (Exception e){
               log.error("EXCEPTION INIT",e);
               return false;
           }
           return true;
       }
       return false;
}

选取合适的代码放置到我们的代码中, 代码如下:

MongoCredential credential = MongoCredential.createMongoCRCredential("mytest03", "mytest03", "password".toCharArray());
MongoClient client = new MongoClient(addresses,  Arrays.asList(credential));


然后运行程序, 成功访问mongodb

最后在 rockmongo中查看数据添加成功


采用docker镜像安装用浏览器访问mongodb副本集的方法

前文介绍了采用docker镜像的办法安装mongodb副本集的集群, 但是在使用Rockmongo进行管理时遇到点问题, 这里给出如何用docker安装一个镜像, 然后如何访问mongodb副本集的办法

关于Rockmongo 和他的传统安装方法参考:   MongoDB 管理工具: Rockmongo

本文采用docker的方法安装上述工具

一。 您需要准备好您的docker环境, 具体参考: Docker部署一个MongoDB集群

若是您没有虚拟机, 也可以参考前面的文章, 里面都有介绍, 尽管都很简陋,错误很多, 但是也应该能给您的参考。

二。 下载docker的镜像, 由于国内的网络条件, 因此您需要先下载相关镜像, 如是用了阿里的相关代理或者其他的加快方法就很好了, 否则您就像我一样, 先下载着, 然后去做别的事情, 估计开完会您回来, 也就下好了

下载命令如下:docker  pull   anapsix/rockmongo


三。 创建文件存储配置文件的目录

mkdir -p  /export/data/rockmongo     这里是我的安装目录, 您具体的要根据您的情况进行设置了。

四。 编辑配置文件如下:

cd /export/data/rockmongo   进入目录

vi config.php  编辑配置文件, 内容如下:

<?php
// >>>>>>>>>   这一段不用修改, 默认的, 除非您知道您在做什么
$MONGO = array();
$MONGO["features"]["log_query"] = "on";//log queries
$MONGO["features"]["theme"] = "default";//theme
$MONGO["features"]["plugins"] = "on";//plugins
// <<<<<<<<<

$i = 0;

// 1>>>>>>>>>>>>>>>>>    下面是 服务器1的相关配置
$MONGO["servers"][$i]["mongo_name"] = "mongoserver1";//mongo server name
$MONGO["servers"][$i]["mongo_host"] = "mongoserver1";//mongo host
// 上面两项要进行配置  一个显示名称, 一个是ip或者域名, 建议两个相同都是域名
// 然后在hosts文件中进行设置一致了, 并且在启动docker时做相关设置工作

// 下面几项  这个端口  您若是默认的就可以了, 若是变化了, 就需要修改了
$MONGO["servers"][$i]["mongo_port"] = "27017";//mongo port
$MONGO["servers"][$i]["mongo_timeout"] = 0;//mongo connection timeout
$MONGO["servers"][$i]["mongo_auth"] = true;//enable mongo authentication?

$MONGO["servers"][$i]["control_auth"] = true;//enable control users, works only if mongo_auth=false
$MONGO["servers"][$i]["control_users"]["admin"] = "admin";//one of control users ["USERNAME"]=PASSWORD, works only if mongo_auth=false

$MONGO["servers"][$i]["ui_only_dbs"] = "";//databases to display
$MONGO["servers"][$i]["ui_hide_dbs"] = "";//databases to hide
$MONGO["servers"][$i]["ui_hide_collections"] = "";//collections to hide
$MONGO["servers"][$i]["ui_hide_system_collections"] = false;//whether hide the system collections
// 1<<<<<<<<<<<<


$i ++;

// 2>>>>>>>>>>>>>>>>> 服务器2的配置
$MONGO["servers"][$i]["mongo_name"] = "mongoserver2";//mongo server name
$MONGO["servers"][$i]["mongo_host"] = "mongoserver2";//mongo host
// 上面两项要进行配置 一个显示名称, 一个是ip或者域名, 建议两个相同都是域名
// 然后在hosts文件中进行设置一致了, 并且在启动docker时做相关设置工作

// 下面几项 这个端口 您若是默认的就可以了, 若是变化了, 就需要修改了
$MONGO["servers"][$i]["mongo_port"] = "27017";//mongo port
$MONGO["servers"][$i]["mongo_timeout"] = 0;//mongo connection timeout
$MONGO["servers"][$i]["mongo_auth"] = true;//enable mongo authentication?

$MONGO["servers"][$i]["control_auth"] = true;//enable control users, works only if mongo_auth=false
$MONGO["servers"][$i]["control_users"]["admin"] = "admin";//one of control users ["USERNAME"]=PASSWORD, works only if mongo_auth=false

$MONGO["servers"][$i]["ui_only_dbs"] = "";//databases to display
$MONGO["servers"][$i]["ui_hide_dbs"] = "";//databases to hide
$MONGO["servers"][$i]["ui_hide_collections"] = "";//collections to hide
$MONGO["servers"][$i]["ui_hide_system_collections"] = false;//whether hide the system collections
// 2<<<<<<<<<<<<<<<<<<<<

$i ++; 

// 3>>>>>>>>>>>>>>>>>>> 服务器3的配置
$MONGO["servers"][$i]["mongo_name"] = "mongoserver3";//mongo server name
$MONGO["servers"][$i]["mongo_host"] = "mongoserver3";//mongo host
// 上面两项要进行配置  一个显示名称, 一个是ip或者域名, 建议两个相同都是域名
// 然后在hosts文件中进行设置一致了, 并且在启动docker时做相关设置工作

// 下面几项  这个端口  您若是默认的就可以了, 若是变化了, 就需要修改了
$MONGO["servers"][$i]["mongo_port"] = "27017";//mongo port
$MONGO["servers"][$i]["mongo_timeout"] = 0;//mongo connection timeout
$MONGO["servers"][$i]["mongo_auth"] = true;//enable mongo authentication?

$MONGO["servers"][$i]["control_auth"] = true;//enable control users, works only if mongo_auth=false
$MONGO["servers"][$i]["control_users"]["admin"] = "admin";//one of control users ["USERNAME"]=PASSWORD, works only if mongo_auth=false

$MONGO["servers"][$i]["ui_only_dbs"] = "";//databases to display
$MONGO["servers"][$i]["ui_hide_dbs"] = "";//databases to hide
$MONGO["servers"][$i]["ui_hide_collections"] = "";//collections to hide
$MONGO["servers"][$i]["ui_hide_system_collections"] = false;//whether hide the system collections
// 3<<<<<<<<<<<<<<<<


?>

最后保存编辑的文件

五。 运行下面的命令

docker run --name mongoadmin -d -p 5000:5000 \
           --add-host mongoserver1:192.168.128.189 \
           --add-host mongoserver2:192.168.128.133 \
           --add-host mongoserver3:192.168.128.132 \
           -v /export/data/rockmongo/config.php:/rockmongo/config.php \
           anapsix/rockmongo && docker logs -f mongoadmin

用上述命令, 启动程序

其中:
--add-host mongoserver1:192.168.128.189 是在容器里面 设置hosts文件, 这里的

mongoserver1 同前面的 config.php 中的名称要一样, ip地址要根据您本地的ip地址进行适当调整
/export/data/rockmongo/config.php:/rockmongo/config.php 是把我们自己编写的配置文件映射给

注意要添加您的防火墙, 把5000端口打开
firewall-cmd --permanent --add-port=5000/tcp 这个是 centos7上的,
若是您的linux同这个不同,可以百度解决。

六。 启动浏览器
在浏览器里面输入: http://192.168.128.132:5000/ 打开登录窗口

mongo管理系统rockmongo-登录界面

用户名和密码参见前面的 安装文档: Docker部署一个MongoDB集群

由于这个系统个 副本集, 在rockmongo具体如何配置没真正了解过
这里采用配置了3台机器, 然后您在登录时选择主的集群登录就可以了
若是登录后发现不是主, 退出在登录就可以, 如下:

mongo管理系统rockmongo-登录到从的情况

经过尝试最后登录到正确的服务器后情况如下

mongo管理系统rockmongo界面