前面介绍了mongodb集群安装方法, 主要是docker下安装副本集的, 然后介绍了spring 访问副本集的方法。
一. 准备工作
1. 您需要用docker 安装mongodb的副本集 集群, 参考: Docker部署一个MongoDB集群 通过这个您才有了可以操作的对象
2. 您需要看过前面的 spring 访问mongodb的文章, 这样您才能配置相关权限,和创建好数据库等, 请参考: spring访问mongodb集群
本文在最后会 给出相关代码
二. 遇到的问题
正常情况下在spring boot中配置 mongodb的链接可以用
spring.data.mongodb.uri=mongodb://localhost/test  方式
spring.data.mongodb.username=mytest03
spring.data.mongodb.password=password
通过上面的uri我们指定了 连接, 下面的是用户名和密码 但是这个方式紧急能指定一个 mongodb的服务器, 无法指定多个 经过搜索, 发现mongodb还有别的配置方式
下面是在 appendix-application-properties.adoc 文件中搜索到全部mongodb的配置
# MONGODB ({sc-spring-boot-autoconfigure}/mongo/MongoProperties.{sc-ext}[MongoProperties])
spring.data.mongodb.authentication-database= # Authentication database name.
spring.data.mongodb.database=test # Database name.
spring.data.mongodb.field-naming-strategy= # Fully qualified name of the FieldNamingStrategy to use.
spring.data.mongodb.grid-fs-database= # GridFS database name.
spring.data.mongodb.host=localhost # Mongo server host. Cannot be set with uri.
spring.data.mongodb.password= # Login password of the mongo server. Cannot be set with uri.
spring.data.mongodb.port=27017 # Mongo server port. Cannot be set with uri.
spring.data.mongodb.reactive-repositories.enabled=true # Enable Mongo reactive repositories.
spring.data.mongodb.repositories.enabled=true # Enable Mongo repositories.
spring.data.mongodb.uri=mongodb://localhost/test # Mongo database URI. Cannot be set with host, port and credentials.
spring.data.mongodb.username= # Login user of the mongo server. Cannot be set with uri.
另外这个文件还有很多 其他的配置, 大家都可以参考, 这个配置文件在spring boot的 源代码中
1. 探索方法
采用下面的写法
spring.data.mongodb.uri=mongodb://mytest03:password@192.168.128.189:27017,mytest03:password@192.168.128.132:27017,mytest03:password@192.168.128.133:27017
结果运行时报解析配置异常
2. 探索方法
spring.data.mongodb.uri=mongodb://192.168.128.189:27017,192.168.128.132:27017,192.168.128.133:27017/mytest03
采用了上面的写法仍然出问题
最后通过搜索可以发现, 可以采用覆盖spring boot bean的方法覆盖掉系统默认呢的mongodb client的处理方法
三. 覆盖spring boot的bean的方法解决mongodb的问题
1. 覆盖的必要性
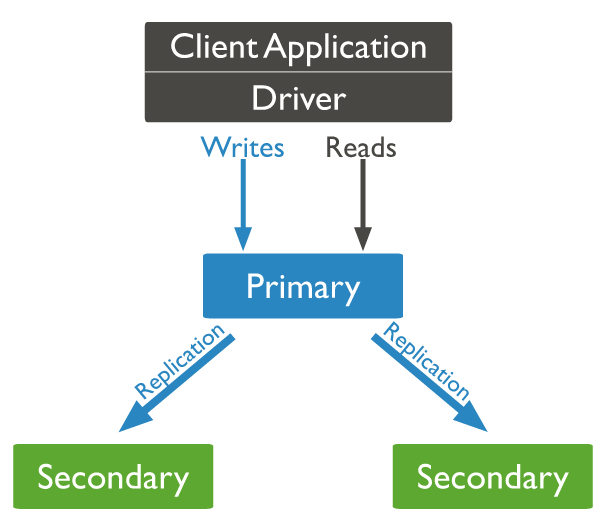
如上图, 在默认的 mongodb副本集链接中, 客户需要连接到主的 机器上, 但是若是副本集的主和从发生了切换, 就会造成 原来连接的不是主了, 因此影响工作。
在mongodb的客户端中支持同时连接多个的(对副本集进行支持的)
List<ServerAddress> addresses = new ArrayList<ServerAddress>();
 ServerAddress address1 = new ServerAddress("192.168.128.189", 27017);
 ServerAddress address2 = new ServerAddress("192.168.128.132", 27017);
 ServerAddress address3 = new ServerAddress("192.168.128.133", 27017);
 addresses.add(address1);
 addresses.add(address2);
 addresses.add(address3);

 MongoCredential credential = MongoCredential.createMongoCRCredential("mytest03", "mytest03", "password".toCharArray());
 MongoClient client = new MongoClient(addresses, Arrays.asList(credential));
 return client;
上面是连接方法
但是, 由于前面spring boot的配置中仅仅能配置一个ip地址, 因此对上面的多地址的客户端连接不支持, 因此spring boot的默认mongodb方法不能满足需求
2. 自定义spring bean的方法解决问题
代码如下:
package cn.iigrowing.study.mongodb;

import java.util.ArrayList;
import java.util.Arrays;
import java.util.List;

import org.springframework.boot.autoconfigure.condition.ConditionalOnMissingBean;
import org.springframework.context.annotation.Bean;
import org.springframework.stereotype.Component;

import com.mongodb.MongoClient;
import com.mongodb.MongoCredential;
import com.mongodb.ServerAddress;

@Component
public class MongoClass {
 @Bean
 @ConditionalOnMissingBean(MongoClient.class)
 public MongoClient getMongodbClients() {


 List<ServerAddress> addresses = new ArrayList<ServerAddress>();
 ServerAddress address1 = new ServerAddress("192.168.128.189", 27017);
 ServerAddress address2 = new ServerAddress("192.168.128.132", 27017);
 ServerAddress address3 = new ServerAddress("192.168.128.133", 27017);
 addresses.add(address1);
 addresses.add(address2);
 addresses.add(address3);


 MongoCredential credential = MongoCredential.createMongoCRCredential("mytest03", "mytest03", "password".toCharArray());
 MongoClient client = new MongoClient(addresses, Arrays.asList(credential));
 return client;
 }

}
在上面代码中重点要注意的是:
@Bean 这个声明了一个bean
@ConditionalOnMissingBean(MongoClient.class) 这个非常重要,
这个是告诉系统, 下面的bean是要替换系统默认的那个bean的(mongodb)
最后
@Component这个是告诉spring boot 要扫描着类, 否则,前面的注解都没用。
本文的配置都是写在程序代码中的, 后面还会修改进行, 参数配置, 稍后提供相关的文档等


