现在要为部门搭建一个绿色的环境,将JIRA、WiKi用统一的账号管理。
服务器选择了tomcat6.0,LDAP选择了OpenDS2.2.0,JDK1.6
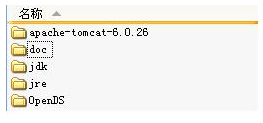
由于要的是绿色环境,那么把这些东西全部放在一个文件夹下,希望如果要把环境装到别的机器上,只用把这个文件夹COPY走就行。
目录结构如图:
因此要先配置一下TOMCAT,让tomcat去一个相对路径找JDK,在TOMCAT_HOME/bin 下编辑catalina.bat。在里边加上一句
set JAVA_HOME=..\..\jdk
安装OpenDS的步骤:http://www.opends.org/ 通过Java Web Start执行QuickSetup(必须要有JDK,在windows上可行,在Ubuntu上没执行)。
OpenDS服务器配置好以后,双击OpenDS_HOME/bat/control-panel.bat
打开控制台,启动服务。
把一下内容保存成一个ldif文件,如E:\environment\OpenDS\ldif\duke.ldif
# add group
dn: ou=Groups,dc=example,dc=com
changetype: add
ou: Groups
description: Group ou
objectClass: top
objectClass: organizationalUnit
# add people ou
dn: ou=People,dc=example,dc=com
changetype: add
ou: People
description: People
objectClass: top
objectClass: organizationalUnit
# add an authorized user (belongs to the group secure)
dn: uid=duke,ou=People,dc=example,dc=com
changetype: add
objectClass: top
objectClass: person
objectClass: organizationalPerson
objectClass: inetOrgPerson
uid: duke
cn: The Duke
sn: Duke
givenName: The
userPassword: password
# unauthorized user
dn: uid=noaccess,ou=People,dc=example,dc=com
changetype: add
objectClass: top
objectClass: person
objectClass: organizationalPerson
objectClass: inetOrgPerson
uid: noaccess
cn: No Access
sn: access
givenName: no
userPassword: noaccess
# add user to the webapp group
dn: cn=secure,ou=Groups,dc=example,dc=com
changetype: add
objectClass: top
objectClass: groupOfUniqueNames
uniqueMember: uid=duke,ou=People,dc=example,dc=com
cn: secure
然后打开CMD,到Opends\bin下输入ldapmodify -p 389 -a -D "cn=Directory Manager" -w password -f E:\environment\OpenDS\ldif\duke.ldif
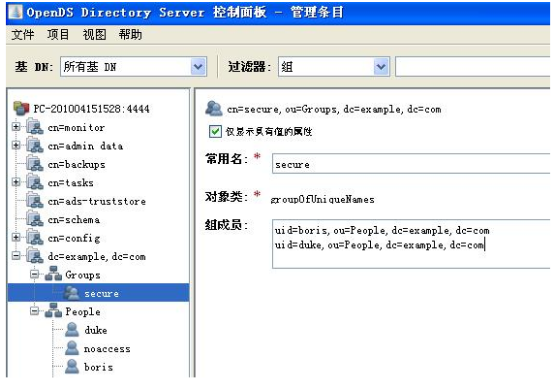
这样就为OpenDS添加了一个权限组:secure 两个用户:duke、noaccess ,并且在secure这个权限组里添加了duke。
可以在控制界面中,在People下添加用户,比如"boris",添加时要选择属性命名,选择uid。然后在secure组成员里添加uid=boris,ou=People,dc=example,dc=com
这样,boris就也有了权限。
现在,要在自己的web project中调用OpenDS的权限验证,先拿一个最简单的project试验出来再说。
首先要修改tomcat的server.xml
在<Engine></Engine>中间加入
<Realm className="org.apache.catalina.realm.JNDIRealm" debug="99"
connectionName="cn=Directory Manager"
connectionPassword="boris"
connectionURL="ldap://localhost:389"
userPattern="uid={0},ou=people,dc=example,dc=com"
roleBase="ou=groups,dc=example,dc=com"
roleName="cn"
roleSearch="(uniqueMember={0})"/>
第5行中的userPattern定义了验证用户的格式,这里是以uid开头。但是在OpenDS建立用户的时候,默认的是以cn开头的,建立时需要注意。
在TOMCAT_HOME/webapps下建立一个最简单的web project,只有一个index.html 内容是hello。
然后修改WEB-INF下的web.xml 如下:
<web-app version="2.4" xmlns="http://java.sun.com/xml/ns/j2ee" xsi="http://www.w3.org/2001/XMLSchema-instance" schemalocation="http://java.sun.com/xml/ns/j2ee http://java.sun.com/xml/ns/j2ee/web-app_2_4.xsd">
<security-role>
<role-name>secure</role-name>
</security-role>
<!-- grant access to all users that possess the role 'secure' and deny all others -->
<security-constraint>
<web-resource-collection>
<web-resource-name>opendsauthtest</web-resource-name>
<url-pattern>/*</url-pattern>
<http-method>GET</http-method>
<http-method>POST</http-method>
</web-resource-collection>
<auth-constraint>
<role-name>secure</role-name>
</auth-constraint>
</security-constraint>
<!-- declare the app uses FORM based authentication using your newly created OpenDS realm -->
<login-config>
<auth-method>BASIC</auth-method>
<realm-name>OpenDS</realm-name>
</login-config>
</web-app>
这里并不完全理解,主要注意<role-name>secure</role-name>,这就是要连接OpenDS的权限组的名称。
做完这些,启动tomcat 输入http://localhost:8080/test
弹出输入密码的页面,输入boris boris 确定,进入到index.html页面。
上篇把OpenDS配置好了。现在要把JSPWiki服务部署起来,并且废弃JSPWiki本身的账号机制,让JSPWiki采用OpenDS的账号机制。
首先把JSPWiki下载下来,地址:http://jspwiki.org/
解压后把里边的JSPWiki.war放在tomcat webapps下。启动tomcat,自动生成了JSPWiki的文件夹。
现在修改JSPWiki的web.xml
在其中添加:
1.
2. <security-constraint>
3. <web-resource-collection>
4. <web-resource-name>Administrative Area</web-resource-name>
5. <url-pattern>/Delete.jsp</url-pattern>
6. </web-resource-collection>
7. <auth-constraint>
8. <role-name>secure</role-name>
9. </auth-constraint>
10. <!--
11. <user-data-constraint>
12. <transport-guarantee>CONFIDENTIAL</transport-guarantee>
13. </user-data-constraint>
14. -->
15. </security-constraint>
16.
17. <security-constraint>
18. <web-resource-collection>
19. <web-resource-name>Authenticated area</web-resource-name>
20. <url-pattern>/Edit.jsp</url-pattern>
21. <url-pattern>/Comment.jsp</url-pattern>
22. <url-pattern>/Login.jsp</url-pattern>
23. <url-pattern>/NewGroup.jsp</url-pattern>
24. <url-pattern>/Rename.jsp</url-pattern>
25. <url-pattern>/Upload.jsp</url-pattern>
26. <http-method>DELETE</http-method>
27. <http-method>GET</http-method>
28. <http-method>HEAD</http-method>
29. <http-method>POST</http-method>
30. <http-method>PUT</http-method>
31. </web-resource-collection>
32. <web-resource-collection>
33. <web-resource-name>Read-only Area</web-resource-name>
34. <url-pattern>/attach</url-pattern>
35. <http-method>DELETE</http-method>
36. <http-method>POST</http-method>
37. <http-method>PUT</http-method>
38. </web-resource-collection>
39. <auth-constraint>
40. <role-name>wiki-admin</role-name>
41. <role-name>wiki-users</role-name>
42. </auth-constraint>
43. <!--
44. <user-data-constraint>
45. <transport-guarantee>CONFIDENTIAL</transport-guarantee>
46. </user-data-constraint> -->
47. </security-constraint>
48.
49. <login-config>
50. <auth-method>FORM</auth-method>
51. <form-login-config>
52. <form-login-page>/LoginForm.jsp</form-login-page>
53. <form-error-page>/LoginForm.jsp</form-error-page>
54. </form-login-config>
55. </login-config>
56. <security-role>
57. <description>
58. This logical role includes all authenticated users
59. </description>
60. <role-name>wiki-users</role-name>
61. </security-role>
62.
63. <security-role>
64. <description>
65. This logical role includes all administrative users
66. </description>
67. <role-name>secure</role-name>
68. </security-role>
这里需要注意的地方是有两处<role-name>secure</role-name>
里边的值应该是OpenDS里的Group名称,这里的secure是上篇文章中建立OpenDS时设置的一个组。
现在需要确认一下jspwiki.properties里边
1. jspwiki.authorizer =com.ecyrd.jspwiki.auth.authorize.WebContainerAuthorizer
是否被注释掉了,如果被注释掉了,就把注释去掉。让这句话生效。
刚只在web.xml中声明了要用secure的权限才能进入JSPWiki,但JSPWiki中并没有这个权限组,只有OpenDS中有,所以要为JSPWiki添加一个权限组:
用写字板打开jspwiki.policy
在里边加入
grant principal com.ecyrd.jspwiki.auth.authorize.Role "secure"
{ permission com.ecyrd.jspwiki.auth.permissions.AllPermission "*";};
只有就为Wiki服务加入了一个新的角色,拥有所有权利。
现在,可以启动tomcat来test了。
用浏览器打开
http://localhost:8080/JSPWiki/Login.jsp
输入boris/boris
结果如下:
成功了,再看看注册新用户页面:
可以看到,已经不能注册了,因为JSPWiki本身的账号机制已经被废弃了。

