纸上得来终觉浅,绝知此事要躬行。理论知识了解以后,最终还是要动手实践,不亲自做一遍永远不知道里面有多少坑。本节的重点是用Spring Security实现授权码模式。
1. maven依赖
<?xml version="1.0" encoding="UTF-8"?>
<project xmlns="http://maven.apache.org/POM/4.0.0" xmlns:xsi="http://www.w3.org/2001/XMLSchema-instance"
    xsi:schemaLocation="http://maven.apache.org/POM/4.0.0 http://maven.apache.org/xsd/maven-4.0.0.xsd">
    <modelVersion>4.0.0</modelVersion>

    <groupId>com.cjs.example</groupId>
    <artifactId>cjs-oauth2-code-server</artifactId>
    <version>0.0.1-SNAPSHOT</version>
    <packaging>jar</packaging>

    <name>cjs-oauth2-code-server</name>
    <description></description>

    <parent>
        <groupId>org.springframework.boot</groupId>
        <artifactId>spring-boot-starter-parent</artifactId>
        <version>2.0.2.RELEASE</version>
        <relativePath/> <!-- lookup parent from repository -->
    </parent>

    <properties>
        <project.build.sourceEncoding>UTF-8</project.build.sourceEncoding>
        <project.reporting.outputEncoding>UTF-8</project.reporting.outputEncoding>
        <java.version>1.8</java.version>
    </properties>

    <dependencies>
        <dependency>
            <groupId>org.springframework.boot</groupId>
            <artifactId>spring-boot-starter-security</artifactId>
        </dependency>
        <dependency>
            <groupId>org.springframework.boot</groupId>
            <artifactId>spring-boot-starter-thymeleaf</artifactId>
        </dependency>
        <dependency>
            <groupId>org.springframework.boot</groupId>
            <artifactId>spring-boot-starter-web</artifactId>
        </dependency>
        <dependency>
            <groupId>org.springframework.security.oauth</groupId>
            <artifactId>spring-security-oauth2</artifactId>
            <version>2.3.3.RELEASE</version>
        </dependency>

        <dependency>
            <groupId>org.projectlombok</groupId>
            <artifactId>lombok</artifactId>
            <optional>true</optional>
        </dependency>
        <dependency>
            <groupId>org.springframework.boot</groupId>
            <artifactId>spring-boot-starter-test</artifactId>
            <scope>test</scope>
        </dependency>
        <dependency>
            <groupId>org.springframework.security</groupId>
            <artifactId>spring-security-test</artifactId>
            <scope>test</scope>
        </dependency>
    </dependencies>

    <build>
        <plugins>
            <plugin>
                <groupId>org.springframework.boot</groupId>
                <artifactId>spring-boot-maven-plugin</artifactId>
            </plugin>
        </plugins>
    </build>


</project>
2. 配置Security
package com.cjs.example.config;

import org.springframework.context.annotation.Bean;
import org.springframework.context.annotation.Configuration;
import org.springframework.security.config.annotation.authentication.builders.AuthenticationManagerBuilder;
import org.springframework.security.config.annotation.web.builders.HttpSecurity;
import org.springframework.security.config.annotation.web.builders.WebSecurity;
import org.springframework.security.config.annotation.web.configuration.EnableWebSecurity;
import org.springframework.security.config.annotation.web.configuration.WebSecurityConfigurerAdapter;
import org.springframework.security.core.userdetails.User;
import org.springframework.security.core.userdetails.UserDetails;
import org.springframework.security.core.userdetails.UserDetailsService;
import org.springframework.security.crypto.bcrypt.BCryptPasswordEncoder;
import org.springframework.security.crypto.password.PasswordEncoder;
import org.springframework.security.provisioning.InMemoryUserDetailsManager;

@Configuration
@EnableWebSecurity
public class WebSecurityConfig extends WebSecurityConfigurerAdapter {

    @Override
    protected void configure(AuthenticationManagerBuilder auth) throws Exception {
        super.configure(auth);
//        auth.inMemoryAuthentication().withUser("zhangsan").password("$2a$10$qsJ/Oy1RmUxFA.YtDT8RJ.Y2kU3U4z0jvd35YmiMOAPpD.nZUIRMC").roles("USER");

    }

    @Override
    public void configure(WebSecurity web) throws Exception {
        super.configure(web);
    }

    @Override
    protected void configure(HttpSecurity http) throws Exception {
        super.configure(http);
    }


    @Bean
    @Override
    protected UserDetailsService userDetailsService() {
        User.UserBuilder builder = User.builder();
        UserDetails user = builder.username("zhangsan").password("$2a$10$GStfEJEyoSHiSxnoP3SbD.R8XRowP1QKOdi.N6/iFEwEJWTQqlSba").roles("USER").build();
        UserDetails admin = builder.username("lisi").password("$2a$10$GStfEJEyoSHiSxnoP3SbD.R8XRowP1QKOdi.N6/iFEwEJWTQqlSba").roles("USER", "ADMIN").build();
        return new InMemoryUserDetailsManager(user, admin);
    }

    @Bean
    public PasswordEncoder passwordEncoder() {
        return new BCryptPasswordEncoder();
    }


    public static void main(String[] args) {
        BCryptPasswordEncoder bCryptPasswordEncoder = new BCryptPasswordEncoder();
        System.out.println(bCryptPasswordEncoder.encode("123456"));
        System.out.println(bCryptPasswordEncoder.encode("12345678"));
    }
}
3. 配置授权服务器
package com.cjs.example.config;

import org.springframework.context.annotation.Configuration;
import org.springframework.security.oauth2.config.annotation.configurers.ClientDetailsServiceConfigurer;
import org.springframework.security.oauth2.config.annotation.web.configuration.AuthorizationServerConfigurerAdapter;
import org.springframework.security.oauth2.config.annotation.web.configuration.EnableAuthorizationServer;
import org.springframework.security.oauth2.config.annotation.web.configurers.AuthorizationServerEndpointsConfigurer;
import org.springframework.security.oauth2.config.annotation.web.configurers.AuthorizationServerSecurityConfigurer;


@Configuration
@EnableAuthorizationServer
public class AuthorizationServerConfig extends AuthorizationServerConfigurerAdapter {

    @Override
    public void configure(AuthorizationServerSecurityConfigurer security) throws Exception {
        super.configure(security);
    }

    @Override
    public void configure(ClientDetailsServiceConfigurer clients) throws Exception {
        clients.inMemory()
                .withClient("my-client-1")
                .secret("$2a$10$0jyHr4rGRdQw.X9mrLkVROdQI8.qnWJ1Sl8ly.yzK0bp06aaAkL9W")
                .authorizedGrantTypes("authorization_code", "refresh_token")
                .scopes("all")
                .redirectUris("http://www.baidu.com");
    }

    @Override
    public void configure(AuthorizationServerEndpointsConfigurer endpoints) throws Exception {
        super.configure(endpoints);
    }

    public static void main(String[] args) {
        System.out.println(new org.apache.tomcat.util.codec.binary.Base64().encodeAsString("my-client-1:12345678".getBytes()));
        System.out.println(java.util.Base64.getEncoder().encodeToString("my-client-1:12345678".getBytes()));
    }
}
这里客户端的secret是12345678,存储的是加密后的值
4. 启动类
package com.cjs.example;

import org.springframework.boot.SpringApplication;
import org.springframework.boot.autoconfigure.SpringBootApplication;

@SpringBootApplication
public class CjsOauth2CodeServerApplication {

    public static void main(String[] args) {
        SpringApplication.run(CjsOauth2CodeServerApplication.class, args);
    }
}
到目前为止,好像我们就做了两件事情:一、配置用户;二、注册客户端
现在,我们有两个用户(zhangsan和lisi)以及一个已注册的客户端(my-client-1)
接下来,用postman模拟客户端请求获取access_token
5. 协议端点
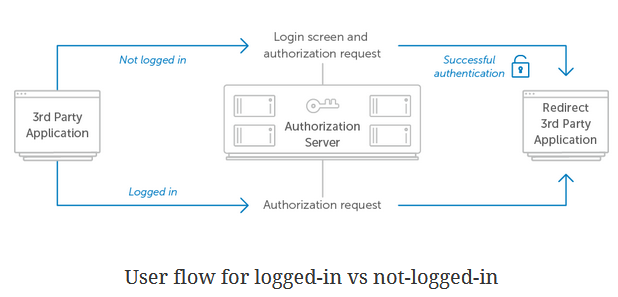
我们知道,在获取access_token之前需要用户授权,然后返回一个code,最后用code换access_token
在这个过程中涉及到三个服务器端点:授权端点、重定向端点、令牌端点
通过控制台看看启动日志可能会加深理解:
  .   ____          _            __ _ _
 /\\ / ___'_ __ _ _(_)_ __  __ _ \ \ \ \
( ( )\___ | '_ | '_| | '_ \/ _` | \ \ \ \
 \\/  ___)| |_)| | | | | || (_| |  ) ) ) )
  '  |____| .__|_| |_|_| |_\__, | / / / /
 =========|_|==============|___/=/_/_/_/
 :: Spring Boot ::        (v2.0.3.RELEASE)

2018-06-26 09:44:09.575  INFO 6528 --- [           main] c.c.e.CjsOauth2CodeServerApplication     : Starting CjsOauth2CodeServerApplication on USER-20170302XK with PID 6528 (E:\cjsworkspace\cjs-oauth2-example\cjs-oauth2-code-server\target\classes started by Administrator in E:\cjsworkspace\cjs-oauth2-example\cjs-oauth2-code-server)5.1. 授权端点
请求
| 参数名称 | 描述 |
| response_type | 必填。将其值设置为code表示如果成功的话将收到一个授权码。 |
| client_id | 必填。客户端标识。 |
| redirect_uri | 可选。重定向URI虽然不是必须的,但是你的服务应该会需要它。而且,这个URL必须和授权服务端注册的redirect_id一致。 |
| scope | 可选。请求可能会有一个或多个scope值。授权服务器会把客户端请求的范围(scope)展示给用户看。 |
| state | 推荐。state参数用于应用存储特定的请求数据的可以防止CSRF攻击。授权服务器必须原封不动地将这个值返回给应用。 |
例如:
http://localhost:8080/oauth/authorize?response_type=code&client_id=my-client-1&redirect_uri=http://www.baidu.com&scope=all
响应
| 参数名称 | 描述 |
| code | 授权码,稍后用此授权码交换访问令牌 |
| state | 请求时带的state参数 |
例如:
https://www.baidu.com/?code=7Zudn6
5.2. 令牌端点
请求
| 参数名称 | 描述 |
| grant_type | 必填。参数值必须是"authorization_code" |
| code | 必填。之前收到的授权码 |
| redirect_uri | 可能是必填的。如果授权请求的时候有redirect_uri,那么token请求的时候也必须带上这个参数,二者的值必须是一样的。 |
| client_id | 客户端标识,如果没有其它的客户端认证存在的话这个参数是必须的。 |
关于客户端认证补充一点
授权服务器可以通过HTTP Basic Auth方式对客户端进行认证,也可以通过在请求中加一个client_secret参数来对客户端进行认证。
不建议将客户端的secret直接作为参数放到client_secret中,而且这种方式下client_id和client_secret都是必填参数。
特别注意,用户(资源所有者)的用户名和密码跟客户端的用户名和密码(client_id、client_secret)不是一套,它们是两个东西。
那么,通过HTTP Basic Auth如何对客户端进行认证呢?客户端需要怎样传参呢?
需要在请求header中设置Authorization,它的值是Basic + 空格 + Base64加密后的client_id:secret
至于为什么,那是协议要求的,具体可以参考https://tools.ietf.org/html/rfc2617#page-5,格式如下:
例如:
POST /oauth/token HTTP/1.1
Content-Type: application/x-www-form-urlencoded
Authorization: Basic bXktY2xpZW50LTE6MTIzNDU2Nzg=
cache-control: no-cache
Postman-Token: baf729b9-f030-41c1-b6fb-d740b0c5c573
User-Agent: PostmanRuntime/7.1.1
Accept: */*
Host: localhost:8080
cookie: JSESSIONID=45EAF00C9829B9F569579DB08533D850; UISESSION=2A65FF6FC8C6BE415DE3C043E3EDAAA4
accept-encoding: gzip, deflate
content-length: 103
Connection: keep-alive

grant_type=authorization_code&code=7Zudn6&redirect_uri=http%3A%2F%2Fwww.baidu.com&client_id=my-client-1
6. 客户端请求
直接在浏览器中输入以下地址,然后会跳到登录授权页面
http://localhost:8080/oauth/authorize?response_type=code&client_id=my-client-1&redirect_uri=http://www.baidu.com&scope=all
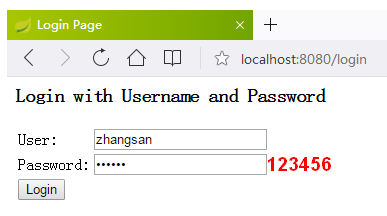
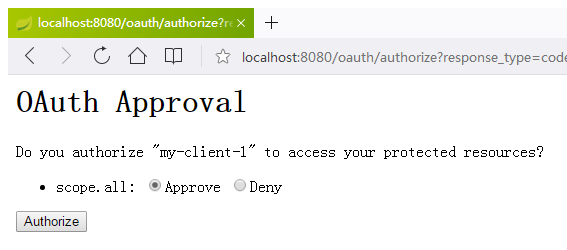
上面这两个页面都是默认自带的
授权成功以后重定向

有了授权码以后就可以换取access_token了
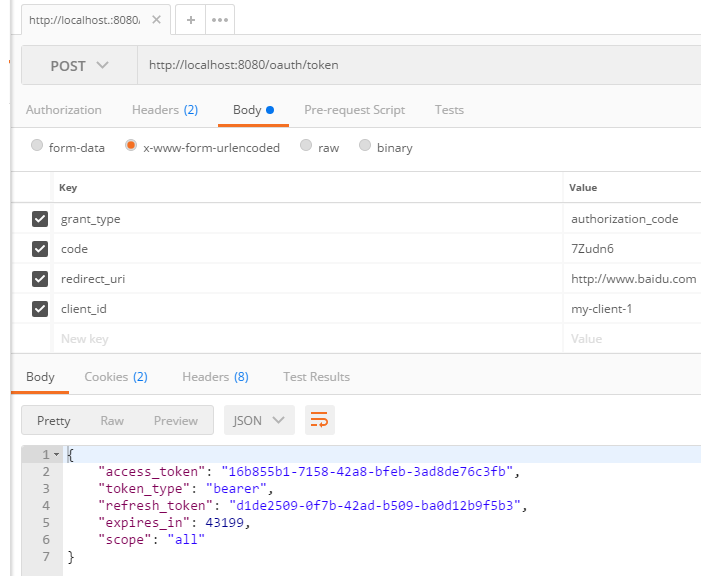

这个请求中唯一需要注意的一个参数就是Authorization,这是用于认证客户端的,本例中它是这样算出来的
public static void main(String[] args) {
    System.out.println(new org.apache.tomcat.util.codec.binary.Base64().encodeAsString("my-client-1:12345678".getBytes()));
    System.out.println(java.util.Base64.getEncoder().encodeToString("my-client-1:12345678".getBytes()));
}
所以,最终是Basic bXktY2xpZW50LTE6MTIzNDU2Nzg=
到此为止,我们只是获得了access_token,下一节将讲解如何配置资源服务器,以及客户端访问受保护的资源。
另外,本例中关于令牌的存储,以及客户端注册都是在内存中,实际生产过程中肯定是要存储到数据库中的,这一部分以后有时间再写吧!
感谢您的阅读,如果您觉得阅读本文对您有帮助,请点一下“推荐”按钮。欢迎各位转载,但必须在文章页面中给出作者和原文连接。

